 ดูบน TensorFlow.org ดูบน TensorFlow.org |  ทำงานใน Google Colab ทำงานใน Google Colab |  ดูแหล่งที่มาบน GitHub ดูแหล่งที่มาบน GitHub |  ดาวน์โหลดโน๊ตบุ๊ค ดาวน์โหลดโน๊ตบุ๊ค |
บทช่วยสอนนี้สาธิตวิธีสร้างและฝึกอบรมเครือข่ายปฏิปักษ์ตามเงื่อนไข (cGAN) ที่เรียกว่า pix2pix ซึ่งเรียนรู้การแมปจากรูปภาพที่ป้อนไปยังรูปภาพที่ส่งออก ตามที่อธิบายไว้ใน การแปลรูปภาพเป็นรูปภาพด้วยเครือข่ายฝ่ายตรงข้ามตามเงื่อนไข โดย Isola et al (2017). pix2pix ไม่ใช่แอปพลิเคชันเฉพาะ—ใช้ได้กับงานที่หลากหลาย รวมถึงการสังเคราะห์ภาพถ่ายจากแผนที่ป้ายกำกับ การสร้างภาพถ่ายที่มีสีจากภาพขาวดำ เปลี่ยนภาพถ่าย Google Maps ให้เป็นภาพถ่ายทางอากาศ และแม้แต่การแปลงภาพร่างเป็นภาพถ่าย
ในตัวอย่างนี้ เครือข่ายของคุณจะสร้างภาพด้านหน้าอาคารโดยใช้ ฐานข้อมูล CMP Facade ที่จัดทำโดย Center for Machine Perception ที่ มหาวิทยาลัยเทคนิคเช็กในปราก เพื่อให้สั้นลง คุณจะต้องใช้ สำเนาชุดข้อมูลที่ประมวลผลล่วงหน้า ซึ่งสร้างโดยผู้เขียน pix2pix
ใน pix2pix cGAN คุณปรับเงื่อนไขกับรูปภาพอินพุตและสร้างรูปภาพเอาต์พุตที่เกี่ยวข้อง cGAN ถูกเสนอครั้งแรกใน Conditional Generative Adversarial Nets (Mirza and Osindero, 2014)
สถาปัตยกรรมของเครือข่ายของคุณจะประกอบด้วย:
- เครื่องกำเนิดไฟฟ้าที่มีสถาปัตยกรรมแบบ U-Net
- ผู้จำแนกที่แสดงโดยตัวแยกประเภท PatchGAN ที่บิดเบือน (เสนอใน กระดาษ pix2pix )
โปรดทราบว่าแต่ละยุคสามารถใช้เวลาประมาณ 15 วินาทีใน V100 GPU ตัวเดียว
ด้านล่างนี้คือตัวอย่างบางส่วนของเอาต์พุตที่สร้างโดย pix2pix cGAN หลังจากการฝึกอบรม 200 ยุคในชุดข้อมูลด้านหน้า (80k ขั้นตอน)


นำเข้า TensorFlow และไลบรารีอื่นๆ
import tensorflow as tf

import os
import pathlib
import time
import datetime

from matplotlib import pyplot as plt
from IPython import display
โหลดชุดข้อมูล
ดาวน์โหลดข้อมูลฐานข้อมูล CMP Facade Database (30MB) มีชุดข้อมูลเพิ่มเติมในรูปแบบเดียวกัน ที่นี่ ใน Colab คุณสามารถเลือกชุดข้อมูลอื่นๆ จากเมนูแบบเลื่อนลง โปรดทราบว่าชุดข้อมูลอื่นๆ บางชุดมีขนาดใหญ่กว่าอย่างเห็นได้ชัด ( edges2handbags คือ 8GB)
dataset_name = "facades"
_URL = f'http://efrosgans.eecs.berkeley.edu/pix2pix/datasets/{dataset_name}.tar.gz'

path_to_zip = tf.keras.utils.get_file(
    fname=f"{dataset_name}.tar.gz",
    origin=_URL,
    extract=True)

path_to_zip  = pathlib.Path(path_to_zip)

PATH = path_to_zip.parent/dataset_name
Downloading data from http://efrosgans.eecs.berkeley.edu/pix2pix/datasets/facades.tar.gz
30171136/30168306 [==============================] - 19s 1us/step
30179328/30168306 [==============================] - 19s 1us/step
list(PATH.parent.iterdir())
[PosixPath('/home/kbuilder/.keras/datasets/facades.tar.gz'),
 PosixPath('/home/kbuilder/.keras/datasets/YellowLabradorLooking_new.jpg'),
 PosixPath('/home/kbuilder/.keras/datasets/facades'),
 PosixPath('/home/kbuilder/.keras/datasets/mnist.npz')]
ภาพต้นฉบับแต่ละภาพมีขนาด 256 x 512 โดยมีภาพขนาด 256 x 256 x 256 สองภาพ:
sample_image = tf.io.read_file(str(PATH / 'train/1.jpg'))
sample_image = tf.io.decode_jpeg(sample_image)
print(sample_image.shape)
(256, 512, 3)
plt.figure()
plt.imshow(sample_image)
<matplotlib.image.AxesImage at 0x7f35a3653c90>

คุณต้องแยกภาพด้านหน้าอาคารจริงออกจากภาพป้ายชื่อสถาปัตยกรรม ซึ่งทั้งหมดจะมีขนาด 256 x 256
กำหนดฟังก์ชันที่โหลดไฟล์รูปภาพและแสดงเมตริกซ์รูปภาพสองตัว:
def load(image_file):
  # Read and decode an image file to a uint8 tensor
  image = tf.io.read_file(image_file)
  image = tf.io.decode_jpeg(image)

  # Split each image tensor into two tensors:
  # - one with a real building facade image
  # - one with an architecture label image
  w = tf.shape(image)[1]
  w = w // 2
  input_image = image[:, w:, :]
  real_image = image[:, :w, :]

  # Convert both images to float32 tensors
  input_image = tf.cast(input_image, tf.float32)
  real_image = tf.cast(real_image, tf.float32)

  return input_image, real_image
พล็อตตัวอย่างของอินพุต (ภาพฉลากสถาปัตยกรรม) และภาพจริง (ภาพถ่ายอาคารด้านหน้า):
inp, re = load(str(PATH / 'train/100.jpg'))
# Casting to int for matplotlib to display the images
plt.figure()
plt.imshow(inp / 255.0)
plt.figure()
plt.imshow(re / 255.0)
<matplotlib.image.AxesImage at 0x7f35981a4910>


ตามที่อธิบายไว้ใน กระดาษ pix2pix คุณต้องใช้การกระตุกแบบสุ่มและการมิเรอร์เพื่อประมวลผลชุดการฝึกล่วงหน้า
กำหนดฟังก์ชันหลายอย่างที่:
- ปรับขนาดรูปภาพ
256 x 256แต่ละภาพให้มีความสูงและความกว้างมากขึ้น —286 x 286 - สุ่มครอบตัดกลับไปเป็น
256 x 256 - สุ่มพลิกภาพในแนวนอนเช่นซ้ายไปขวา (สุ่มมิเรอร์)
- ปรับภาพให้อยู่ในช่วง
[-1, 1]
# The facade training set consist of 400 images
BUFFER_SIZE = 400
# The batch size of 1 produced better results for the U-Net in the original pix2pix experiment
BATCH_SIZE = 1
# Each image is 256x256 in size
IMG_WIDTH = 256
IMG_HEIGHT = 256
def resize(input_image, real_image, height, width):
  input_image = tf.image.resize(input_image, [height, width],
                                method=tf.image.ResizeMethod.NEAREST_NEIGHBOR)
  real_image = tf.image.resize(real_image, [height, width],
                               method=tf.image.ResizeMethod.NEAREST_NEIGHBOR)

  return input_image, real_image
def random_crop(input_image, real_image):
  stacked_image = tf.stack([input_image, real_image], axis=0)
  cropped_image = tf.image.random_crop(
      stacked_image, size=[2, IMG_HEIGHT, IMG_WIDTH, 3])

  return cropped_image[0], cropped_image[1]
# Normalizing the images to [-1, 1]
def normalize(input_image, real_image):
  input_image = (input_image / 127.5) - 1
  real_image = (real_image / 127.5) - 1

  return input_image, real_image
@tf.function()
def random_jitter(input_image, real_image):
  # Resizing to 286x286
  input_image, real_image = resize(input_image, real_image, 286, 286)

  # Random cropping back to 256x256
  input_image, real_image = random_crop(input_image, real_image)

  if tf.random.uniform(()) > 0.5:
    # Random mirroring
    input_image = tf.image.flip_left_right(input_image)
    real_image = tf.image.flip_left_right(real_image)

  return input_image, real_image
คุณสามารถตรวจสอบเอาต์พุตที่ประมวลผลล่วงหน้าบางส่วนได้:
plt.figure(figsize=(6, 6))
for i in range(4):
  rj_inp, rj_re = random_jitter(inp, re)
  plt.subplot(2, 2, i + 1)
  plt.imshow(rj_inp / 255.0)
  plt.axis('off')
plt.show()

เมื่อตรวจสอบแล้วว่าการโหลดและการประมวลผลล่วงหน้านั้นได้ผล เรามากำหนดฟังก์ชันตัวช่วยสองสามอย่างที่จะโหลดและประมวลผลชุดการฝึกและการทดสอบล่วงหน้า:
def load_image_train(image_file):
  input_image, real_image = load(image_file)
  input_image, real_image = random_jitter(input_image, real_image)
  input_image, real_image = normalize(input_image, real_image)

  return input_image, real_image
def load_image_test(image_file):
  input_image, real_image = load(image_file)
  input_image, real_image = resize(input_image, real_image,
                                   IMG_HEIGHT, IMG_WIDTH)
  input_image, real_image = normalize(input_image, real_image)

  return input_image, real_image
สร้างไปป์ไลน์อินพุตด้วย tf.data
train_dataset = tf.data.Dataset.list_files(str(PATH / 'train/*.jpg'))
train_dataset = train_dataset.map(load_image_train,
                                  num_parallel_calls=tf.data.AUTOTUNE)
train_dataset = train_dataset.shuffle(BUFFER_SIZE)
train_dataset = train_dataset.batch(BATCH_SIZE)
try:
  test_dataset = tf.data.Dataset.list_files(str(PATH / 'test/*.jpg'))
except tf.errors.InvalidArgumentError:
  test_dataset = tf.data.Dataset.list_files(str(PATH / 'val/*.jpg'))
test_dataset = test_dataset.map(load_image_test)
test_dataset = test_dataset.batch(BATCH_SIZE)
สร้างเครื่องกำเนิดไฟฟ้า
ตัวสร้าง pix2pix cGAN ของคุณคือ U-Net ที่ ดัดแปลง U-Net ประกอบด้วยตัวเข้ารหัส (ตัวสุ่มตัวอย่าง) และตัวถอดรหัส (ตัวขยายสัญญาณ) (คุณสามารถหาข้อมูลเพิ่มเติมเกี่ยวกับเรื่องนี้ได้ในบทช่วยสอน การแบ่งส่วนรูปภาพ และบน เว็บไซต์โครงการ U-Net )
- แต่ละบล็อกในตัวเข้ารหัสคือ: Convolution -> Batch normalization -> Leaky ReLU
- แต่ละบล็อคในตัวถอดรหัสคือ: Transposed convolution -> Batch normalization -> Dropout (ใช้กับ 3 บล็อกแรก) -> ReLU
- มีการข้ามการเชื่อมต่อระหว่างตัวเข้ารหัสและตัวถอดรหัส (เช่นเดียวกับใน U-Net)
กำหนด downsampler (ตัวเข้ารหัส):
OUTPUT_CHANNELS = 3
def downsample(filters, size, apply_batchnorm=True):
  initializer = tf.random_normal_initializer(0., 0.02)

  result = tf.keras.Sequential()
  result.add(
      tf.keras.layers.Conv2D(filters, size, strides=2, padding='same',
                             kernel_initializer=initializer, use_bias=False))

  if apply_batchnorm:
    result.add(tf.keras.layers.BatchNormalization())

  result.add(tf.keras.layers.LeakyReLU())

  return result
down_model = downsample(3, 4)
down_result = down_model(tf.expand_dims(inp, 0))
print (down_result.shape)
(1, 128, 128, 3)
กำหนด upsampler (ตัวถอดรหัส):
def upsample(filters, size, apply_dropout=False):
  initializer = tf.random_normal_initializer(0., 0.02)

  result = tf.keras.Sequential()
  result.add(
    tf.keras.layers.Conv2DTranspose(filters, size, strides=2,
                                    padding='same',
                                    kernel_initializer=initializer,
                                    use_bias=False))

  result.add(tf.keras.layers.BatchNormalization())

  if apply_dropout:
      result.add(tf.keras.layers.Dropout(0.5))

  result.add(tf.keras.layers.ReLU())

  return result
up_model = upsample(3, 4)
up_result = up_model(down_result)
print (up_result.shape)
(1, 256, 256, 3)
กำหนดตัวสร้างด้วย downsampler และ upsampler:
def Generator():
  inputs = tf.keras.layers.Input(shape=[256, 256, 3])

  down_stack = [
    downsample(64, 4, apply_batchnorm=False),  # (batch_size, 128, 128, 64)
    downsample(128, 4),  # (batch_size, 64, 64, 128)
    downsample(256, 4),  # (batch_size, 32, 32, 256)
    downsample(512, 4),  # (batch_size, 16, 16, 512)
    downsample(512, 4),  # (batch_size, 8, 8, 512)
    downsample(512, 4),  # (batch_size, 4, 4, 512)
    downsample(512, 4),  # (batch_size, 2, 2, 512)
    downsample(512, 4),  # (batch_size, 1, 1, 512)
  ]

  up_stack = [
    upsample(512, 4, apply_dropout=True),  # (batch_size, 2, 2, 1024)
    upsample(512, 4, apply_dropout=True),  # (batch_size, 4, 4, 1024)
    upsample(512, 4, apply_dropout=True),  # (batch_size, 8, 8, 1024)
    upsample(512, 4),  # (batch_size, 16, 16, 1024)
    upsample(256, 4),  # (batch_size, 32, 32, 512)
    upsample(128, 4),  # (batch_size, 64, 64, 256)
    upsample(64, 4),  # (batch_size, 128, 128, 128)
  ]

  initializer = tf.random_normal_initializer(0., 0.02)
  last = tf.keras.layers.Conv2DTranspose(OUTPUT_CHANNELS, 4,
                                         strides=2,
                                         padding='same',
                                         kernel_initializer=initializer,
                                         activation='tanh')  # (batch_size, 256, 256, 3)

  x = inputs

  # Downsampling through the model
  skips = []
  for down in down_stack:
    x = down(x)
    skips.append(x)

  skips = reversed(skips[:-1])

  # Upsampling and establishing the skip connections
  for up, skip in zip(up_stack, skips):
    x = up(x)
    x = tf.keras.layers.Concatenate()([x, skip])

  x = last(x)

  return tf.keras.Model(inputs=inputs, outputs=x)
เห็นภาพสถาปัตยกรรมแบบจำลองเครื่องกำเนิดไฟฟ้า:
generator = Generator()
tf.keras.utils.plot_model(generator, show_shapes=True, dpi=64)

ทดสอบเครื่องกำเนิดไฟฟ้า:
gen_output = generator(inp[tf.newaxis, ...], training=False)
plt.imshow(gen_output[0, ...])
Clipping input data to the valid range for imshow with RGB data ([0..1] for floats or [0..255] for integers).
<matplotlib.image.AxesImage at 0x7f35cfd20610>

กำหนดการสูญเสียเครื่องกำเนิดไฟฟ้า
GAN เรียนรู้การสูญเสียที่ปรับให้เข้ากับข้อมูล ในขณะที่ cGAN เรียนรู้การสูญเสียที่มีโครงสร้างซึ่งจะลงโทษโครงสร้างที่เป็นไปได้ซึ่งแตกต่างจากเอาต์พุตของเครือข่ายและรูปภาพเป้าหมาย ตามที่อธิบายไว้ใน เอกสาร pix2pix
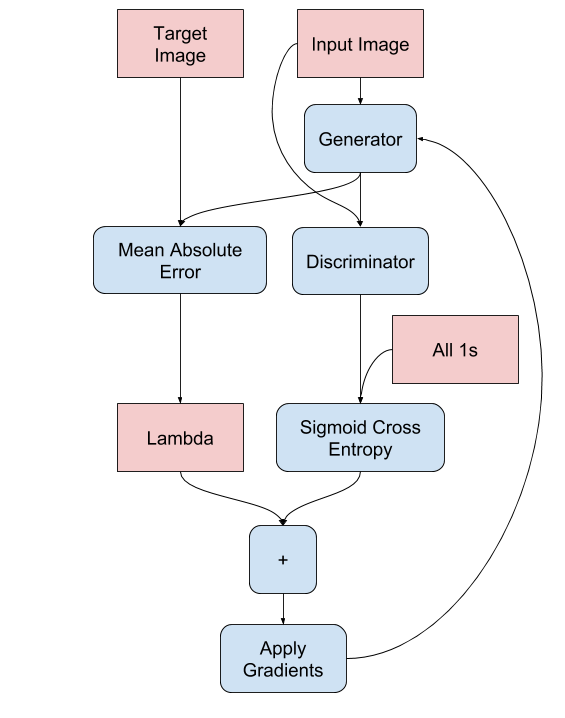
- การสูญเสียตัวสร้างคือการสูญเสียครอสเอนโทรปีแบบซิกมอยด์ของรูปภาพที่สร้างขึ้นและ อาร์เรย์ของ รูปภาพ
- กระดาษ pix2pix ยังกล่าวถึงการสูญเสีย L1 ซึ่งเป็น MAE (หมายถึงข้อผิดพลาดแน่นอน) ระหว่างภาพที่สร้างขึ้นและภาพเป้าหมาย
- ซึ่งช่วยให้รูปภาพที่สร้างขึ้นมีโครงสร้างคล้ายกับรูปภาพเป้าหมาย
- สูตรในการคำนวณการสูญเสียของตัวกำเนิดทั้งหมดคือ
gan_loss + LAMBDA * l1_lossโดยที่LAMBDA = 100ค่านี้ถูกกำหนดโดยผู้เขียนบทความ
LAMBDA = 100
loss_object = tf.keras.losses.BinaryCrossentropy(from_logits=True)
def generator_loss(disc_generated_output, gen_output, target):
  gan_loss = loss_object(tf.ones_like(disc_generated_output), disc_generated_output)

  # Mean absolute error
  l1_loss = tf.reduce_mean(tf.abs(target - gen_output))

  total_gen_loss = gan_loss + (LAMBDA * l1_loss)

  return total_gen_loss, gan_loss, l1_loss
ขั้นตอนการฝึกอบรมสำหรับเครื่องกำเนิดไฟฟ้ามีดังนี้:

สร้างผู้เลือกปฏิบัติ
discriminator ใน pix2pix cGAN เป็นตัวแยกประเภท PatchGAN แบบ Convolutional ซึ่งพยายามจัดประเภทว่าแต่ละ แพทช์ ของรูปภาพเป็นของจริงหรือไม่ ตามที่อธิบายไว้ใน กระดาษ pix2pix
- แต่ละบล็อกใน discriminator คือ: Convolution -> Batch normalization -> Leaky ReLU
- รูปร่างของผลลัพธ์หลังจากเลเยอร์สุดท้ายคือ
(batch_size, 30, 30, 1) - แพตช์รูปภาพ
30 x 30แต่ละรายการของเอาต์พุตจะจำแนกส่วนของอิมเมจอินพุต70 x 70 - discriminator ได้รับ 2 อินพุต:
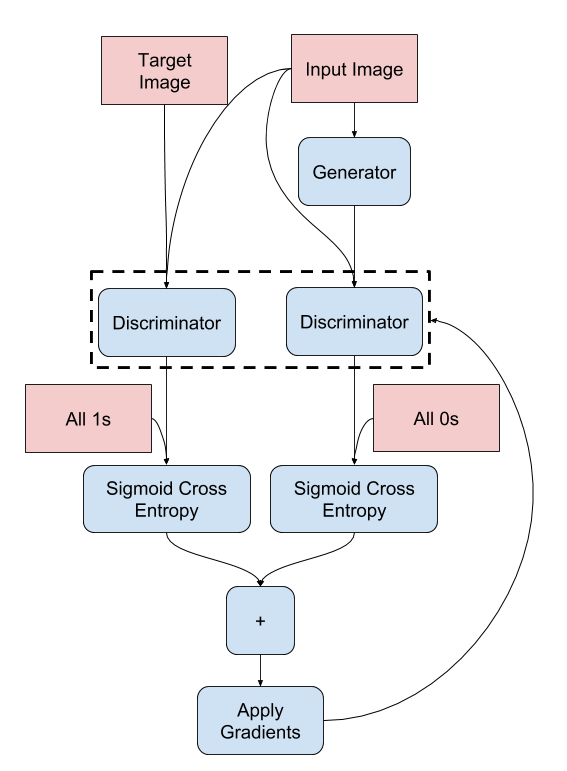
- รูปภาพอินพุตและรูปภาพเป้าหมายซึ่งควรจัดว่าเป็นของจริง
- รูปภาพอินพุตและรูปภาพที่สร้างขึ้น (เอาต์พุตของตัวสร้าง) ซึ่งควรจัดว่าเป็นของปลอม
- ใช้
tf.concat([inp, tar], axis=-1)เพื่อเชื่อมอินพุต 2 ตัวนี้เข้าด้วยกัน
มากำหนดการเลือกปฏิบัติกัน:
def Discriminator():
  initializer = tf.random_normal_initializer(0., 0.02)

  inp = tf.keras.layers.Input(shape=[256, 256, 3], name='input_image')
  tar = tf.keras.layers.Input(shape=[256, 256, 3], name='target_image')

  x = tf.keras.layers.concatenate([inp, tar])  # (batch_size, 256, 256, channels*2)

  down1 = downsample(64, 4, False)(x)  # (batch_size, 128, 128, 64)
  down2 = downsample(128, 4)(down1)  # (batch_size, 64, 64, 128)
  down3 = downsample(256, 4)(down2)  # (batch_size, 32, 32, 256)

  zero_pad1 = tf.keras.layers.ZeroPadding2D()(down3)  # (batch_size, 34, 34, 256)
  conv = tf.keras.layers.Conv2D(512, 4, strides=1,
                                kernel_initializer=initializer,
                                use_bias=False)(zero_pad1)  # (batch_size, 31, 31, 512)

  batchnorm1 = tf.keras.layers.BatchNormalization()(conv)

  leaky_relu = tf.keras.layers.LeakyReLU()(batchnorm1)

  zero_pad2 = tf.keras.layers.ZeroPadding2D()(leaky_relu)  # (batch_size, 33, 33, 512)

  last = tf.keras.layers.Conv2D(1, 4, strides=1,
                                kernel_initializer=initializer)(zero_pad2)  # (batch_size, 30, 30, 1)

  return tf.keras.Model(inputs=[inp, tar], outputs=last)
เห็นภาพสถาปัตยกรรมแบบจำลองผู้จำแนก:
discriminator = Discriminator()
tf.keras.utils.plot_model(discriminator, show_shapes=True, dpi=64)

ทดสอบการเลือกปฏิบัติ:
disc_out = discriminator([inp[tf.newaxis, ...], gen_output], training=False)
plt.imshow(disc_out[0, ..., -1], vmin=-20, vmax=20, cmap='RdBu_r')
plt.colorbar()
<matplotlib.colorbar.Colorbar at 0x7f35cec82c50>ตัวยึดตำแหน่ง41

กำหนดการสูญเสียผู้เลือกปฏิบัติ
- ฟังก์ชัน
discriminator_lossรับ 2 อินพุต: รูปภาพจริง และ รูปภาพที่สร้าง -
real_lossคือการสูญเสียครอสเอนโทรปีแบบซิกมอยด์ของ รูปภาพจริง และ อาร์เรย์ของรูปภาพจริง (เนื่องจากเป็นรูปภาพจริง) -
generated_lossคือการสูญเสีย sigmoid cross-entropy ของ รูปภาพที่สร้างขึ้น และ อาร์เรย์ของค่าศูนย์ (เนื่องจากเป็นรูปภาพปลอม) -
total_lossคือผลรวมของreal_lossและgenerated_loss
def discriminator_loss(disc_real_output, disc_generated_output):
  real_loss = loss_object(tf.ones_like(disc_real_output), disc_real_output)

  generated_loss = loss_object(tf.zeros_like(disc_generated_output), disc_generated_output)

  total_disc_loss = real_loss + generated_loss

  return total_disc_loss
ขั้นตอนการฝึกอบรมสำหรับผู้เลือกปฏิบัติแสดงไว้ด้านล่าง
หากต้องการเรียนรู้เพิ่มเติมเกี่ยวกับสถาปัตยกรรมและไฮเปอร์พารามิเตอร์ โปรดดู เอกสาร pix2pix

กำหนดตัวเพิ่มประสิทธิภาพและตัวรักษาจุดตรวจ
generator_optimizer = tf.keras.optimizers.Adam(2e-4, beta_1=0.5)
discriminator_optimizer = tf.keras.optimizers.Adam(2e-4, beta_1=0.5)
checkpoint_dir = './training_checkpoints'
checkpoint_prefix = os.path.join(checkpoint_dir, "ckpt")
checkpoint = tf.train.Checkpoint(generator_optimizer=generator_optimizer,
                                 discriminator_optimizer=discriminator_optimizer,
                                 generator=generator,
                                 discriminator=discriminator)
สร้างภาพ
เขียนฟังก์ชันเพื่อพล็อตภาพระหว่างการฝึก
- ส่งภาพจากชุดทดสอบไปยังเครื่องกำเนิด
- เครื่องกำเนิดจะแปลอิมเมจอินพุตเป็นเอาต์พุต
- ขั้นตอนสุดท้ายคือการวางแผนการทำนายและ voila !
def generate_images(model, test_input, tar):
  prediction = model(test_input, training=True)
  plt.figure(figsize=(15, 15))

  display_list = [test_input[0], tar[0], prediction[0]]
  title = ['Input Image', 'Ground Truth', 'Predicted Image']

  for i in range(3):
    plt.subplot(1, 3, i+1)
    plt.title(title[i])
    # Getting the pixel values in the [0, 1] range to plot.
    plt.imshow(display_list[i] * 0.5 + 0.5)
    plt.axis('off')
  plt.show()
ทดสอบฟังก์ชัน:
for example_input, example_target in test_dataset.take(1):
  generate_images(generator, example_input, example_target)

การฝึกอบรม
- สำหรับแต่ละตัวอย่างอินพุตจะสร้างเอาต์พุต
- discriminator ได้รับ
input_imageและภาพที่สร้างขึ้นเป็นอินพุตแรก อินพุตที่สองคือinput_imageและtarget_image - ถัดไป คำนวณเครื่องกำเนิดและการสูญเสียผู้จำแนก
- จากนั้น คำนวณความลาดชันของการสูญเสียที่สัมพันธ์กับทั้งตัวสร้างและตัวแปรจำแนก (อินพุต) และนำไปใช้กับเครื่องมือเพิ่มประสิทธิภาพ
- สุดท้าย บันทึกการสูญเสียไปยัง TensorBoard
log_dir="logs/"

summary_writer = tf.summary.create_file_writer(
  log_dir + "fit/" + datetime.datetime.now().strftime("%Y%m%d-%H%M%S"))
@tf.function
def train_step(input_image, target, step):
  with tf.GradientTape() as gen_tape, tf.GradientTape() as disc_tape:
    gen_output = generator(input_image, training=True)

    disc_real_output = discriminator([input_image, target], training=True)
    disc_generated_output = discriminator([input_image, gen_output], training=True)

    gen_total_loss, gen_gan_loss, gen_l1_loss = generator_loss(disc_generated_output, gen_output, target)
    disc_loss = discriminator_loss(disc_real_output, disc_generated_output)

  generator_gradients = gen_tape.gradient(gen_total_loss,
                                          generator.trainable_variables)
  discriminator_gradients = disc_tape.gradient(disc_loss,
                                               discriminator.trainable_variables)

  generator_optimizer.apply_gradients(zip(generator_gradients,
                                          generator.trainable_variables))
  discriminator_optimizer.apply_gradients(zip(discriminator_gradients,
                                              discriminator.trainable_variables))

  with summary_writer.as_default():
    tf.summary.scalar('gen_total_loss', gen_total_loss, step=step//1000)
    tf.summary.scalar('gen_gan_loss', gen_gan_loss, step=step//1000)
    tf.summary.scalar('gen_l1_loss', gen_l1_loss, step=step//1000)
    tf.summary.scalar('disc_loss', disc_loss, step=step//1000)
วงรอบการฝึกจริง เนื่องจากบทช่วยสอนนี้สามารถเรียกใช้ชุดข้อมูลได้มากกว่าหนึ่งชุด และชุดข้อมูลมีขนาดแตกต่างกันอย่างมาก ลูปการฝึกอบรมจึงถูกตั้งค่าให้ทำงานเป็นขั้นตอนแทนที่จะเป็นยุค
- วนซ้ำตามจำนวนก้าว
- ทุกๆ 10 ขั้นตอนจะพิมพ์จุด (
.) - ทุกๆ 1k ขั้นตอน: ล้างการแสดงผลและเรียกใช้
generate_imagesเพื่อแสดงความคืบหน้า - ทุกๆ 5k ก้าว: บันทึกจุดตรวจ
def fit(train_ds, test_ds, steps):
  example_input, example_target = next(iter(test_ds.take(1)))
  start = time.time()

  for step, (input_image, target) in train_ds.repeat().take(steps).enumerate():
    if (step) % 1000 == 0:
      display.clear_output(wait=True)

      if step != 0:
        print(f'Time taken for 1000 steps: {time.time()-start:.2f} sec\n')

      start = time.time()

      generate_images(generator, example_input, example_target)
      print(f"Step: {step//1000}k")

    train_step(input_image, target, step)

    # Training step
    if (step+1) % 10 == 0:
      print('.', end='', flush=True)


    # Save (checkpoint) the model every 5k steps
    if (step + 1) % 5000 == 0:
      checkpoint.save(file_prefix=checkpoint_prefix)
รอบการฝึกนี้จะบันทึกบันทึกที่คุณสามารถดูได้ใน TensorBoard เพื่อติดตามความคืบหน้าของการฝึก
หากคุณทำงานบนเครื่องท้องถิ่น คุณจะต้องเปิดกระบวนการ TensorBoard แยกต่างหาก เมื่อทำงานในโน้ตบุ๊ก ให้เปิดโปรแกรมดูก่อนเริ่มการฝึกเพื่อตรวจสอบด้วย TensorBoard
ในการเปิดโปรแกรมแสดงให้วางสิ่งต่อไปนี้ลงในเซลล์รหัส:
%load_ext tensorboard
%tensorboard --logdir {log_dir}
สุดท้าย ให้รันลูปการฝึก:
fit(train_dataset, test_dataset, steps=40000)
Time taken for 1000 steps: 36.53 secตัวยึดตำแหน่ง52

Step: 39k
....................................................................................................
หากคุณต้องการแชร์ผลลัพธ์ของ TensorBoard แบบ สาธารณะ คุณสามารถอัปโหลดบันทึกไปที่ TensorBoard.dev โดยคัดลอกสิ่งต่อไปนี้ลงในเซลล์รหัส
tensorboard dev upload --logdir {log_dir}
คุณสามารถดู ผลลัพธ์ของการรัน สมุดบันทึกนี้ครั้งก่อนได้ที่ TensorBoard.dev
TensorBoard.dev เป็นประสบการณ์ที่ได้รับการจัดการสำหรับการโฮสต์ ติดตาม และแชร์การทดลอง ML กับทุกคน
นอกจากนี้ยังสามารถรวมอินไลน์โดยใช้ <iframe> :
display.IFrame(
    src="https://tensorboard.dev/experiment/lZ0C6FONROaUMfjYkVyJqw",
    width="100%",
    height="1000px")
การตีความบันทึกมีความละเอียดอ่อนมากขึ้นเมื่อฝึก GAN (หรือ cGAN เช่น pix2pix) เมื่อเทียบกับการจัดหมวดหมู่อย่างง่ายหรือแบบจำลองการถดถอย สิ่งที่ต้องมองหา:
- ตรวจสอบว่าทั้งเครื่องกำเนิดไฟฟ้าและแบบจำลองการเลือกปฏิบัติไม่มี "ชนะ" หาก
gen_gan_lossหรือdisc_lossต่ำมาก แสดงว่าโมเดลนี้มีอำนาจเหนืออีกโมเดลหนึ่ง และคุณฝึกโมเดลที่รวมกันไม่สำเร็จ -
log(2) = 0.69เป็นจุดอ้างอิงที่ดีสำหรับการสูญเสียเหล่านี้ เนื่องจากบ่งชี้ถึงความฉงนสนเท่ห์ของ 2 - โดยเฉลี่ยแล้วผู้แยกแยะมีความไม่แน่นอนเท่ากันเกี่ยวกับตัวเลือกทั้งสอง - สำหรับ
disc_lossค่าที่ต่ำกว่า0.69หมายความว่าผู้เลือกปฏิบัติทำได้ดีกว่าการสุ่มในชุดของจริงและรูปภาพที่สร้างขึ้นรวมกัน - สำหรับ
gen_gan_lossค่าที่ต่ำกว่า0.69หมายความว่าตัวสร้างกำลังดำเนินการได้ดีกว่าการสุ่มเพื่อหลอกผู้แยกแยะ - เมื่อการฝึกดำเนินไป
gen_l1_lossควรลดลง
คืนค่าจุดตรวจล่าสุดและทดสอบเครือข่าย
ls {checkpoint_dir}
checkpoint          ckpt-5.data-00000-of-00001
ckpt-1.data-00000-of-00001  ckpt-5.index
ckpt-1.index            ckpt-6.data-00000-of-00001
ckpt-2.data-00000-of-00001  ckpt-6.index
ckpt-2.index            ckpt-7.data-00000-of-00001
ckpt-3.data-00000-of-00001  ckpt-7.index
ckpt-3.index            ckpt-8.data-00000-of-00001
ckpt-4.data-00000-of-00001  ckpt-8.index
ckpt-4.index
# Restoring the latest checkpoint in checkpoint_dir
checkpoint.restore(tf.train.latest_checkpoint(checkpoint_dir))
<tensorflow.python.training.tracking.util.CheckpointLoadStatus at 0x7f35cfd6b8d0>
สร้างภาพบางส่วนโดยใช้ชุดทดสอบ
# Run the trained model on a few examples from the test set
for inp, tar in test_dataset.take(5):
  generate_images(generator, inp, tar)


