 TensorFlow.org에서 보기 TensorFlow.org에서 보기 |  Google Colab에서 실행 Google Colab에서 실행 |  GitHub에서 소스 보기 GitHub에서 소스 보기 |  노트북 다운로드 노트북 다운로드 |
1. 소개
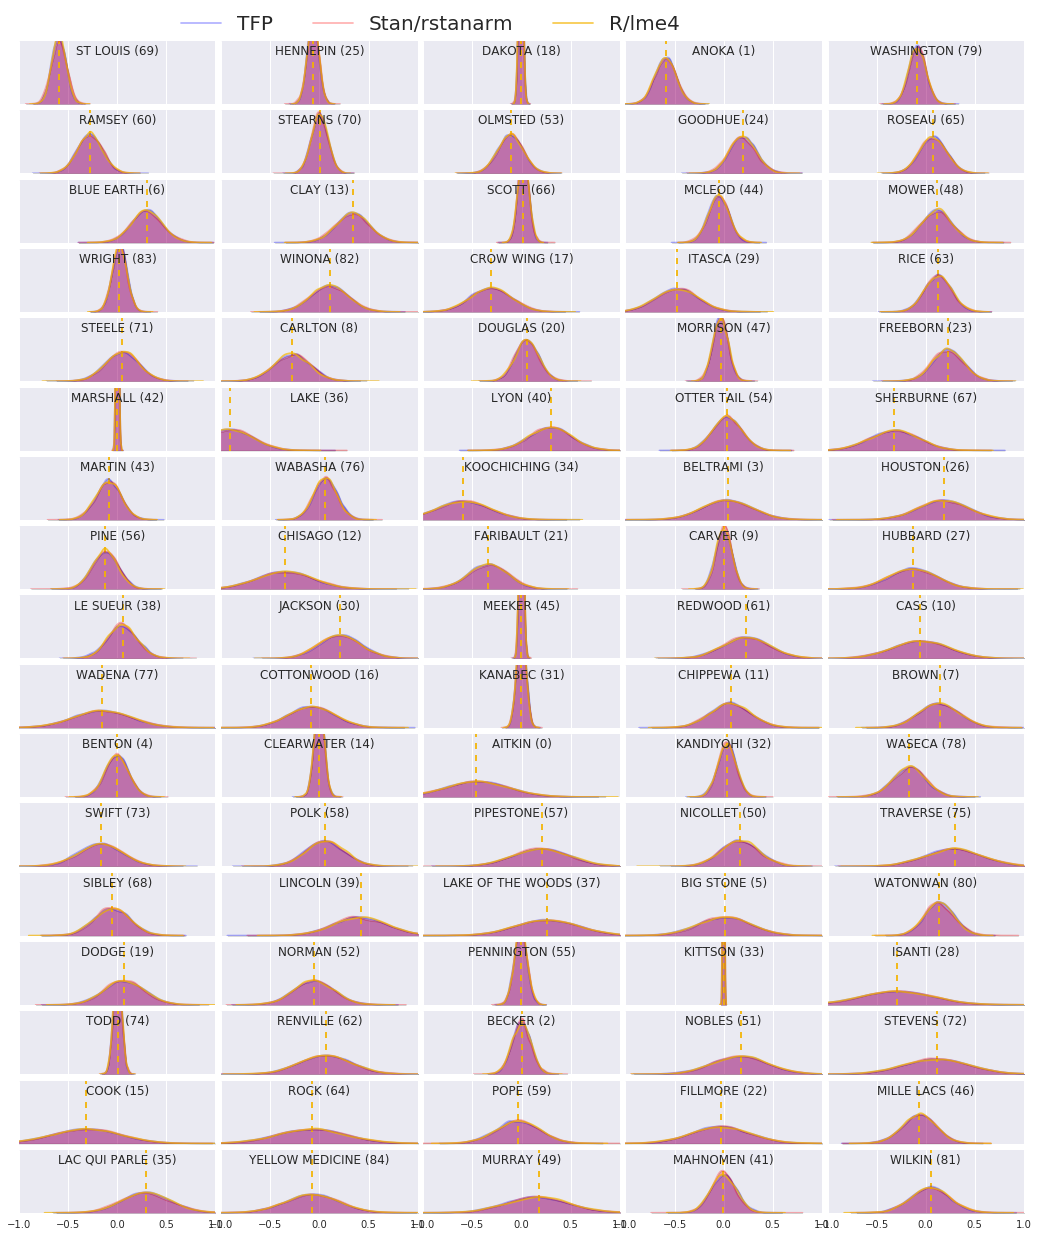
이 colab에서는 선형 혼합 효과 회귀 모델을 인기 있는 장난감 데이터 세트에 맞출 것입니다. 우리는 R의 사용이 맞는 세 번을 다할 것 lme4 , 스탠의 혼합 효과 패키지 및 TensorFlow 확률 (TFP) 프리미티브. 우리는 세 가지 모두가 거의 동일한 적합 매개변수와 사후 분포를 제공함을 보여줌으로써 결론을 내립니다.
우리의 주요 결론은 총요소 생산성이 모델 HLM-같이하고, 예. 다른 소프트웨어 패키지와 일치하는 결과를 생산하고 장착 할 필요는 일반 조각을 가지고 있다는 것입니다 lme4 , rstanarm . 이 colab은 비교된 패키지의 계산 효율성을 정확하게 반영하지 않습니다.
%matplotlib inline

import os
from six.moves import urllib
import numpy as np
import pandas as pd
import warnings

from matplotlib import pyplot as plt
import seaborn as sns

from IPython.core.pylabtools import figsize
figsize(11, 9)

import tensorflow.compat.v1 as tf
import tensorflow_datasets as tfds
import tensorflow_probability as tfp
2 계층적 선형 모델
R, 스탠 및 TFP 사이에 우리의 비교를 위해, 우리는 맞는 계층 선형 모델 받는 사람 (HLM) 라돈 데이터 세트가 인기 만든 겔만, 등으로 베이지안 데이터 분석. 알. (페이지 559, 두 번째 판; 페이지 250, 세 번째 판.).
다음 생성 모델을 가정합니다.
\[\begin{align*} \text{for } & c=1\ldots \text{NumCounties}:\\ & \beta_c \sim \text{Normal}\left(\text{loc}=0, \text{scale}=\sigma_C \right) \\ \text{for } & i=1\ldots \text{NumSamples}:\\ &\eta_i = \underbrace{\omega_0 + \omega_1 \text{Floor}_i}_\text{fixed effects} + \underbrace{\beta_{ \text{County}_i} \log( \text{UraniumPPM}_{\text{County}_i}))}_\text{random effects} \\ &\log(\text{Radon}_i) \sim \text{Normal}(\text{loc}=\eta_i , \text{scale}=\sigma_N) \end{align*}\]
R의에서 lme4 "표기 물결"이 모델은 동일합니다 :
log_radon ~ 1 + floor + (0 + log_uranium_ppm | county)
우리는 대한 MLE를 찾을 수 \(\omega, \sigma_C, \sigma_N\) 의 (증거 조건으로) 사후 분포를 사용하여 \(\{\beta_c\}_{c=1}^\text{NumCounties}\).
본질적으로 동일 모델의하지만, 임의의 절편을 참조 부록 A를 .
HLMs의보다 일반적인 사양을 참조 부록 B를 .
3 데이터 통합
이 섹션에서 우리는 얻을 radon 데이터 집합을 하고 우리의 가정 된 모델을 준수하기 위해 최소한의 전처리을한다.
def load_and_preprocess_radon_dataset(state='MN'):
  """Preprocess Radon dataset as done in "Bayesian Data Analysis" book.

  We filter to Minnesota data (919 examples) and preprocess to obtain the
  following features:
  - `log_uranium_ppm`: Log of soil uranium measurements.
  - `county`: Name of county in which the measurement was taken.
  - `floor`: Floor of house (0 for basement, 1 for first floor) on which the
    measurement was taken.

  The target variable is `log_radon`, the log of the Radon measurement in the
  house.
  """
  ds = tfds.load('radon', split='train')
  radon_data = tfds.as_dataframe(ds)
  radon_data.rename(lambda s: s[9:] if s.startswith('feat') else s, axis=1, inplace=True)
  df = radon_data[radon_data.state==state.encode()].copy()

  # For any missing or invalid activity readings, we'll use a value of `0.1`.
  df['radon'] = df.activity.apply(lambda x: x if x > 0. else 0.1)
  # Make county names look nice.
  df['county'] = df.county.apply(lambda s: s.decode()).str.strip().str.title()
  # Remap categories to start from 0 and end at max(category).
  county_name = sorted(df.county.unique())
  df['county'] = df.county.astype(
      pd.api.types.CategoricalDtype(categories=county_name)).cat.codes
  county_name = list(map(str.strip, county_name))

  df['log_radon'] = df['radon'].apply(np.log)
  df['log_uranium_ppm'] = df['Uppm'].apply(np.log)
  df = df[['idnum', 'log_radon', 'floor', 'county', 'log_uranium_ppm']]

  return df, county_name
radon, county_name = load_and_preprocess_radon_dataset()
# We'll use the following directory to store our preprocessed dataset.
CACHE_DIR = os.path.join(os.sep, 'tmp', 'radon')

# Save processed data. (So we can later read it in R.)
if not tf.gfile.Exists(CACHE_DIR):
  tf.gfile.MakeDirs(CACHE_DIR)
with tf.gfile.Open(os.path.join(CACHE_DIR, 'radon.csv'), 'w') as f:
  radon.to_csv(f, index=False)
3.1 데이터 알기
이 섹션에서 우리는 탐구 radon 제안 된 모델은 합리적인 이유의 더 나은 이해를 얻기 위해 데이터 집합을.
radon.head()
fig, ax = plt.subplots(figsize=(22, 5));
county_freq = radon['county'].value_counts()
county_freq.plot(kind='bar', color='#436bad');
plt.xlabel('County index')
plt.ylabel('Number of radon readings')
plt.title('Number of radon readings per county', fontsize=16)
county_freq = np.array(zip(county_freq.index, county_freq.values))  # We'll use this later.

fig, ax = plt.subplots(ncols=2, figsize=[10, 4]);

radon['log_radon'].plot(kind='density', ax=ax[0]);
ax[0].set_xlabel('log(radon)')

radon['floor'].value_counts().plot(kind='bar', ax=ax[1]);
ax[1].set_xlabel('Floor');
ax[1].set_ylabel('Count');

fig.subplots_adjust(wspace=0.25)
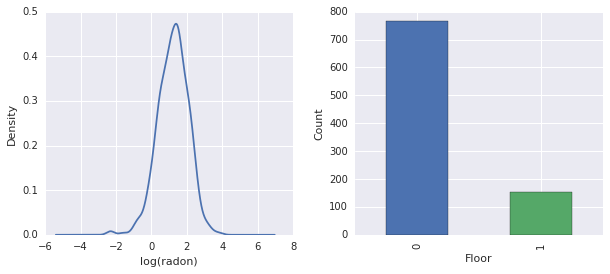
결론:
- 85개 카운티의 롱테일이 있습니다. (GLMM에서 흔히 발생합니다.)
- 실제로 \(\log(\text{Radon})\) 구속이다. (따라서 선형 회귀가 의미가 있을 수 있습니다.)
- 독서는 가장에 만들어진 \(0\)번째 층; 더 읽기는 바닥 위에 만들어진 \(1\). (따라서 고정 효과에는 가중치가 두 개뿐입니다.)
4 R의 HLM
이 섹션에서 우리는 R의 사용 lme4 확률 모델은 위에서 설명한 맞게 패키지를.
suppressMessages({
  library('bayesplot')
  library('data.table')
  library('dplyr')
  library('gfile')
  library('ggplot2')
  library('lattice')
  library('lme4')
  library('plyr')
  library('rstanarm')
  library('tidyverse')
  RequireInitGoogle()
})
data = read_csv(gfile::GFile('/tmp/radon/radon.csv'))
Parsed with column specification:
cols(
  log_radon = col_double(),
  floor = col_integer(),
  county = col_integer(),
  log_uranium_ppm = col_double()
)
head(data)
# A tibble: 6 x 4
  log_radon floor county log_uranium_ppm
      <dbl> <int>  <int>           <dbl>
1     0.788     1      0          -0.689
2     0.788     0      0          -0.689
3     1.06      0      0          -0.689
4     0         0      0          -0.689
5     1.13      0      1          -0.847
6     0.916     0      1          -0.847
# https://github.com/stan-dev/example-models/wiki/ARM-Models-Sorted-by-Chapter
radon.model <- lmer(log_radon ~ 1 + floor  + (0 + log_uranium_ppm | county), data = data)
summary(radon.model)
Linear mixed model fit by REML ['lmerMod']
Formula: log_radon ~ 1 + floor + (0 + log_uranium_ppm | county)
   Data: data

REML criterion at convergence: 2166.3

Scaled residuals:
    Min      1Q  Median      3Q     Max
-4.5202 -0.6064  0.0107  0.6334  3.4111

Random effects:
 Groups   Name            Variance Std.Dev.
 county   log_uranium_ppm 0.7545   0.8686
 Residual                 0.5776   0.7600
Number of obs: 919, groups:  county, 85

Fixed effects:
            Estimate Std. Error t value
(Intercept)  1.47585    0.03899   37.85
floor       -0.67974    0.06963   -9.76

Correlation of Fixed Effects:
      (Intr)
floor -0.330
qqmath(ranef(radon.model, condVar=TRUE))
$county
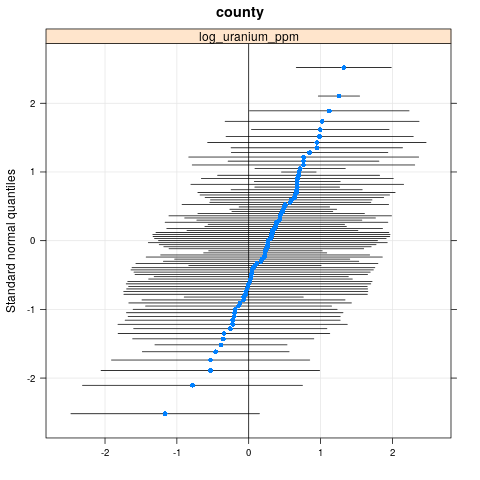
write.csv(as.data.frame(ranef(radon.model, condVar = TRUE)), '/tmp/radon/lme4_fit.csv')
5 스탠의 HLM
이 섹션에서는 사용 rstanarm를 같은 식 / 구문을 사용하여 스탠 모델에 맞게 lme4 상기 모델.
달리 lme4 아래 TF 모델은 rstanarm 자신이 배포에서 가져온 매개 변수와 정규 분포에서 그려진 완전히 베이지안 모델, 즉, 모든 매개 변수가 추정하는 것입니다.
fit <- stan_lmer(log_radon ~ 1 + floor + (0 + log_uranium_ppm | county), data = data)
SAMPLING FOR MODEL 'continuous' NOW (CHAIN 1).

Chain 1, Iteration:    1 / 2000 [  0%]  (Warmup)
Chain 1, Iteration:  200 / 2000 [ 10%]  (Warmup)
Chain 1, Iteration:  400 / 2000 [ 20%]  (Warmup)
Chain 1, Iteration:  600 / 2000 [ 30%]  (Warmup)
Chain 1, Iteration:  800 / 2000 [ 40%]  (Warmup)
Chain 1, Iteration: 1000 / 2000 [ 50%]  (Warmup)
Chain 1, Iteration: 1001 / 2000 [ 50%]  (Sampling)
Chain 1, Iteration: 1200 / 2000 [ 60%]  (Sampling)
Chain 1, Iteration: 1400 / 2000 [ 70%]  (Sampling)
Chain 1, Iteration: 1600 / 2000 [ 80%]  (Sampling)
Chain 1, Iteration: 1800 / 2000 [ 90%]  (Sampling)
Chain 1, Iteration: 2000 / 2000 [100%]  (Sampling)
 Elapsed Time: 7.73495 seconds (Warm-up)
               2.98852 seconds (Sampling)
               10.7235 seconds (Total)


SAMPLING FOR MODEL 'continuous' NOW (CHAIN 2).

Chain 2, Iteration:    1 / 2000 [  0%]  (Warmup)
Chain 2, Iteration:  200 / 2000 [ 10%]  (Warmup)
Chain 2, Iteration:  400 / 2000 [ 20%]  (Warmup)
Chain 2, Iteration:  600 / 2000 [ 30%]  (Warmup)
Chain 2, Iteration:  800 / 2000 [ 40%]  (Warmup)
Chain 2, Iteration: 1000 / 2000 [ 50%]  (Warmup)
Chain 2, Iteration: 1001 / 2000 [ 50%]  (Sampling)
Chain 2, Iteration: 1200 / 2000 [ 60%]  (Sampling)
Chain 2, Iteration: 1400 / 2000 [ 70%]  (Sampling)
Chain 2, Iteration: 1600 / 2000 [ 80%]  (Sampling)
Chain 2, Iteration: 1800 / 2000 [ 90%]  (Sampling)
Chain 2, Iteration: 2000 / 2000 [100%]  (Sampling)
 Elapsed Time: 7.51252 seconds (Warm-up)
               3.08653 seconds (Sampling)
               10.5991 seconds (Total)


SAMPLING FOR MODEL 'continuous' NOW (CHAIN 3).

Chain 3, Iteration:    1 / 2000 [  0%]  (Warmup)
Chain 3, Iteration:  200 / 2000 [ 10%]  (Warmup)
Chain 3, Iteration:  400 / 2000 [ 20%]  (Warmup)
Chain 3, Iteration:  600 / 2000 [ 30%]  (Warmup)
Chain 3, Iteration:  800 / 2000 [ 40%]  (Warmup)
Chain 3, Iteration: 1000 / 2000 [ 50%]  (Warmup)
Chain 3, Iteration: 1001 / 2000 [ 50%]  (Sampling)
Chain 3, Iteration: 1200 / 2000 [ 60%]  (Sampling)
Chain 3, Iteration: 1400 / 2000 [ 70%]  (Sampling)
Chain 3, Iteration: 1600 / 2000 [ 80%]  (Sampling)
Chain 3, Iteration: 1800 / 2000 [ 90%]  (Sampling)
Chain 3, Iteration: 2000 / 2000 [100%]  (Sampling)
 Elapsed Time: 8.14628 seconds (Warm-up)
               3.01001 seconds (Sampling)
               11.1563 seconds (Total)


SAMPLING FOR MODEL 'continuous' NOW (CHAIN 4).

Chain 4, Iteration:    1 / 2000 [  0%]  (Warmup)
Chain 4, Iteration:  200 / 2000 [ 10%]  (Warmup)
Chain 4, Iteration:  400 / 2000 [ 20%]  (Warmup)
Chain 4, Iteration:  600 / 2000 [ 30%]  (Warmup)
Chain 4, Iteration:  800 / 2000 [ 40%]  (Warmup)
Chain 4, Iteration: 1000 / 2000 [ 50%]  (Warmup)
Chain 4, Iteration: 1001 / 2000 [ 50%]  (Sampling)
Chain 4, Iteration: 1200 / 2000 [ 60%]  (Sampling)
Chain 4, Iteration: 1400 / 2000 [ 70%]  (Sampling)
Chain 4, Iteration: 1600 / 2000 [ 80%]  (Sampling)
Chain 4, Iteration: 1800 / 2000 [ 90%]  (Sampling)
Chain 4, Iteration: 2000 / 2000 [100%]  (Sampling)
 Elapsed Time: 7.6801 seconds (Warm-up)
               3.23663 seconds (Sampling)
               10.9167 seconds (Total)
fit
stan_lmer(formula = log_radon ~ 1 + floor + (0 + log_uranium_ppm |
    county), data = data)

Estimates:
            Median MAD_SD
(Intercept)  1.5    0.0
floor       -0.7    0.1
sigma        0.8    0.0

Error terms:
 Groups   Name            Std.Dev.
 county   log_uranium_ppm 0.87
 Residual                 0.76
Num. levels: county 85

Sample avg. posterior predictive
distribution of y (X = xbar):
         Median MAD_SD
mean_PPD 1.2    0.0

Observations: 919  Number of unconstrained parameters: 90
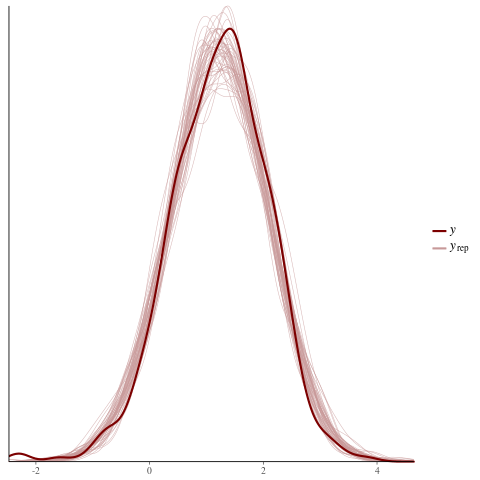
color_scheme_set("red")
ppc_dens_overlay(y = fit$y,
                 yrep = posterior_predict(fit, draws = 50))
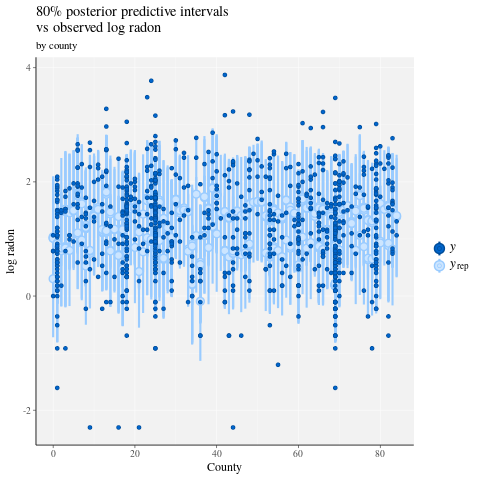
color_scheme_set("brightblue")
ppc_intervals(
  y = data$log_radon,
  yrep = posterior_predict(fit),
  x = data$county,
  prob = 0.8
) +
  labs(
    x = "County",
    y = "log radon",
    title = "80% posterior predictive intervals \nvs observed log radon",
    subtitle = "by county"
  ) +
  panel_bg(fill = "gray95", color = NA) +
  grid_lines(color = "white")
# Write the posterior samples (4000 for each variable) to a CSV.
write.csv(tidy(as.matrix(fit)), "/tmp/radon/stan_fit.csv")
with tf.gfile.Open('/tmp/radon/lme4_fit.csv', 'r') as f:
  lme4_fit = pd.read_csv(f, index_col=0)
lme4_fit.head()
나중에 시각화하기 위해 lme4에서 그룹 랜덤 효과에 대한 점 추정치 및 조건부 표준 편차를 검색합니다.
posterior_random_weights_lme4 = np.array(lme4_fit.condval, dtype=np.float32)
lme4_prior_scale = np.array(lme4_fit.condsd, dtype=np.float32)
print(posterior_random_weights_lme4.shape, lme4_prior_scale.shape)
(85,) (85,)
lme4 추정 평균과 표준 편차를 사용하여 카운티 가중치에 대한 샘플을 그립니다.
with tf.Session() as sess:
  lme4_dist = tfp.distributions.Independent(
      tfp.distributions.Normal(
          loc=posterior_random_weights_lme4,
          scale=lme4_prior_scale),
      reinterpreted_batch_ndims=1)
  posterior_random_weights_lme4_final_ = sess.run(lme4_dist.sample(4000))
posterior_random_weights_lme4_final_.shape
(4000, 85)
또한 Stan 적합에서 카운티 가중치의 사후 샘플을 검색합니다.
with tf.gfile.Open('/tmp/radon/stan_fit.csv', 'r') as f:
  samples = pd.read_csv(f, index_col=0)
samples.head()
posterior_random_weights_cols = [
    col for col in samples.columns if 'b.log_uranium_ppm.county' in col
]
posterior_random_weights_final_stan = samples[
    posterior_random_weights_cols].values
print(posterior_random_weights_final_stan.shape)
(4000, 85)
이 스탠 예를 들어, 하나 더 가까이, 즉 총요소 생산성, 직접 확률 모델을 지정하여 스타일 LMER 구현하는 방법을 보여줍니다.
6 TF 확률의 HLM
이 섹션에서 우리는 낮은 수준의 TensorFlow 확률 프리미티브 (사용 Distributions 뿐만 아니라 알 수없는 매개 변수에 맞게 우리의 계층 선형 모델을 지정).
# Handy snippet to reset the global graph and global session.
with warnings.catch_warnings():
  warnings.simplefilter('ignore')
  tf.reset_default_graph()
  try:
    sess.close()
  except:
    pass
  sess = tf.InteractiveSession()
6.1 모델 지정
이 섹션에서 우리는 지정 혼합 효과 모델 선형 라돈 TFP 프리미티브를 사용합니다. 이를 위해 두 개의 TFP 분포를 생성하는 두 개의 함수를 지정합니다.
-
make_weights_prior(승산 랜덤 가중치위한 다변량 정규 전에 \(\log(\text{UraniumPPM}_{c_i})\) 선형 예측을 compue)이다. -
make_log_radon_likelihood: 한 배치Normal각 관측 위에 분포 \(\log(\text{Radon}_i)\) 종속 변수.
우리는 우리가 TF 변수 (즉, 사용해야 이러한 분포의 각각의 매개 변수를 피팅되기 때문에 tf.get_variable ). 그러나 우리는 비제약 최적화를 사용하기를 원하기 때문에 표준 편차를 나타내는 양수와 같이 필요한 의미를 얻기 위해 실제 값을 제한하는 방법을 찾아야 합니다.
inv_scale_transform = lambda y: np.log(y)  # Not using TF here.
fwd_scale_transform = tf.exp
다음 함수의 사전 구축해 \(p(\beta|\sigma_C)\) 어디 \(\beta\) 랜덤 효과 및 가중치이다 \(\sigma_C\) 표준 편차.
우리는 사용 tf.make_template 이 함수에 대한 첫 번째 호출이 사용하는 TF 변수와 변수의 현재 값 재사용 이후의 모든 통화를 인스턴스화 수 있도록.
def _make_weights_prior(num_counties, dtype):
  """Returns a `len(log_uranium_ppm)` batch of univariate Normal."""
  raw_prior_scale = tf.get_variable(
      name='raw_prior_scale',
      initializer=np.array(inv_scale_transform(1.), dtype=dtype))
  return tfp.distributions.Independent(
      tfp.distributions.Normal(
          loc=tf.zeros(num_counties, dtype=dtype),
          scale=fwd_scale_transform(raw_prior_scale)),
      reinterpreted_batch_ndims=1)


make_weights_prior = tf.make_template(
    name_='make_weights_prior', func_=_make_weights_prior)
다음 함수는 우리의 가능성, 구축 \(p(y|x,\omega,\beta,\sigma_N)\) 어디에 \(y,x\) 나타낸다 응답 증거, \(\omega,\beta\) 나타낸다 고정 소수점 및 임의 효과 무게 및 \(\sigma_N\) 표준 편차.
여기서 다시 우리는 사용 tf.make_template TF 변수가 호출에서 재사용하고 있는지 확인할 수도 있습니다.
def _make_log_radon_likelihood(random_effect_weights, floor, county,
                               log_county_uranium_ppm, init_log_radon_stddev):
  raw_likelihood_scale = tf.get_variable(
      name='raw_likelihood_scale',
      initializer=np.array(
          inv_scale_transform(init_log_radon_stddev), dtype=dtype))
  fixed_effect_weights = tf.get_variable(
      name='fixed_effect_weights', initializer=np.array([0., 1.], dtype=dtype))
  fixed_effects = fixed_effect_weights[0] + fixed_effect_weights[1] * floor
  random_effects = tf.gather(
      random_effect_weights * log_county_uranium_ppm,
      indices=tf.to_int32(county),
      axis=-1)
  linear_predictor = fixed_effects + random_effects
  return tfp.distributions.Normal(
      loc=linear_predictor, scale=fwd_scale_transform(raw_likelihood_scale))


make_log_radon_likelihood = tf.make_template(
    name_='make_log_radon_likelihood', func_=_make_log_radon_likelihood)
마지막으로 사전 및 가능성 생성기를 사용하여 조인트 로그 밀도를 구성합니다.
def joint_log_prob(random_effect_weights, log_radon, floor, county,
                   log_county_uranium_ppm, dtype):
  num_counties = len(log_county_uranium_ppm)
  rv_weights = make_weights_prior(num_counties, dtype)
  rv_radon = make_log_radon_likelihood(
      random_effect_weights,
      floor,
      county,
      log_county_uranium_ppm,
      init_log_radon_stddev=radon.log_radon.values.std())
  return (rv_weights.log_prob(random_effect_weights)
          + tf.reduce_sum(rv_radon.log_prob(log_radon), axis=-1))
6.2 훈련(기대 극대화의 확률적 근사)
선형 혼합 효과 회귀 모델에 맞추기 위해 SAEM(기대값 최대화 알고리즘)의 확률적 근사 버전을 사용합니다. 기본 아이디어는 예상 관절 로그 밀도(E-단계)를 근사화하기 위해 후방 샘플을 사용하는 것입니다. 그런 다음 이 계산을 최대화하는 매개변수를 찾습니다(M-단계). 좀 더 구체적으로, 고정 소수점 반복은 다음과 같이 주어집니다.
\[\begin{align*} \text{E}[ \log p(x, Z | \theta) | \theta_0] &\approx \frac{1}{M} \sum_{m=1}^M \log p(x, z_m | \theta), \quad Z_m\sim p(Z | x, \theta_0) && \text{E-step}\\ &=: Q_M(\theta, \theta_0) \\ \theta_0 &= \theta_0 - \eta \left.\nabla_\theta Q_M(\theta, \theta_0)\right|_{\theta=\theta_0} && \text{M-step} \end{align*}\]
여기서 \(x\) 증거이다 \(Z\) 아웃 소외 될 필요 일부 잠재 변수 및 \(\theta,\theta_0\) 수를 파라미터 화.
보다 철저한 설명을 참조 버나드 Delyon, 마크 Lavielle, 에릭, Moulines (앤. 주의적., 1999)에 의한 EM 알고리즘의 확률 근사 버전의 컨버전스를 .
E-step을 계산하려면 후방에서 샘플링해야 합니다. 우리의 후방은 샘플링하기 쉽지 않기 때문에 우리는 Hamiltonian Monte Carlo(HMC)를 사용합니다. HMC는 새로운 샘플을 제안하기 위해 정규화되지 않은 사후 로그 밀도의 기울기(파라미터가 아닌 wrt 상태)를 사용하는 Monte Carlo Markov Chain 절차입니다.
정규화되지 않은 사후 로그 밀도를 지정하는 것은 간단합니다. 조건을 지정하려는 모든 항목에 "고정"된 조인트 로그 밀도일 뿐입니다.
# Specify unnormalized posterior.

dtype = np.float32

log_county_uranium_ppm = radon[
    ['county', 'log_uranium_ppm']].drop_duplicates().values[:, 1]
log_county_uranium_ppm = log_county_uranium_ppm.astype(dtype)

def unnormalized_posterior_log_prob(random_effect_weights):
  return joint_log_prob(
      random_effect_weights=random_effect_weights,
      log_radon=dtype(radon.log_radon.values),
      floor=dtype(radon.floor.values),
      county=np.int32(radon.county.values),
      log_county_uranium_ppm=log_county_uranium_ppm,
      dtype=dtype)
이제 HMC 전환 커널을 생성하여 E-step 설정을 완료합니다.
노트:
우리가 사용하는
state_stop_gradient=True통해 backpropping에서 M-단계 - MCMC에서 그리는 것을 방지 할 수 있습니다. (우리의 E-단계가 의도적으로 이전의 가장 잘 알려진 추정량에 매개 변수화 때문에 리콜, 우리는을 통해 backprop 필요가 없다.)우리는 사용
tf.placeholder우리는 결국 우리의 TF 그래프를 실행할 때, 우리는 다음 반복의 체인의 값으로 이전 반복의 임의 MCMC 샘플을 공급할 수 있도록.우리는 TFP의 적응 사용
step_size, 휴리스틱을tfp.mcmc.hmc_step_size_update_fn.
# Set-up E-step.

step_size = tf.get_variable(
    'step_size',
    initializer=np.array(0.2, dtype=dtype),
    trainable=False)

hmc = tfp.mcmc.HamiltonianMonteCarlo(
    target_log_prob_fn=unnormalized_posterior_log_prob,
    num_leapfrog_steps=2,
    step_size=step_size,
    step_size_update_fn=tfp.mcmc.make_simple_step_size_update_policy(
      num_adaptation_steps=None),
    state_gradients_are_stopped=True)

init_random_weights = tf.placeholder(dtype, shape=[len(log_county_uranium_ppm)])

posterior_random_weights, kernel_results = tfp.mcmc.sample_chain(
    num_results=3,
    num_burnin_steps=0,
    num_steps_between_results=0,
    current_state=init_random_weights,
    kernel=hmc)
이제 M-step을 설정합니다. 이것은 본질적으로 TF에서 수행할 수 있는 최적화와 동일합니다.
# Set-up M-step.

loss = -tf.reduce_mean(kernel_results.accepted_results.target_log_prob)

global_step = tf.train.get_or_create_global_step()

learning_rate = tf.train.exponential_decay(
    learning_rate=0.1,
    global_step=global_step,
    decay_steps=2,
    decay_rate=0.99)

optimizer = tf.train.AdamOptimizer(learning_rate=learning_rate)
train_op = optimizer.minimize(loss, global_step=global_step)
우리는 몇 가지 가사 작업으로 마무리합니다. 모든 변수가 초기화되었음을 TF에 알려야 합니다. 우리가 할 수 있도록 우리는 또한 우리의 TF 변수에 핸들을 만들 print 절차의 각 반복에서 그 값을.
# Initialize all variables.

init_op = tf.initialize_all_variables()
# Grab variable handles for diagnostic purposes.

with tf.variable_scope('make_weights_prior', reuse=True):
  prior_scale = fwd_scale_transform(tf.get_variable(
      name='raw_prior_scale', dtype=dtype))

with tf.variable_scope('make_log_radon_likelihood', reuse=True):
  likelihood_scale = fwd_scale_transform(tf.get_variable(
      name='raw_likelihood_scale', dtype=dtype))
  fixed_effect_weights = tf.get_variable(
      name='fixed_effect_weights', dtype=dtype)
6.3 실행
이 섹션에서는 SAEM TF 그래프를 실행합니다. 여기서 주요 트릭은 HMC 커널의 마지막 드로우를 다음 반복에 제공하는 것입니다. 이것은 우리의 사용을 통해 달성 feed_dict 에서 sess.run 전화.
init_op.run()
w_ = np.zeros([len(log_county_uranium_ppm)], dtype=dtype)
%%time
maxiter = int(1500)
num_accepted = 0
num_drawn = 0
for i in range(maxiter):
  [
      _,
      global_step_,
      loss_,
      posterior_random_weights_,
      kernel_results_,
      step_size_,
      prior_scale_,
      likelihood_scale_,
      fixed_effect_weights_,
  ] = sess.run([
      train_op,
      global_step,
      loss,
      posterior_random_weights,
      kernel_results,
      step_size,
      prior_scale,
      likelihood_scale,
      fixed_effect_weights,
  ], feed_dict={init_random_weights: w_})
  w_ = posterior_random_weights_[-1, :]
  num_accepted += kernel_results_.is_accepted.sum()
  num_drawn += kernel_results_.is_accepted.size
  acceptance_rate = num_accepted / num_drawn
  if i % 100 == 0 or i == maxiter - 1:
    print('global_step:{:>4}  loss:{: 9.3f}  acceptance:{:.4f}  '
          'step_size:{:.4f}  prior_scale:{:.4f}  likelihood_scale:{:.4f}  '
          'fixed_effect_weights:{}'.format(
              global_step_, loss_.mean(), acceptance_rate, step_size_,
              prior_scale_, likelihood_scale_, fixed_effect_weights_))
global_step:   0  loss: 1966.948  acceptance:1.0000  step_size:0.2000  prior_scale:1.0000  likelihood_scale:0.8529  fixed_effect_weights:[ 0.  1.]
global_step: 100  loss: 1165.385  acceptance:0.6205  step_size:0.2040  prior_scale:0.9568  likelihood_scale:0.7611  fixed_effect_weights:[ 1.47523439 -0.66043079]
global_step: 200  loss: 1149.851  acceptance:0.6766  step_size:0.2081  prior_scale:0.7465  likelihood_scale:0.7665  fixed_effect_weights:[ 1.48918796 -0.67058587]
global_step: 300  loss: 1163.464  acceptance:0.6811  step_size:0.2040  prior_scale:0.8445  likelihood_scale:0.7594  fixed_effect_weights:[ 1.46291411 -0.67586178]
global_step: 400  loss: 1158.846  acceptance:0.6808  step_size:0.2081  prior_scale:0.8377  likelihood_scale:0.7574  fixed_effect_weights:[ 1.47349834 -0.68823022]
global_step: 500  loss: 1154.193  acceptance:0.6766  step_size:0.1961  prior_scale:0.8546  likelihood_scale:0.7564  fixed_effect_weights:[ 1.47703862 -0.67521363]
global_step: 600  loss: 1163.903  acceptance:0.6783  step_size:0.2040  prior_scale:0.9491  likelihood_scale:0.7587  fixed_effect_weights:[ 1.48268366 -0.69667786]
global_step: 700  loss: 1163.894  acceptance:0.6767  step_size:0.1961  prior_scale:0.8644  likelihood_scale:0.7617  fixed_effect_weights:[ 1.4719094  -0.66897118]
global_step: 800  loss: 1153.689  acceptance:0.6742  step_size:0.2123  prior_scale:0.8366  likelihood_scale:0.7609  fixed_effect_weights:[ 1.47345769 -0.68343043]
global_step: 900  loss: 1155.312  acceptance:0.6718  step_size:0.2040  prior_scale:0.8633  likelihood_scale:0.7581  fixed_effect_weights:[ 1.47426116 -0.6748783 ]
global_step:1000  loss: 1151.278  acceptance:0.6690  step_size:0.2081  prior_scale:0.8737  likelihood_scale:0.7581  fixed_effect_weights:[ 1.46990883 -0.68891817]
global_step:1100  loss: 1156.858  acceptance:0.6676  step_size:0.2040  prior_scale:0.8716  likelihood_scale:0.7584  fixed_effect_weights:[ 1.47386014 -0.6796245 ]
global_step:1200  loss: 1166.247  acceptance:0.6653  step_size:0.2000  prior_scale:0.8748  likelihood_scale:0.7588  fixed_effect_weights:[ 1.47389269 -0.67626756]
global_step:1300  loss: 1165.263  acceptance:0.6636  step_size:0.2040  prior_scale:0.8771  likelihood_scale:0.7581  fixed_effect_weights:[ 1.47612262 -0.67752427]
global_step:1400  loss: 1158.108  acceptance:0.6640  step_size:0.2040  prior_scale:0.8748  likelihood_scale:0.7587  fixed_effect_weights:[ 1.47534692 -0.6789524 ]
global_step:1499  loss: 1161.030  acceptance:0.6638  step_size:0.1941  prior_scale:0.8738  likelihood_scale:0.7589  fixed_effect_weights:[ 1.47624075 -0.67875224]
CPU times: user 1min 16s, sys: 17.6 s, total: 1min 33s
Wall time: 27.9 s
~1500단계 후에 매개변수 추정치가 안정화된 것 같습니다.
6.4 결과
이제 매개변수를 맞추었으므로 많은 수의 사후 샘플을 생성하고 결과를 연구해 보겠습니다.
%%time
posterior_random_weights_final, kernel_results_final = tfp.mcmc.sample_chain(
    num_results=int(15e3),
    num_burnin_steps=int(1e3),
    current_state=init_random_weights,
    kernel=tfp.mcmc.HamiltonianMonteCarlo(
      target_log_prob_fn=unnormalized_posterior_log_prob,
      num_leapfrog_steps=2,
      step_size=step_size))

[
    posterior_random_weights_final_,
    kernel_results_final_,
] = sess.run([
    posterior_random_weights_final,
    kernel_results_final,
], feed_dict={init_random_weights: w_})
CPU times: user 1min 42s, sys: 26.6 s, total: 2min 8s
Wall time: 35.1 s
print('prior_scale: ', prior_scale_)
print('likelihood_scale: ', likelihood_scale_)
print('fixed_effect_weights: ', fixed_effect_weights_)
print('acceptance rate final: ', kernel_results_final_.is_accepted.mean())
prior_scale:  0.873799
likelihood_scale:  0.758913
fixed_effect_weights:  [ 1.47624075 -0.67875224]
acceptance rate final:  0.7448
우리는 지금 상자와 수염의 다이어그램 구성 \(\beta_c \log(\text{UraniumPPM}_c)\) 임의 효과를. 우리는 카운티 빈도를 감소시켜 무작위 효과를 주문할 것입니다.
x = posterior_random_weights_final_ * log_county_uranium_ppm
I = county_freq[:, 0]
x = x[:, I]
cols = np.array(county_name)[I]
pw = pd.DataFrame(x)
pw.columns = cols

fig, ax = plt.subplots(figsize=(25, 4))
ax = pw.boxplot(rot=80, vert=True);

이 박스 및 위스커 도면에서 우리는 현 수준의 분산 관찰 \(\log(\text{UraniumPPM})\) 군 랜덤 효과 상승이 적은 데이터 집합으로 표현된다. 직관적으로 이것은 의미가 있습니다. 특정 카운티에 대한 증거가 적다면 특정 카운티의 영향에 대해 덜 확신해야 합니다.
7 나란히 비교
이제 세 가지 절차의 결과를 모두 비교합니다. 이를 위해 Stan과 TFP에 의해 생성된 사후 샘플의 비모수 추정치를 계산합니다. 우리는 또한 R의 생산 추정 파라 메트릭 (대략)에 대해 비교합니다 lme4 패키지로 제공된다.
다음 플롯은 미네소타의 각 카운티에 대한 각 가중치의 사후 분포를 보여줍니다. 우리는 스탠 (적색), (파란색) TFP 및 R의에 대한 결과를 보여줍니다 lme4 (주황색). 우리는 Stan과 TFP의 결과를 음영 처리하므로 두 사람이 동의할 때 보라색이 나타날 것으로 예상합니다. 단순성을 위해 우리는 R의 결과를 음영 처리하지 않습니다. 각 서브플롯은 단일 카운티를 나타내며 래스터 스캔 순서(즉, 왼쪽에서 오른쪽으로, 위에서 아래로)의 내림차순 빈도로 정렬됩니다.
nrows = 17
ncols = 5
fig, ax = plt.subplots(nrows, ncols, figsize=(18, 21), sharey=True, sharex=True)
with warnings.catch_warnings():
  warnings.simplefilter('ignore')
  ii = -1
  for r in range(nrows):
    for c in range(ncols):
      ii += 1
      idx = county_freq[ii, 0]
      sns.kdeplot(
          posterior_random_weights_final_[:, idx] * log_county_uranium_ppm[idx],
          color='blue',
          alpha=.3,
          shade=True,
          label='TFP',
          ax=ax[r][c])
      sns.kdeplot(
          posterior_random_weights_final_stan[:, idx] *
          log_county_uranium_ppm[idx],
          color='red',
          alpha=.3,
          shade=True,
          label='Stan/rstanarm',
          ax=ax[r][c])
      sns.kdeplot(
          posterior_random_weights_lme4_final_[:, idx] *
          log_county_uranium_ppm[idx],
          color='#F4B400',
          alpha=.7,
          shade=False,
          label='R/lme4',
          ax=ax[r][c])
      ax[r][c].vlines(
          posterior_random_weights_lme4[idx] * log_county_uranium_ppm[idx],
          0,
          5,
          color='#F4B400',
          linestyle='--')
      ax[r][c].set_title(county_name[idx] + ' ({})'.format(idx), y=.7)
      ax[r][c].set_ylim(0, 5)
      ax[r][c].set_xlim(-1., 1.)
      ax[r][c].get_yaxis().set_visible(False)
      if ii == 2:
        ax[r][c].legend(bbox_to_anchor=(1.4, 1.7), fontsize=20, ncol=3)
      else:
        ax[r][c].legend_.remove()
  fig.subplots_adjust(wspace=0.03, hspace=0.1)
8 결론
이 colab에서는 선형 혼합 효과 회귀 모델을 라돈 데이터 세트에 맞춥니다. R, Stan 및 TensorFlow Probability의 세 가지 소프트웨어 패키지를 시도했습니다. 우리는 세 가지 다른 소프트웨어 패키지에 의해 계산된 85개의 사후 분포를 플로팅하여 결론을 내렸습니다.
부록 A: 대체 라돈 HLM(무작위 가로채기 추가)
이 섹션에서는 각 카운티와 연결된 임의의 가로채기도 있는 대체 HLM에 대해 설명합니다.
\[\begin{align*} \text{for } & c=1\ldots \text{NumCounties}:\\ & \beta_c \sim \text{MultivariateNormal}\left(\text{loc}=\left[ \begin{array}{c} 0 \\ 0 \end{array}\right] , \text{scale}=\left[\begin{array}{cc} \sigma_{11} & 0 \\ \sigma_{12} & \sigma_{22} \end{array}\right] \right) \\ \text{for } & i=1\ldots \text{NumSamples}:\\ & c_i := \text{County}_i \\ &\eta_i = \underbrace{\omega_0 + \omega_1\text{Floor}_i \vphantom{\log( \text{CountyUraniumPPM}_{c_i}))} }_{\text{fixed effects} } + \underbrace{\beta_{c_i,0} + \beta_{c_i,1}\log( \text{CountyUraniumPPM}_{c_i}))}_{\text{random effects} } \\ &\log(\text{Radon}_i) \sim \text{Normal}(\text{loc}=\eta_i , \text{scale}=\sigma) \end{align*}\]
R의에서 lme4 "표기 물결"이 모델은 동일합니다 :
log_radon ~ 1 + floor + (1 + log_county_uranium_ppm | county)
부록 B: 일반화된 선형 혼합 효과 모델
이 섹션에서는 본문에서 사용되는 것보다 계층적 선형 모델의 더 일반적인 특성을 제공합니다. 이 일반적인 모델이 알려져있다 일반화 선형 혼합 효과 모델 (GLMM).
GLMMs의 일반화가있는 일반화 된 선형 모델 (GLMS). GLMM은 샘플 특정 랜덤 노이즈를 예측된 선형 응답에 통합하여 GLM을 확장합니다. 이것은 거의 보이지 않는 기능이 더 일반적으로 보이는 기능과 정보를 공유할 수 있도록 하기 때문에 부분적으로 유용합니다.
생성 과정으로서 일반화 선형 혼합 효과 모델(GLMM)은 다음과 같은 특징이 있습니다.
\begin{align} \text{for } & r = 1\ldots R: \hspace{2.45cm}\text 텍스트 \ & \ \ ETA 난 \ underbrace {\ vphantom {\ 합 {R = 1} ^ R을} = {정렬} 시작 X I ^ \ 가기 \ 오메가} \ 텍스트 {고정 효과} + \ underbrace {\ 합 {R = 1} ^ R z의 {R, I} ^ \ 가기 \ 버전 임을 기억해야 {R, C에 R (I)}} \ 텍스트 {랜덤 효과} \ 및 Y_i | X I \ 오메가 {Z {R, I} \ 베타 R} {R = 1} ^ R \ SIM \ 텍스트 {분포} (\ 텍스트 {평균} = g ^ {- 1} (\ eta_i )) \end{정렬} \end{정렬}
어디:
\begin{align} R &= \text{무작위 효과 그룹의 수}\ |C_r| & = \ 텍스트 {그룹에 대한 카테고리의 번호 \(r\)\ N 및 = \ 텍스트 {트레이닝 샘플의 수} \ x_i로부터 \ 오메가 및 \에서 \ mathbb {R} ^ {D_0} \ D_0 & = \ 텍스트 {} 고정 효과의 수} (그룹 아래 \ C R (I) = \ 텍스트 {카테고리 \(r\)의) \(i\)번째 샘플} \ Z {R, I} \에서 \ mathbb {R} ^ { D_R} \ D 연구 = \ 텍스트 {그룹과 연관된 임의의 효과의 개수 \(r\) ^ {D_R \ 시간 D_R} {S \에서 \ mathbb {R에서} \ \ 시그마 {R} \} S \ succ 0 }\ \eta_i\mapsto g^{-1}(\eta_i) &= \mu_i, \text{역링크 함수}\ \text{Distribution} &=\text{일부 분포는 평균에 의해서만 매개변수화 가능} \ 끝{align}
즉,이 각 그룹의 모든 카테고리가 IID MVN과 연결되어 있다고 \(\beta_{rc}\). 있지만 \(\beta_{rc}\) 립니다 그들은 단지 indentically 그룹에 대한 분산되어, 항상 독립적 인 \(r\); 통지는 정확히 하나가 \(\Sigma_r\) 각 \(r\in\{1,\ldots,R\}\).
affinely 샘플의 그룹의 기능과 결합 \(z_{r,i}\)결과는 시료에 특정 잡음 \(i\)(달리 인 선형 예측 번째 응답 \(x_i^\top\omega\)).
우리가 추정 할 때 \(\{\Sigma_r:r\in\{1,\ldots,R\}\}\) 우리는 본질적으로 다른에 존재하는 신호 익사 것이다 임의 효과 그룹이 수행 잡음의 양을 추정하고 \(x_i^\top\omega\).
에 대한 다양한 옵션이 있습니다 \(\text{Distribution}\) 및 역 링크 기능 , \(g^{-1}\). 일반적인 선택은 다음과 같습니다.
- \(Y_i\sim\text{Normal}(\text{mean}=\eta_i, \text{scale}=\sigma)\),
- \(Y_i\sim\text{Binomial}(\text{mean}=n_i \cdot \text{sigmoid}(\eta_i), \text{total_count}=n_i)\)하고,
- \(Y_i\sim\text{Poisson}(\text{mean}=\exp(\eta_i))\).
더 많은 가능성의 경우, 참조 tfp.glm 모듈을.
