 TensorFlow.org पर देखें TensorFlow.org पर देखें |  Google Colab में चलाएं Google Colab में चलाएं |  GitHub पर स्रोत देखें GitHub पर स्रोत देखें |  नोटबुक डाउनलोड करें नोटबुक डाउनलोड करें |
अव्यक्त चर मॉडल उच्च आयामी डेटा में छिपी संरचना को पकड़ने का प्रयास करते हैं। उदाहरणों में सिद्धांत घटक विश्लेषण (पीसीए) और कारक विश्लेषण शामिल हैं। गाऊसी प्रक्रियाएं "गैर-पैरामीट्रिक" मॉडल हैं जो लचीले ढंग से स्थानीय सहसंबंध संरचना और अनिश्चितता को पकड़ सकती हैं। गाऊसी प्रक्रिया अव्यक्त चर मॉडल ( लॉरेंस, 2004 ) इन अवधारणाओं को जोड़ती है।
पृष्ठभूमि: गाऊसी प्रक्रियाएं
एक गाऊसी प्रक्रिया यादृच्छिक चर का कोई संग्रह है जैसे कि किसी भी परिमित उपसमुच्चय पर सीमांत वितरण एक बहुभिन्नरूपी सामान्य वितरण है। प्रतिगमन के संदर्भ में ग्राम पंचायतों को विस्तार से देखा के लिए, बाहर की जाँच TensorFlow संभावना में गाऊसी प्रक्रिया प्रतिगमन ।
हम एक तथाकथित सूचकांक सेट का उपयोग संग्रह है कि जीपी शामिल में यादृच्छिक चर के प्रत्येक लेबल करने के लिए। एक परिमित सूचकांक सेट के मामले में, हम बस एक बहुभिन्नरूपी सामान्य प्राप्त करते हैं। जीपी के, सबसे दिलचस्प है, हालांकि जब हम अनंत संग्रह पर विचार करें। जैसे सूचकांक सेट के मामले में \(\mathbb{R}^D\), जहाँ हम में प्रत्येक बिंदु के लिए एक यादृच्छिक चर है \(D\)आयामी अंतरिक्ष, जीपी यादृच्छिक कार्यों पर एक वितरण के बारे में सोचा जा सकता है। इस तरह के एक जीपी से एक एकल ड्रा, अगर यह महसूस किया जा सकता है, में हर मुद्दे पर एक (संयुक्त रूप से सामान्य रूप से वितरित) मान असाइन होता \(\mathbb{R}^D\)। इस colab में, हम कुछ अधिक जीपी के पर ध्यान केंद्रित करेंगे\(\mathbb{R}^D\)।
सामान्य वितरण पूरी तरह से उनके पहले और दूसरे क्रम के आँकड़ों से निर्धारित होते हैं - वास्तव में, सामान्य वितरण को परिभाषित करने का एक तरीका यह है कि जिसके उच्च-क्रम के संचयक सभी शून्य हैं। यह जीपी के लिए मामला है, भी है: हम पूरी तरह से मतलब और सहप्रसरण * वर्णन करके एक जीपी निर्दिष्ट करें। याद रखें कि परिमित-आयामी बहुभिन्नरूपी मानदंडों के लिए, माध्य एक सदिश है और सहप्रसरण एक वर्ग, सममित धनात्मक-निश्चित मैट्रिक्स है। अनंत आयामी जीपी में, इन संरचनाओं एक मतलब कार्य करने के लिए सामान्य \(m : \mathbb{R}^D \to \mathbb{R}\), सूचकांक सेट के प्रत्येक बिंदु पर परिभाषित है, और एक सहप्रसरण "कर्नेल" समारोह,\(k : \mathbb{R}^D \times \mathbb{R}^D \to \mathbb{R}\)। कर्नेल समारोह होना आवश्यक है सकारात्मक-निश्चित है, जो अनिवार्य है कि कहते हैं, अंक की एक परिमित सेट तक ही सीमित है, यह एक postiive-निश्चित मैट्रिक्स अर्जित करता है।
GP की अधिकांश संरचना इसके सहप्रसरण कर्नेल फ़ंक्शन से प्राप्त होती है - यह फ़ंक्शन बताता है कि कैसे सैम्पल्ड फ़ंक्शन के मान आस-पास (या न-आस-पास) बिंदुओं में भिन्न होते हैं। विभिन्न सहप्रसरण कार्य विभिन्न डिग्री की चिकनाई को प्रोत्साहित करते हैं। एक आमतौर पर इस्तेमाल किया गिरी समारोह "exponentiated द्विघात" (उर्फ, "गाऊसी", या "रेडियल आधार समारोह" "घातीय चुकता"), है \(k(x, x') = \sigma^2 e^{(x - x^2) / \lambda^2}\)। अन्य उदाहरण डेविड Duvenaud के पर दिए गए हैं गिरी रसोई की किताब पेज विहित पाठ में के रूप में, साथ ही मशीन लर्निंग के लिए गाऊसी प्रक्रियाओं ।
* अनंत सूचकांक सेट के साथ, हमें एक निरंतरता की स्थिति की भी आवश्यकता होती है। चूंकि जीपी की परिभाषा परिमित सीमांत के संदर्भ में है, इसलिए हमें यह आवश्यक होना चाहिए कि ये सीमांत उस क्रम में सुसंगत हों, जिसमें सीमांत लिया जाता है। यह स्टोकेस्टिक प्रक्रियाओं के सिद्धांत में कुछ हद तक उन्नत विषय है, इस ट्यूटोरियल के दायरे से बाहर है; यह कहने के लिए पर्याप्त है कि चीजें अंत में ठीक हो जाती हैं!
जीपी लागू करना: प्रतिगमन और अव्यक्त चर मॉडल
एक तरह से हम जीपी उपयोग कर सकते हैं प्रतिगमन के लिए है: आदानों के रूप में मनाया डेटा के एक झुंड दिया \(\{x_i\}_{i=1}^N\) (सूचकांक सेट के तत्वों) और टिप्पणियों\(\{y_i\}_{i=1}^N\), हम इन एक नया पर पीछे भविष्य कहनेवाला वितरण के रूप में उपयोग कर सकते हैं अंक के सेट \(\{x_j^*\}_{j=1}^M\)। के बाद से वितरण सभी गाऊसी कर रहे हैं, यह कुछ सरल रेखीय बीजगणित करने पर निर्भर करता है (लेकिन ध्यान दें: अपेक्षित संगणना डेटा बिंदुओं की संख्या में क्रम घन है और डेटा बिंदुओं की संख्या में अंतरिक्ष द्विघात की आवश्यकता होती है - इस में एक प्रमुख सीमित कारक है जीपी का उपयोग और अधिक वर्तमान शोध सटीक पश्च अनुमान के लिए कम्प्यूटेशनल रूप से व्यवहार्य विकल्पों पर केंद्रित है)। हम में और अधिक विस्तार में जीपी प्रतिगमन कवर TFP colab में जीपी प्रतिगमन ।
एक और तरीका है कि हम जीपी का उपयोग एक गुप्त चर मॉडल के रूप में कर सकते हैं: उच्च-आयामी अवलोकनों (उदाहरण के लिए, छवियों) के संग्रह को देखते हुए, हम कुछ निम्न-आयामी गुप्त संरचना को प्रस्तुत कर सकते हैं। हम मानते हैं कि, गुप्त संरचना पर सशर्त, बड़ी संख्या में आउटपुट (छवि में पिक्सेल) एक दूसरे से स्वतंत्र हैं। इस मॉडल में प्रशिक्षण के होते हैं
- मॉडल मापदंडों का अनुकूलन (कर्नेल फ़ंक्शन मापदंडों के साथ-साथ, जैसे, अवलोकन शोर विचरण), और
- प्रत्येक प्रशिक्षण अवलोकन (छवि) के लिए, सूचकांक सेट में एक संबंधित बिंदु स्थान खोजना। डेटा के सीमांत लॉग संभावना को अधिकतम करके सभी अनुकूलन किए जा सकते हैं।
आयात
import numpy as np
import tensorflow.compat.v2 as tf
tf.enable_v2_behavior()
import tensorflow_probability as tfp
tfd = tfp.distributions
tfk = tfp.math.psd_kernels
%pylab inline
Populating the interactive namespace from numpy and matplotlib
MNIST डेटा लोड करें
# Load the MNIST data set and isolate a subset of it.
(x_train, y_train), (_, _) = tf.keras.datasets.mnist.load_data()
N = 1000
small_x_train = x_train[:N, ...].astype(np.float64) / 256.
small_y_train = y_train[:N]
Downloading data from https://storage.googleapis.com/tensorflow/tf-keras-datasets/mnist.npz
11493376/11490434 [==============================] - 0s 0us/step
11501568/11490434 [==============================] - 0s 0us/step
प्रशिक्षित करने योग्य चर तैयार करें
हम संयुक्त रूप से 3 मॉडल मापदंडों के साथ-साथ गुप्त इनपुट का प्रशिक्षण देंगे।
# Create some trainable model parameters. We will constrain them to be strictly
# positive when constructing the kernel and the GP.
unconstrained_amplitude = tf.Variable(np.float64(1.), name='amplitude')
unconstrained_length_scale = tf.Variable(np.float64(1.), name='length_scale')
unconstrained_observation_noise = tf.Variable(np.float64(1.), name='observation_noise')
# We need to flatten the images and, somewhat unintuitively, transpose from
# shape [100, 784] to [784, 100]. This is because the 784 pixels will be
# treated as *independent* conditioned on the latent inputs, meaning we really
# have a batch of 784 GP's with 100 index_points.
observations_ = small_x_train.reshape(N, -1).transpose()

# Create a collection of N 2-dimensional index points that will represent our
# latent embeddings of the data. (Lawrence, 2004) prescribes initializing these
# with PCA, but a random initialization actually gives not-too-bad results, so
# we use this for simplicity. For a fun exercise, try doing the
# PCA-initialization yourself!
init_ = np.random.normal(size=(N, 2))
latent_index_points = tf.Variable(init_, name='latent_index_points')
मॉडल और प्रशिक्षण संचालन का निर्माण
# Create our kernel and GP distribution
EPS = np.finfo(np.float64).eps

def create_kernel():
  amplitude = tf.math.softplus(EPS + unconstrained_amplitude)
  length_scale = tf.math.softplus(EPS + unconstrained_length_scale)
  kernel = tfk.ExponentiatedQuadratic(amplitude, length_scale)
  return kernel

def loss_fn():
  observation_noise_variance = tf.math.softplus(
      EPS + unconstrained_observation_noise)
  gp = tfd.GaussianProcess(
      kernel=create_kernel(),
      index_points=latent_index_points,
      observation_noise_variance=observation_noise_variance)
  log_probs = gp.log_prob(observations_, name='log_prob')
  return -tf.reduce_mean(log_probs)

trainable_variables = [unconstrained_amplitude,
                       unconstrained_length_scale,
                       unconstrained_observation_noise,
                       latent_index_points]

optimizer = tf.optimizers.Adam(learning_rate=1.0)

@tf.function(autograph=False, jit_compile=True)
def train_model():
  with tf.GradientTape() as tape:
    loss_value = loss_fn()
  grads = tape.gradient(loss_value, trainable_variables)
  optimizer.apply_gradients(zip(grads, trainable_variables))
  return loss_value
परिणामी गुप्त एम्बेडिंग को प्रशिक्षित और प्लॉट करें
# Initialize variables and train!
num_iters = 100
log_interval = 20
lips = np.zeros((num_iters, N, 2), np.float64)
for i in range(num_iters):
  loss = train_model()
  lips[i] = latent_index_points.numpy()
  if i % log_interval == 0 or i + 1 == num_iters:
    print("Loss at step %d: %f" % (i, loss))
Loss at step 0: 1108.121688
Loss at step 20: -159.633761
Loss at step 40: -263.014394
Loss at step 60: -283.713056
Loss at step 80: -288.709413
Loss at step 99: -289.662253
प्लॉट परिणाम
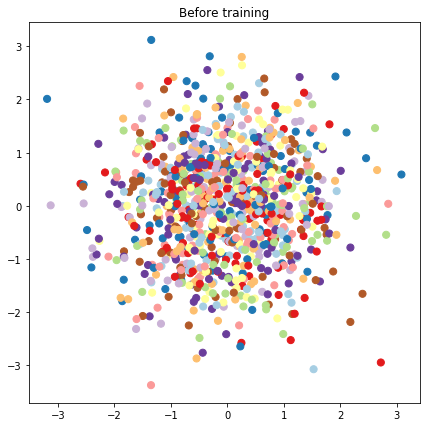
# Plot the latent locations before and after training
plt.figure(figsize=(7, 7))
plt.title("Before training")
plt.grid(False)
plt.scatter(x=init_[:, 0], y=init_[:, 1],
           c=y_train[:N], cmap=plt.get_cmap('Paired'), s=50)
plt.show()

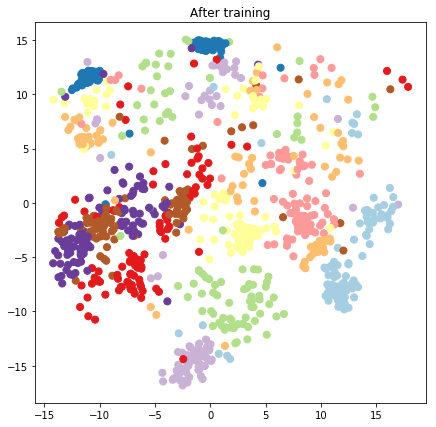
plt.figure(figsize=(7, 7))
plt.title("After training")
plt.grid(False)
plt.scatter(x=lips[-1, :, 0], y=lips[-1, :, 1],
           c=y_train[:N], cmap=plt.get_cmap('Paired'), s=50)
plt.show()


प्रेडिक्टिव मॉडल और सैंपलिंग ऑप्स का निर्माण
# We'll draw samples at evenly spaced points on a 10x10 grid in the latent
# input space.
sample_grid_points = 10
grid_ = np.linspace(-4, 4, sample_grid_points).astype(np.float64)
# Create a 10x10 grid of 2-vectors, for a total shape [10, 10, 2]
grid_ = np.stack(np.meshgrid(grid_, grid_), axis=-1)

# This part's a bit subtle! What we defined above was a batch of 784 (=28x28)
# independent GP distributions over the input space. Each one corresponds to a
# single pixel of an MNIST image. Now what we'd like to do is draw 100 (=10x10)
# *independent* samples, each one separately conditioned on all the observations
# as well as the learned latent input locations above.
#
# The GP regression model below will define a batch of 784 independent
# posteriors. We'd like to get 100 independent samples each at a different
# latent index point. We could loop over the points in the grid, but that might
# be a bit slow. Instead, we can vectorize the computation by tacking on *even
# more* batch dimensions to our GaussianProcessRegressionModel distribution.
# In the below grid_ shape, we have concatentaed
#   1. batch shape: [sample_grid_points, sample_grid_points, 1]
#   2. number of examples: [1]
#   3. number of latent input dimensions: [2]
# The `1` in the batch shape will broadcast with 784. The final result will be
# samples of shape [10, 10, 784, 1]. The `1` comes from the "number of examples"
# and we can just `np.squeeze` it off.
grid_ = grid_.reshape(sample_grid_points, sample_grid_points, 1, 1, 2)

# Create the GPRegressionModel instance which represents the posterior
# predictive at the grid of new points.
gprm = tfd.GaussianProcessRegressionModel(
    kernel=create_kernel(),
    # Shape [10, 10, 1, 1, 2]
    index_points=grid_,
    # Shape [1000, 2]. 1000 2 dimensional vectors.
    observation_index_points=latent_index_points,
    # Shape [784, 1000]. A batch of 784 1000-dimensional observations.
    observations=observations_)
डेटा और गुप्त एम्बेडिंग पर वातानुकूलित नमूने बनाएं
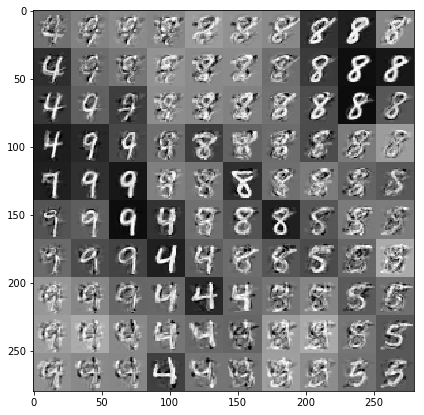
हम गुप्त स्थान में 2-डी ग्रिड पर 100 बिंदुओं पर नमूना लेते हैं।
samples = gprm.sample()

# Plot the grid of samples at new points. We do a bit of tweaking of the samples
# first, squeezing off extra 1-shapes and normalizing the values.
samples_ = np.squeeze(samples.numpy())
samples_ = ((samples_ -
             samples_.min(-1, keepdims=True)) /
            (samples_.max(-1, keepdims=True) -
             samples_.min(-1, keepdims=True)))
samples_ = samples_.reshape(sample_grid_points, sample_grid_points, 28, 28)
samples_ = samples_.transpose([0, 2, 1, 3])
samples_ = samples_.reshape(28 * sample_grid_points, 28 * sample_grid_points)
plt.figure(figsize=(7, 7))
ax = plt.subplot()
ax.grid(False)
ax.imshow(-samples_, interpolation='none', cmap='Greys')
plt.show()

निष्कर्ष
हमने गाऊसी प्रक्रिया गुप्त चर मॉडल का एक संक्षिप्त दौरा किया है, और दिखाया है कि हम इसे टीएफ और टीएफ संभावना कोड की कुछ पंक्तियों में कैसे कार्यान्वित कर सकते हैं।
