
グラフィックス処理装置(GPU)を使用して機械学習(ML)モデルを実行すると、モデルのパフォーマンスと ML 対応アプリケーションのユーザーエクスペリエンスが大幅に向上します。iOS デバイスでは、デリゲートを使用して GPU で高速化されたモデルの実行を有効にできます。デリゲートは TensorFlow Lite のハードウェアドライバーとして機能し、モデルのコードを GPU プロセッサで実行できるようにします。
このページでは、iOS アプリで TensorFlow Lite モデルの GPU アクセラレーションを有効にする方法について説明します。ベストプラクティスや高度な手法など、TensorFlow Lite の GPU デリゲートの使用に関する詳細については、GPU デリゲートのページを参照してください。
Interpreter API による GPU の使用
TensorFlow Lite Interpreter API は、機械学習アプリケーションをビルドするための一連の汎用 API を提供します。次の手順では、GPU サポートを iOS アプリに追加する方法について説明します。このガイドは、TensorFlow Lite で ML モデルを正常に実行できる iOS アプリが既にあることを前提としています。
注意: TensorFlow Lite を使用する iOS アプリをまだお持ちでない場合は、iOS クイックスタートに従ってデモアプリをビルドしてください。チュートリアルを完了したら、これらの手順に従って GPU サポートを有効にできます。
Podfile を変更して GPU サポートを追加
TensorFlow Lite 2.3.0 リリース以降は、バイナリサイズを減らすために GPU デリゲートがポッドから除外されていますが、TensorFlowLiteSwift ポッドのサブスペックを指定して含めることができます。
pod 'TensorFlowLiteSwift/Metal', '~> 0.0.1-nightly',
または
pod 'TensorFlowLiteSwift', '~> 0.0.1-nightly', :subspecs => ['Metal']
Objective-C(2.4.0 リリース以降)または C API を使用する場合は、TensorFlowLiteObjC または TensorFlowLitC を使用することもできます。
注意: TensorFlow Lite バージョン 2.1.0 から 2.2.0 まででは、GPU デリゲートは TensorFlowLiteC ポッドに含まれています。使用するプログラミング言語に応じて、 TensorFlowLiteC と TensorFlowLiteSwift のいずれかを選択できます。
GPU デリゲートの初期化と使用
TensorFlow Lite Interpreter API で GPU デリゲートを使用すると、多くのプログラミング言語を使用できます。Swift と Objective-C が推奨されますが、C++ と C も使用できます。TensorFlow Lite の 2.4 より前のバージョンを使用している場合は、C を使用する必要があります。次のコード例は、これらの各言語でデリゲートを使用する方法の概要を示しています。
Swift
import TensorFlowLite

// Load model ...

// Initialize TensorFlow Lite interpreter with the GPU delegate.
let delegate = MetalDelegate()
if let interpreter = try Interpreter(modelPath: modelPath,
                                      delegates: [delegate]) {
  // Run inference ...
}
Objective-C
// Import module when using CocoaPods with module support
@import TFLTensorFlowLite;

// Or import following headers manually
#import "tensorflow/lite/objc/apis/TFLMetalDelegate.h"
#import "tensorflow/lite/objc/apis/TFLTensorFlowLite.h"

// Initialize GPU delegate
TFLMetalDelegate* metalDelegate = [[TFLMetalDelegate alloc] init];

// Initialize interpreter with model path and GPU delegate
TFLInterpreterOptions* options = [[TFLInterpreterOptions alloc] init];
NSError* error = nil;
TFLInterpreter* interpreter = [[TFLInterpreter alloc]
                                initWithModelPath:modelPath
                                          options:options
                                        delegates:@[ metalDelegate ]
                                            error:&error];
if (error != nil) { /* Error handling... */ }

if (![interpreter allocateTensorsWithError:&error]) { /* Error handling... */ }
if (error != nil) { /* Error handling... */ }

// Run inference ...
C++
// Set up interpreter.
auto model = FlatBufferModel::BuildFromFile(model_path);
if (!model) return false;
tflite::ops::builtin::BuiltinOpResolver op_resolver;
std::unique_ptr<Interpreter> interpreter;
InterpreterBuilder(*model, op_resolver)(&interpreter);

// Prepare GPU delegate.
auto* delegate = TFLGpuDelegateCreate(/*default options=*/nullptr);
if (interpreter->ModifyGraphWithDelegate(delegate) != kTfLiteOk) return false;

// Run inference.
WriteToInputTensor(interpreter->typed_input_tensor<float>(0));
if (interpreter->Invoke() != kTfLiteOk) return false;
ReadFromOutputTensor(interpreter->typed_output_tensor<float>(0));

// Clean up.
TFLGpuDelegateDelete(delegate);
C(2.4.0 より前)
#include "tensorflow/lite/c/c_api.h"
#include "tensorflow/lite/delegates/gpu/metal_delegate.h"

// Initialize model
TfLiteModel* model = TfLiteModelCreateFromFile(model_path);

// Initialize interpreter with GPU delegate
TfLiteInterpreterOptions* options = TfLiteInterpreterOptionsCreate();
TfLiteDelegate* delegate = TFLGPUDelegateCreate(nil);  // default config
TfLiteInterpreterOptionsAddDelegate(options, metal_delegate);
TfLiteInterpreter* interpreter = TfLiteInterpreterCreate(model, options);
TfLiteInterpreterOptionsDelete(options);

TfLiteInterpreterAllocateTensors(interpreter);

NSMutableData *input_data = [NSMutableData dataWithLength:input_size * sizeof(float)];
NSMutableData *output_data = [NSMutableData dataWithLength:output_size * sizeof(float)];
TfLiteTensor* input = TfLiteInterpreterGetInputTensor(interpreter, 0);
const TfLiteTensor* output = TfLiteInterpreterGetOutputTensor(interpreter, 0);

// Run inference
TfLiteTensorCopyFromBuffer(input, inputData.bytes, inputData.length);
TfLiteInterpreterInvoke(interpreter);
TfLiteTensorCopyToBuffer(output, outputData.mutableBytes, outputData.length);

// Clean up
TfLiteInterpreterDelete(interpreter);
TFLGpuDelegateDelete(metal_delegate);
TfLiteModelDelete(model);
GPU API 言語の使用上の注意
- 2.4.0 より前の TensorFlow Lite バージョンでは、Objective-C 用の C API のみを使用できます。
- C++ API は、bazel を使用している場合、または TensorFlow Lite を自分でビルドしている場合にのみ使用できます。C++ API は CocoaPods では使用できません。
- C++ を使用した GPU デリゲートで TensorFlow Lite を使用する場合、
TFLGpuDelegateCreate()関数を介して GPU デリゲートを取得し、Interpreter::AllocateTensors()を呼び出す代わりに、Interpreter::ModifyGraphWithDelegate()に渡します。
リリースモードでのビルドとテスト
適切な Metal API アクセラレータ設定でリリースビルドに変更して、パフォーマンスを向上させ、最終テストを行います。このセクションでは、リリースビルドを有効にして、Metal アクセラレーションの設定を構成する方法について説明します。
注意: これらの手順には、XCode v10.1 以降が必要です。
リリースビルドに変更するには、以下の手順を実行します。
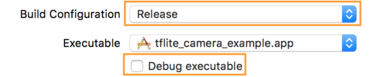
- Product > Scheme > Edit Scheme... を選択し、Run を選択して、ビルド設定を編集します。
- Info タブで、Build Configuration を Release に変更し、Debug executable のチェックを外します。
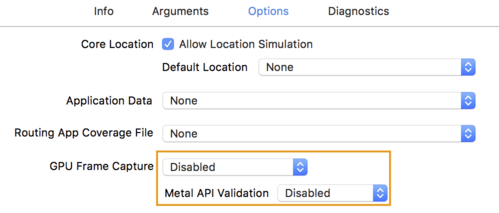
- Options タブをクリックし、GPU Frame Capture を Disabled に変更し、Metal API Validation を Disabled に変更します。
- 64 ビットアーキテクチャのリリース専用ビルドを選択してください。Project navigator > tflite_camera_example > PROJECT > your_project_name > Build Settings で Build Active Architecture Only > Release を Yes に設定します。

高度な GPU サポート
このセクションでは、デリゲートオプション、入力および出力バッファ、量子化モデルの使用など、iOS の GPU デリゲートの高度な使用法について説明します。
iOS のデリゲートオプション
GPU デリゲートのコンストラクタは、Swift API、Objective-C API、C API のオプションの struct を受け入れます。初期化子に nullptr を渡す(C API)か、または何も渡さない(Objective-C および Swift API)ことにより、デフォルトオプション(上記の基本的な使用例で説明されています)が設定されます。
Swift
// THIS:
var options = MetalDelegate.Options()
options.isPrecisionLossAllowed = false
options.waitType = .passive
options.isQuantizationEnabled = true
let delegate = MetalDelegate(options: options)

// IS THE SAME AS THIS:
let delegate = MetalDelegate()
Objective-C
// THIS:
TFLMetalDelegateOptions* options = [[TFLMetalDelegateOptions alloc] init];
options.precisionLossAllowed = false;
options.waitType = TFLMetalDelegateThreadWaitTypePassive;
options.quantizationEnabled = true;

TFLMetalDelegate* delegate = [[TFLMetalDelegate alloc] initWithOptions:options];

// IS THE SAME AS THIS:
TFLMetalDelegate* delegate = [[TFLMetalDelegate alloc] init];
C
// THIS:
const TFLGpuDelegateOptions options = {
  .allow_precision_loss = false,
  .wait_type = TFLGpuDelegateWaitType::TFLGpuDelegateWaitTypePassive,
  .enable_quantization = true,
};

TfLiteDelegate* delegate = TFLGpuDelegateCreate(options);

// IS THE SAME AS THIS:
TfLiteDelegate* delegate = TFLGpuDelegateCreate(nullptr);
ヒント: nullptr またはデフォルトコンストラクタを使用すると便利ですが、将来デフォルト値が変更された場合に予期しない動作が発生しないように、オプションを明示的に設定する必要があります。
C++ API を使用した入出力バッファ
GPU での計算では、データが GPU で利用可能である必要があります。この要件は、多くの場合、メモリコピーを実行する必要があることを意味します。かなりの時間がかかる可能性があるため、データが CPU/GPU メモリの境界を超えることは可能な限り避ける必要があります。通常、このような交差は避けられませんが、特殊なケースではどちらか一方を省略できます。
注意: 次の手法は、Bazel を使用している場合、または TensorFlow Lite を自分でビルドしている場合にのみ使用できます。C++ API は CocoaPods では使用できません。
ネットワークの入力が GPU メモリに既に読み込まれている画像(たとえば、カメラフィードを含む GPU テクスチャ)である場合、CPU メモリに読み込むことなく、GPU メモリに保持できます。また、ネットワークの出力がレンダリング可能な画像(たとえば、画像スタイルの転送)の形式である場合は、画面に直接表示できます。
TensorFlow Lite では、最高のパフォーマンスを実現するために、TensorFlow ハードウェアバッファから直接読み書きできるので、回避可能なメモリコピーをバイパスできます。
画像入力が GPU メモリにある場合、最初に Metal の MTLBuffer オブジェクトに変換する必要があります。TFLGpuDelegateBindMetalBufferToTensor()関数を使用して、MTLBuffer をユーザーが準備した TfLiteTensor に関連付けることができます。この関数は Interpreter::ModifyGraphWithDelegate() 後に呼び出す必要があることに注意してください。さらに、推論出力はデフォルトで GPU メモリから CPU メモリにコピーされます。初期化中に Interpreter::SetAllowBufferHandleOutput(true) を呼び出すことで、この動作を無効にできます。
C++
#include "tensorflow/lite/delegates/gpu/metal_delegate.h"
#include "tensorflow/lite/delegates/gpu/metal_delegate_internal.h"

// ...

// Prepare GPU delegate.
auto* delegate = TFLGpuDelegateCreate(nullptr);

if (interpreter->ModifyGraphWithDelegate(delegate) != kTfLiteOk) return false;

interpreter->SetAllowBufferHandleOutput(true);  // disable default gpu->cpu copy
if (!TFLGpuDelegateBindMetalBufferToTensor(
        delegate, interpreter->inputs()[0], user_provided_input_buffer)) {
  return false;
}
if (!TFLGpuDelegateBindMetalBufferToTensor(
        delegate, interpreter->outputs()[0], user_provided_output_buffer)) {
  return false;
}

// Run inference.
if (interpreter->Invoke() != kTfLiteOk) return false;
デフォルトの動作を無効にすると、推論出力を GPU メモリから CPU メモリにコピーするには、出力テンソルごとに Interpreter::EnsureTensorDataIsReadable() を明示的に呼び出す必要があります。このアプローチは量子化されたモデルでも機能しますが、バッファが内部の非量子化バッファにバインドされているため、float32 データで float32 サイズのバッファを使用する必要があります。
量子化モデル
iOS GPU デリゲートライブラリは、デフォルトで量子化モデルをサポートします。 GPU デリゲートで量子化モデルを使用するためにコードを変更する必要はありません。次のセクションでは、テストまたは実験目的で量子化サポートを無効にする方法について説明します。
量子化モデルのサポートの無効化
次のコードは、量子化されたモデルのサポートを無効にする方法を示しています。
Swift
    var options = MetalDelegate.Options()
    options.isQuantizationEnabled = false
    let delegate = MetalDelegate(options: options)
Objective-C
    TFLMetalDelegateOptions* options = [[TFLMetalDelegateOptions alloc] init];
    options.quantizationEnabled = false;
C
    TFLGpuDelegateOptions options = TFLGpuDelegateOptionsDefault();
    options.enable_quantization = false;

    TfLiteDelegate* delegate = TFLGpuDelegateCreate(options);
GPU アクセラレーションを使用した量子化モデルの実行の詳細については、GPU デリゲートの概要を参照してください。