 مشاهده در TensorFlow.org مشاهده در TensorFlow.org |  در Google Colab اجرا شود در Google Colab اجرا شود |  در GitHub مشاهده کنید در GitHub مشاهده کنید |  دانلود دفترچه یادداشت دانلود دفترچه یادداشت |  مدل TF Hub را ببینید مدل TF Hub را ببینید |
این Colab استفاده از یک ماژول TF Hub بر اساس یک شبکه متخاصم مولد (GAN) را نشان می دهد. این ماژول از بردارهای N بعدی، که فضای پنهان نامیده می شود، به تصاویر RGB نگاشت می شود.
دو مثال ارائه شده است:
- نقشه برداری از فضا نهفته به تصاویر، و
- با توجه به یک تصویر مورد نظر، با استفاده از گرادیان نزولی برای پیدا کردن یک بردار نهفته است که به تولید یک تصویر مشابه تصویر هدف.
پیش نیازهای اختیاری
- آشنایی با سطح پایین مفاهیم Tensorflow .
- شبکه خصمانه زایشی در ویکیپدیا.
- مقاله در گانز پیشرو: پیشرو در حال رشد گانز برای بهبود کیفیت، ثبات، و تنوع .
مدل های بیشتر
در اینجا شما می توانید تمام مدل های حال حاضر در میزبانی پیدا tfhub.dev که می تواند تصاویر را تولید کند.
برپایی
# Install imageio for creating animations.pip -q install imageiopip -q install scikit-imagepip install git+https://github.com/tensorflow/docs
واردات و تعاریف عملکرد
from absl import logging

import imageio
import PIL.Image
import matplotlib.pyplot as plt
import numpy as np

import tensorflow as tf
tf.random.set_seed(0)

import tensorflow_hub as hub
from tensorflow_docs.vis import embed
import time

try:
  from google.colab import files
except ImportError:
  pass

from IPython import display
from skimage import transform

# We could retrieve this value from module.get_input_shapes() if we didn't know
# beforehand which module we will be using.
latent_dim = 512


# Interpolates between two vectors that are non-zero and don't both lie on a
# line going through origin. First normalizes v2 to have the same norm as v1.
# Then interpolates between the two vectors on the hypersphere.
def interpolate_hypersphere(v1, v2, num_steps):
  v1_norm = tf.norm(v1)
  v2_norm = tf.norm(v2)
  v2_normalized = v2 * (v1_norm / v2_norm)

  vectors = []
  for step in range(num_steps):
    interpolated = v1 + (v2_normalized - v1) * step / (num_steps - 1)
    interpolated_norm = tf.norm(interpolated)
    interpolated_normalized = interpolated * (v1_norm / interpolated_norm)
    vectors.append(interpolated_normalized)
  return tf.stack(vectors)

# Simple way to display an image.
def display_image(image):
  image = tf.constant(image)
  image = tf.image.convert_image_dtype(image, tf.uint8)
  return PIL.Image.fromarray(image.numpy())

# Given a set of images, show an animation.
def animate(images):
  images = np.array(images)
  converted_images = np.clip(images * 255, 0, 255).astype(np.uint8)
  imageio.mimsave('./animation.gif', converted_images)
  return embed.embed_file('./animation.gif')

logging.set_verbosity(logging.ERROR)
درون یابی فضای پنهان
بردارهای تصادفی
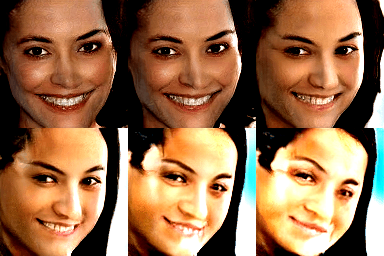
درونیابی فضای پنهان بین دو بردار به طور تصادفی اولیه. ما یک TF توپی ماژول استفاده خواهد کرد progan-128 است که شامل یک پیشرو GAN-پیش آموزش داده است.
progan = hub.load("https://tfhub.dev/google/progan-128/1").signatures['default']
def interpolate_between_vectors():
  v1 = tf.random.normal([latent_dim])
  v2 = tf.random.normal([latent_dim])

  # Creates a tensor with 25 steps of interpolation between v1 and v2.
  vectors = interpolate_hypersphere(v1, v2, 50)

  # Uses module to generate images from the latent space.
  interpolated_images = progan(vectors)['default']

  return interpolated_images

interpolated_images = interpolate_between_vectors()
animate(interpolated_images)

یافتن نزدیکترین بردار در فضای نهفته
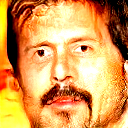
تصحیح یک تصویر هدف به عنوان مثال از یک تصویر تولید شده از ماژول استفاده کنید یا تصویر خود را آپلود کنید.
image_from_module_space = True  # @param { isTemplate:true, type:"boolean" }

def get_module_space_image():
  vector = tf.random.normal([1, latent_dim])
  images = progan(vector)['default'][0]
  return images

def upload_image():
  uploaded = files.upload()
  image = imageio.imread(uploaded[list(uploaded.keys())[0]])
  return transform.resize(image, [128, 128])

if image_from_module_space:
  target_image = get_module_space_image()
else:
  target_image = upload_image()

display_image(target_image)

پس از تعریف یک تابع از دست دادن بین تصویر هدف و تصویر تولید شده توسط یک متغیر فضای پنهان، میتوانیم از گرادیان نزول برای یافتن مقادیر متغیری استفاده کنیم که تلفات را به حداقل میرساند.
tf.random.set_seed(42)
initial_vector = tf.random.normal([1, latent_dim])
display_image(progan(initial_vector)['default'][0])

def find_closest_latent_vector(initial_vector, num_optimization_steps,
                               steps_per_image):
  images = []
  losses = []

  vector = tf.Variable(initial_vector)
  optimizer = tf.optimizers.Adam(learning_rate=0.01)
  loss_fn = tf.losses.MeanAbsoluteError(reduction="sum")

  for step in range(num_optimization_steps):
    if (step % 100)==0:
      print()
    print('.', end='')
    with tf.GradientTape() as tape:
      image = progan(vector.read_value())['default'][0]
      if (step % steps_per_image) == 0:
        images.append(image.numpy())
      target_image_difference = loss_fn(image, target_image[:,:,:3])
      # The latent vectors were sampled from a normal distribution. We can get
      # more realistic images if we regularize the length of the latent vector to
      # the average length of vector from this distribution.
      regularizer = tf.abs(tf.norm(vector) - np.sqrt(latent_dim))

      loss = target_image_difference + regularizer
      losses.append(loss.numpy())
    grads = tape.gradient(loss, [vector])
    optimizer.apply_gradients(zip(grads, [vector]))

  return images, losses


num_optimization_steps=200
steps_per_image=5
images, loss = find_closest_latent_vector(initial_vector, num_optimization_steps, steps_per_image)
....................................................................................................
....................................................................................................
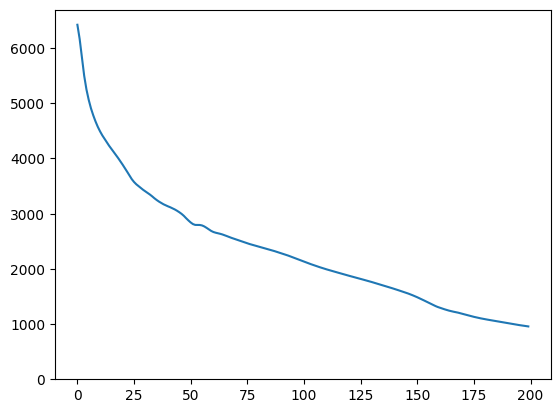
plt.plot(loss)
plt.ylim([0,max(plt.ylim())])
(0.0, 6696.301751708985)

animate(np.stack(images))

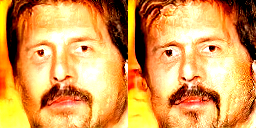
نتیجه را با هدف مقایسه کنید:
display_image(np.concatenate([images[-1], target_image], axis=1))

بازی با مثال بالا
اگر تصویر از فضای ماژول باشد، فرود سریع است و به یک نمونه معقول همگرا می شود. سعی کنید از نزولی به یک تصویر است که از فضا ماژول نیست. فرود تنها در صورتی همگرا می شود که تصویر به طور منطقی به فضای تصاویر آموزشی نزدیک باشد.
چگونه می توان آن را سریعتر و به تصویر واقعی تری فرود آورد؟ می توان امتحان کرد:
- استفاده از تلفات مختلف در تفاوت تصویر، به عنوان مثال درجه دوم،
- با استفاده از تنظیم کننده های مختلف بر روی بردار نهفته،
- مقداردهی اولیه از یک بردار تصادفی در اجراهای متعدد،
- و غیره.
