 TensorFlow.org で表示 TensorFlow.org で表示 |
 Google Colab で実行 Google Colab で実行 |
 GitHub で表示 GitHub で表示 |
 ノートブックをダウンロード ノートブックをダウンロード |
注意: このノートブックでは、pip を用いた Python パッケージのインストールに加え、sudo apt installを使用してシステムパッケージをインストールします。これにはunzipを使います。
この Colab は、非英語/現地語のテキスト分類に Tensorflow Hub を使用したデモンストレーションです。ここではローカル言語として ベンガル語 を選択し、事前トレーニングされた単語埋め込みを使用してベンガル語のニュース記事を 5 つのカテゴリに分類する、マルチクラス分類タスクを解決します。ベンガル語の事前トレーニング済みの単語埋め込みは fastText を使用します。これは Facebook のライブラリで、157 言語の事前トレーニング済みの単語ベクトルが公開されています。
ここでは TF-Hub (TensorFlow Hub) の事前トレーニング済みの埋め込みエクスポート機能を使用して、まず単語埋め込みをテキスト埋め込みモジュールに変換した後、そのモジュールを使用して Tensorflow の使いやすい高レベル API である tf.keras で分類器のトレーニングを行い、ディープラーニングモデルを構築します。ここでは fastText Embedding を使用していますが、他のタスクで事前トレーニングした別の埋め込みをエクスポートし、TensorFlow Hub で素早く結果を得ることも可能です。
セットアップ
# https://github.com/pypa/setuptools/issues/1694#issuecomment-466010982pip install gdown --no-use-pep517
sudo apt-get install -y unzipReading package lists... Building dependency tree... Reading state information... unzip is already the newest version (6.0-25ubuntu1.1). The following packages were automatically installed and are no longer required: libatasmart4 libblockdev-fs2 libblockdev-loop2 libblockdev-part-err2 libblockdev-part2 libblockdev-swap2 libblockdev-utils2 libblockdev2 libparted-fs-resize0 Use 'sudo apt autoremove' to remove them. 0 upgraded, 0 newly installed, 0 to remove and 169 not upgraded.
import os

import tensorflow as tf
import tensorflow_hub as hub

import gdown
import numpy as np
from sklearn.metrics import classification_report
import matplotlib.pyplot as plt
import seaborn as sns
2022-12-14 21:14:33.859463: W tensorflow/compiler/xla/stream_executor/platform/default/dso_loader.cc:64] Could not load dynamic library 'libnvinfer.so.7'; dlerror: libnvinfer.so.7: cannot open shared object file: No such file or directory
2022-12-14 21:14:33.859555: W tensorflow/compiler/xla/stream_executor/platform/default/dso_loader.cc:64] Could not load dynamic library 'libnvinfer_plugin.so.7'; dlerror: libnvinfer_plugin.so.7: cannot open shared object file: No such file or directory
2022-12-14 21:14:33.859564: W tensorflow/compiler/tf2tensorrt/utils/py_utils.cc:38] TF-TRT Warning: Cannot dlopen some TensorRT libraries. If you would like to use Nvidia GPU with TensorRT, please make sure the missing libraries mentioned above are installed properly.
データセット
ここで使用するのは BARD(ベンガル語記事データセット)です。これは、様々なベンガル語のニュースポータルから収集した約 3,76,226 件の記事が、経済、州、国際、スポーツ、エンターテイメントの 5 つのカテゴリに分類されています。ファイルは Google Drive からダウンロードしますが、bit.ly/BARD_DATASET のリンクはこの GitHub リポジトリから参照しています。
gdown.download(
    url='https://drive.google.com/uc?id=1Ag0jd21oRwJhVFIBohmX_ogeojVtapLy',
    output='bard.zip',
    quiet=True
)
'bard.zip'
unzip -qo bard.zip事前トレーニング済み単語ベクトルを TF-Hub モジュールにエクスポートする
TF-Hub には、単語埋め込みを TF-Hubの テキスト埋め込みモジュールに変換する、この便利なスクリプトがあります。export_v2.py と同じディレクトリに単語埋め込み用の .txt または .vec ファイルをダウンロードしてスクリプトを実行するだけで、ベンガル語やその他の言語用のモジュールを作成することができます。
エクスポーターは埋め込みベクトルを読み込んで、Tensorflow の SavedModel にエクスポートします。SavedModel には重みとグラフを含む完全な TensorFlow プログラムが含まれています。TF-Hub は SavedModel をモジュールとして読み込むことができます。モデルを構築には tf.keras を使用するので、ハブモジュールにラッパーを提供する hub.KerasLayer を用いて Keras のレイヤーとして使用します。
まず、fastText から単語埋め込みを、TF-Hub のレポジトリから埋め込みエクスポーターを取得します。
curl -O https://dl.fbaipublicfiles.com/fasttext/vectors-crawl/cc.bn.300.vec.gzcurl -O https://raw.githubusercontent.com/tensorflow/hub/master/examples/text_embeddings_v2/export_v2.pygunzip -qf cc.bn.300.vec.gz --k
% Total    % Received % Xferd  Average Speed   Time    Time     Time  Current
                                 Dload  Upload   Total   Spent    Left  Speed
100  840M  100  840M    0     0  36.3M      0  0:00:23  0:00:23 --:--:-- 40.7M
  % Total    % Received % Xferd  Average Speed   Time    Time     Time  Current
                                 Dload  Upload   Total   Spent    Left  Speed
100  7469  100  7469    0     0  42680      0 --:--:-- --:--:-- --:--:-- 42437
次に、エクスポートスクリプトを埋め込みファイル上で実行します。fastText Embedding にはヘッダ行があり、かなり大きい(ベンガル語でモジュール変換後 3.3GB 程度)ため、ヘッダ行を無視して最初の 100,000 トークンのみをテキスト埋め込みモジュールにエクスポートします。
python export_v2.py --embedding_file=cc.bn.300.vec --export_path=text_module --num_lines_to_ignore=1 --num_lines_to_use=1000002022-12-14 21:15:51.442482: W tensorflow/compiler/xla/stream_executor/platform/default/dso_loader.cc:64] Could not load dynamic library 'libnvinfer.so.7'; dlerror: libnvinfer.so.7: cannot open shared object file: No such file or directory 2022-12-14 21:15:51.442587: W tensorflow/compiler/xla/stream_executor/platform/default/dso_loader.cc:64] Could not load dynamic library 'libnvinfer_plugin.so.7'; dlerror: libnvinfer_plugin.so.7: cannot open shared object file: No such file or directory 2022-12-14 21:15:51.442598: W tensorflow/compiler/tf2tensorrt/utils/py_utils.cc:38] TF-TRT Warning: Cannot dlopen some TensorRT libraries. If you would like to use Nvidia GPU with TensorRT, please make sure the missing libraries mentioned above are installed properly. INFO:tensorflow:Assets written to: text_module/assets I1214 21:16:06.572780 140166311728960 builder_impl.py:797] Assets written to: text_module/assets
module_path = "text_module"
embedding_layer = hub.KerasLayer(module_path, trainable=False)
WARNING:tensorflow:Please fix your imports. Module tensorflow.python.training.tracking.data_structures has been moved to tensorflow.python.trackable.data_structures. The old module will be deleted in version 2.11.
テキスト埋め込みモジュールは、文字列の 1 次元テンソル内の文のバッチを入力として受け取り、文に対応する形状の埋め込みベクトル (batch_size, embedding_dim) を出力します。これは入力をスペースで分割して、前処理を行います。単語埋め込みは sqrtn コンバイナ(こちらを参照)を使用して文の埋め込みに結合されます。これの実演として、ベンガル語の単語リストを入力として渡し、対応する埋め込みベクトルを取得します。
embedding_layer(['বাস', 'বসবাস', 'ট্রেন', 'যাত্রী', 'ট্রাক'])
<tf.Tensor: shape=(5, 300), dtype=float64, numpy=
array([[ 0.0462, -0.0355,  0.0129, ...,  0.0025, -0.0966,  0.0216],
       [-0.0631, -0.0051,  0.085 , ...,  0.0249, -0.0149,  0.0203],
       [ 0.1371, -0.069 , -0.1176, ...,  0.029 ,  0.0508, -0.026 ],
       [ 0.0532, -0.0465, -0.0504, ...,  0.02  , -0.0023,  0.0011],
       [ 0.0908, -0.0404, -0.0536, ..., -0.0275,  0.0528,  0.0253]])>
Tensorflow Dataset を変換する
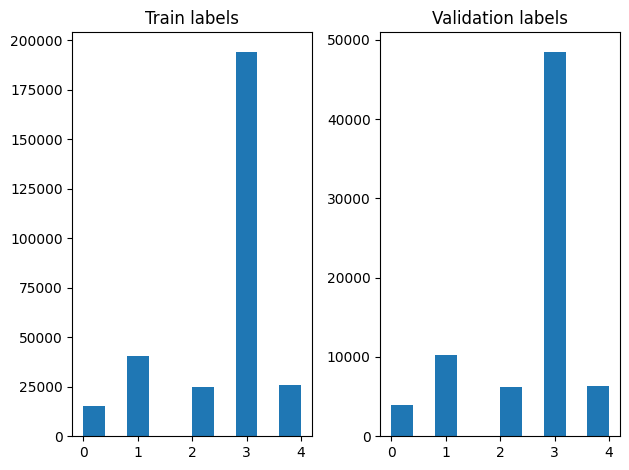
データセットが非常に大きいため、データセット全体をメモリに読み込むのではなく、Tensorflow Dataset の関数を利用してジェネレータを使用し、実行時にサンプルをバッチで生成します。また、データセットは非常にバランスが悪いので、ジェネレータを使用する前にデータセットをシャッフルします。
dir_names = ['economy', 'sports', 'entertainment', 'state', 'international']

file_paths = []
labels = []
for i, dir in enumerate(dir_names):
  file_names = ["/".join([dir, name]) for name in os.listdir(dir)]
  file_paths += file_names
  labels += [i] * len(os.listdir(dir))

np.random.seed(42)
permutation = np.random.permutation(len(file_paths))

file_paths = np.array(file_paths)[permutation]
labels = np.array(labels)[permutation]
シャッフル後には、トレーニング例と検証例のラベルの分布を確認することができます。
train_frac = 0.8
train_size = int(len(file_paths) * train_frac)
# plot training vs validation distribution
plt.subplot(1, 2, 1)
plt.hist(labels[0:train_size])
plt.title("Train labels")
plt.subplot(1, 2, 2)
plt.hist(labels[train_size:])
plt.title("Validation labels")
plt.tight_layout()

ジェネレータを使用して Datasete を作成するには、まず file_paths から各項目を、ラベル配列からラベルを読み込むジェネレータ関数を書き込み、各ステップ毎にそれぞれ 1 つのトレーニング例を生成します。このジェネレータ関数を tf.data.Dataset.from_generator メソッドに渡して出力タイプを指定します。各トレーニング例は、tf.string データ型の項目と One-Hot エンコーディングされたラベルを含むタプルです。tf.data.Dataset.skip メソッドとtf.data.Dataset.take メソッドを使用して、データセットは 80 対 20 の割合でトレーニングデータと検証データに分割しています。
def load_file(path, label):
    return tf.io.read_file(path), label
def make_datasets(train_size):
  batch_size = 256

  train_files = file_paths[:train_size]
  train_labels = labels[:train_size]
  train_ds = tf.data.Dataset.from_tensor_slices((train_files, train_labels))
  train_ds = train_ds.map(load_file).shuffle(5000)
  train_ds = train_ds.batch(batch_size).prefetch(tf.data.AUTOTUNE)

  test_files = file_paths[train_size:]
  test_labels = labels[train_size:]
  test_ds = tf.data.Dataset.from_tensor_slices((test_files, test_labels))
  test_ds = test_ds.map(load_file)
  test_ds = test_ds.batch(batch_size).prefetch(tf.data.AUTOTUNE)


  return train_ds, test_ds
train_data, validation_data = make_datasets(train_size)
モデルのトレーニングと評価
既にモジュールの周りにラッパーを追加し、Keras の他のレイヤーと同じように使用できるようになったので、レイヤーの線形スタックである小さな Sequential モデルを作成します。他のレイヤーと同様に model.add を使用して、テキスト埋め込みモジュールの追加が可能です。損失とオプティマイザを指定してモデルをコンパイルし、10 エポック分をトレーニングします。tf.keras API はテンソルフローのデータセットを入力として扱うことができるので、fit メソッドに Dataset インスタンスを渡してモデルをトレーニングすることができます。ジェネレータ関数を使用するので、tf.data がサンプルの生成、バッチ処理、モデルへの供給を行います。
モデル
def create_model():
  model = tf.keras.Sequential([
    tf.keras.layers.Input(shape=[], dtype=tf.string),
    embedding_layer,
    tf.keras.layers.Dense(64, activation="relu"),
    tf.keras.layers.Dense(16, activation="relu"),
    tf.keras.layers.Dense(5),
  ])
  model.compile(loss=tf.losses.SparseCategoricalCrossentropy(from_logits=True),
      optimizer="adam", metrics=['accuracy'])
  return model
model = create_model()
# Create earlystopping callback
early_stopping_callback = tf.keras.callbacks.EarlyStopping(monitor='val_loss', min_delta=0, patience=3)
WARNING:tensorflow:From /tmpfs/src/tf_docs_env/lib/python3.9/site-packages/tensorflow/python/autograph/pyct/static_analysis/liveness.py:83: Analyzer.lamba_check (from tensorflow.python.autograph.pyct.static_analysis.liveness) is deprecated and will be removed after 2023-09-23.
Instructions for updating:
Lambda fuctions will be no more assumed to be used in the statement where they are used, or at least in the same block. https://github.com/tensorflow/tensorflow/issues/56089
トレーニング
history = model.fit(train_data,
                    validation_data=validation_data,
                    epochs=5,
                    callbacks=[early_stopping_callback])
Epoch 1/5
1176/1176 [==============================] - 27s 22ms/step - loss: 0.2242 - accuracy: 0.9247 - val_loss: 0.1505 - val_accuracy: 0.9484
Epoch 2/5
1176/1176 [==============================] - 24s 20ms/step - loss: 0.1441 - accuracy: 0.9498 - val_loss: 0.1370 - val_accuracy: 0.9527
Epoch 3/5
1176/1176 [==============================] - 24s 21ms/step - loss: 0.1334 - accuracy: 0.9530 - val_loss: 0.1293 - val_accuracy: 0.9537
Epoch 4/5
1176/1176 [==============================] - 24s 20ms/step - loss: 0.1270 - accuracy: 0.9547 - val_loss: 0.1249 - val_accuracy: 0.9552
Epoch 5/5
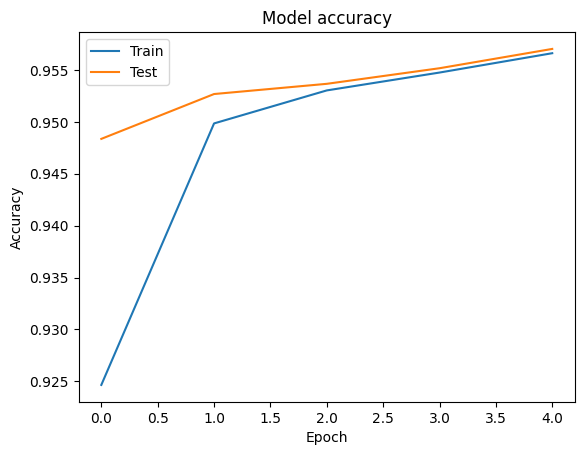
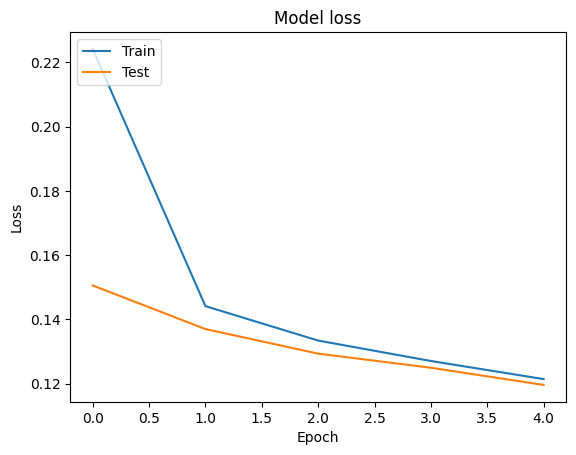
1176/1176 [==============================] - 24s 20ms/step - loss: 0.1214 - accuracy: 0.9566 - val_loss: 0.1196 - val_accuracy: 0.9570
評価
tf.keras.Model.fit メソッドが返す各エポックの損失と精度の値を含む tf.keras.callbacks.History オブジェクトを使用して、学習データと検証データの精度と損失曲線を可視化することができます。
# Plot training & validation accuracy values
plt.plot(history.history['accuracy'])
plt.plot(history.history['val_accuracy'])
plt.title('Model accuracy')
plt.ylabel('Accuracy')
plt.xlabel('Epoch')
plt.legend(['Train', 'Test'], loc='upper left')
plt.show()

# Plot training & validation loss values
plt.plot(history.history['loss'])
plt.plot(history.history['val_loss'])
plt.title('Model loss')
plt.ylabel('Loss')
plt.xlabel('Epoch')
plt.legend(['Train', 'Test'], loc='upper left')
plt.show()


予測
検証データの予測値を取得して混同行列をチェックすることにより、5 つの各クラスのモデルの性能を確認することができます。tf.keras.Model.predict メソッドが各クラスの確率として N-D 配列を返すので、np.argmax を使用してそれらをクラスラベルに変換することができます。
y_pred = model.predict(validation_data)
294/294 [==============================] - 4s 15ms/step
y_pred = np.argmax(y_pred, axis=1)
samples = file_paths[0:3]
for i, sample in enumerate(samples):
  f = open(sample)
  text = f.read()
  print(text[0:100])
  print("True Class: ", sample.split("/")[0])
  print("Predicted Class: ", dir_names[y_pred[i]])
  f.close()
ঈদের সময় অধিকাংশ নির্মাতাই কয়েকটি করে নাটক নির্মাণ করলেও বছরের দুই ঈদে দুটি নাটক নির্মাণ করেন হানিফ
True Class:  entertainment
Predicted Class:  state

‘চৈত্র মাসে এভাবে পানিতে ধান নিতে দেখছি না। বৈশাখ মাসে বৃষ্টি অইতো। কৃষকেরা পাকনা ধান কিছু অইলেও তু
True Class:  state
Predicted Class:  state

পেশাদার ফুটবলার ছিলেন না, কোনো সংগঠকও নন। তারপরও ইতালির সিলভিও গাজ্জানিগার মৃত্যুতে ফুটবলের ইতিহাস
True Class:  sports
Predicted Class:  state
パフォーマンスを比較する
これで labelsから検証データの正しいラベルを得ることができるようになったので、それを予測と比較して classification_report を取得します。
y_true = np.array(labels[train_size:])
print(classification_report(y_true, y_pred, target_names=dir_names))
precision    recall  f1-score   support

      economy       0.82      0.78      0.79      3897
       sports       0.99      0.98      0.98     10204
entertainment       0.92      0.93      0.92      6256
        state       0.97      0.97      0.97     48512
international       0.93      0.93      0.93      6377

     accuracy                           0.96     75246
    macro avg       0.92      0.92      0.92     75246
 weighted avg       0.96      0.96      0.96     75246
また、発表されたオリジナルの論文で結果として報告されている精度 0.96 とモデルの性能を比較することもできます。オリジナルの論文の著者は、句読点や数字を削除したり、最も頻繁に使われるストップワードの上位 25 個を削除したり、データセットに対して多くの前処理を行ったと説明しています。classification_report を見ると分かりますが、ここでは前処理を行わずに 5 エポック分のトレーニングを行っただけでも、0.96 の精度と正解率が得られています!
この例では、埋め込みモジュールから Keras レイヤーを作成する際に trainable=False を設定しました。つまり、トレーニング中に埋め込み重みを更新しないことを意味します。これを True 設定にしてこのデータセットでトレーニングを行ってみると、わずか 2 エポックで 97% の精度を達成します。
