 ดูบน TensorFlow.org ดูบน TensorFlow.org |  ทำงานใน Google Colab ทำงานใน Google Colab |  ดูแหล่งที่มาบน GitHub ดูแหล่งที่มาบน GitHub |  ดาวน์โหลดโน๊ตบุ๊ค ดาวน์โหลดโน๊ตบุ๊ค |
คู่มือนี้ให้ภาพรวมคร่าวๆ ของ ข้อมูลเบื้องต้นเกี่ยวกับ TensorFlow แต่ละส่วนของเอกสารนี้เป็นภาพรวมของหัวข้อที่ใหญ่กว่า ซึ่งคุณจะพบลิงก์ไปยังคู่มือฉบับเต็มได้ที่ส่วนท้ายของแต่ละส่วน
TensorFlow เป็นแพลตฟอร์มแบบ end-to-end สำหรับแมชชีนเลิร์นนิง รองรับสิ่งต่อไปนี้:
- การคำนวณตัวเลขตามอาร์เรย์หลายมิติ (คล้ายกับ NumPy )
- GPU และการประมวลผลแบบกระจาย
- แยกความแตกต่างอัตโนมัติ
- การสร้างแบบจำลอง การฝึกอบรม และการส่งออก
- และอื่น ๆ
เทนเซอร์
TensorFlow ทำงานบนอาร์เรย์หลายมิติหรือ เท นเซอร์ที่แสดงเป็น tf.Tensor นี่คือเมตริกซ์สองมิติ:
import tensorflow as tf

x = tf.constant([[1., 2., 3.],
                 [4., 5., 6.]])

print(x)
print(x.shape)
print(x.dtype)
tf.Tensor(
[[1. 2. 3.]
 [4. 5. 6.]], shape=(2, 3), dtype=float32)
(2, 3)
<dtype: 'float32'>
คุณลักษณะที่สำคัญที่สุดของ tf.Tensor คือ shape และ dtype :
-
Tensor.shape: บอกขนาดของเทนเซอร์ตามแกนแต่ละแกน -
Tensor.dtype: บอกคุณถึงประเภทขององค์ประกอบทั้งหมดในเทนเซอร์
TensorFlow นำการดำเนินการทางคณิตศาสตร์มาตรฐานไปใช้กับเมตริกซ์ เช่นเดียวกับการดำเนินการหลายอย่างสำหรับการเรียนรู้ของเครื่องโดยเฉพาะ
ตัวอย่างเช่น:
x + x
<tf.Tensor: shape=(2, 3), dtype=float32, numpy=
array([[ 2.,  4.,  6.],
       [ 8., 10., 12.]], dtype=float32)>
5 * x
<tf.Tensor: shape=(2, 3), dtype=float32, numpy=
array([[ 5., 10., 15.],
       [20., 25., 30.]], dtype=float32)>
x @ tf.transpose(x)
<tf.Tensor: shape=(2, 2), dtype=float32, numpy=
array([[14., 32.],
       [32., 77.]], dtype=float32)>
tf.concat([x, x, x], axis=0)
<tf.Tensor: shape=(6, 3), dtype=float32, numpy=
array([[1., 2., 3.],
       [4., 5., 6.],
       [1., 2., 3.],
       [4., 5., 6.],
       [1., 2., 3.],
       [4., 5., 6.]], dtype=float32)>
tf.nn.softmax(x, axis=-1)
<tf.Tensor: shape=(2, 3), dtype=float32, numpy=
array([[0.09003057, 0.24472848, 0.6652409 ],
       [0.09003057, 0.24472848, 0.6652409 ]], dtype=float32)>
tf.reduce_sum(x)
<tf.Tensor: shape=(), dtype=float32, numpy=21.0>
การคำนวณขนาดใหญ่บน CPU อาจช้า เมื่อกำหนดค่าอย่างเหมาะสม TensorFlow สามารถใช้ฮาร์ดแวร์ตัวเร่งความเร็ว เช่น GPU เพื่อดำเนินการได้อย่างรวดเร็ว
if tf.config.list_physical_devices('GPU'):
  print("TensorFlow **IS** using the GPU")
else:
  print("TensorFlow **IS NOT** using the GPU")
TensorFlow **IS** using the GPU
ดูรายละเอียดใน คู่มือเทนเซอร์
ตัวแปร
วัตถุ tf.Tensor ปกติจะไม่เปลี่ยนรูป ในการจัดเก็บน้ำหนักของโมเดล (หรือสถานะที่เปลี่ยนแปลงได้อื่นๆ) ใน TensorFlow ให้ใช้ tf.Variable
var = tf.Variable([0.0, 0.0, 0.0])
var.assign([1, 2, 3])
<tf.Variable 'UnreadVariable' shape=(3,) dtype=float32, numpy=array([1., 2., 3.], dtype=float32)>
var.assign_add([1, 1, 1])
<tf.Variable 'UnreadVariable' shape=(3,) dtype=float32, numpy=array([2., 3., 4.], dtype=float32)>
ดูรายละเอียดใน คู่มือตัวแปร
แยกความแตกต่างอัตโนมัติ
การ ไล่สี แบบไล่ระดับและอัลกอริธึมที่เกี่ยวข้องเป็นรากฐานที่สำคัญของการเรียนรู้ของเครื่องสมัยใหม่
เพื่อเปิดใช้งานสิ่งนี้ TensorFlow ใช้การสร้างความแตกต่างอัตโนมัติ (autodiff) ซึ่งใช้แคลคูลัสในการคำนวณการไล่ระดับสี โดยทั่วไป คุณจะใช้สิ่งนี้เพื่อคำนวณการไล่ระดับสีของ ข้อผิดพลาด หรือ การสูญเสีย ของแบบจำลองตามน้ำหนักของแบบจำลอง
x = tf.Variable(1.0)

def f(x):
  y = x**2 + 2*x - 5
  return y
f(x)
<tf.Tensor: shape=(), dtype=float32, numpy=-2.0>
ที่ x = 1.0 , y = f(x) = (1**2 + 2*1 - 5) = -2 .
อนุพันธ์ของ y คือ y' = f'(x) = (2*x + 2) = 4 . TensorFlow สามารถคำนวณสิ่งนี้ได้โดยอัตโนมัติ:
with tf.GradientTape() as tape:
  y = f(x)

g_x = tape.gradient(y, x)  # g(x) = dy/dx

g_x
<tf.Tensor: shape=(), dtype=float32, numpy=4.0>
ตัวอย่างแบบง่ายนี้ใช้อนุพันธ์เทียบกับสเกลาร์เดียว ( x ) แต่ TensorFlow สามารถคำนวณเกรเดียนท์เทียบกับเทนเซอร์ที่ไม่ใช่สเกลาร์จำนวนเท่าใดก็ได้พร้อมกัน
ดูรายละเอียดใน คู่มือ Autodiff
กราฟและ tf.function
แม้ว่าคุณสามารถใช้ TensorFlow แบบโต้ตอบได้เหมือนกับไลบรารี Python ใดๆ TensorFlow ยังมีเครื่องมือสำหรับ:
- การเพิ่มประสิทธิภาพการทำงาน : เพื่อเพิ่มความเร็วในการฝึกอบรมและการอนุมาน
- ส่งออก : เพื่อให้คุณสามารถบันทึกโมเดลของคุณเมื่อการฝึกอบรมเสร็จสิ้น
คุณต้องใช้ tf.function เพื่อแยกโค้ด pure-TensorFlow ออกจาก Python
@tf.function
def my_func(x):
  print('Tracing.\n')
  return tf.reduce_sum(x)
ครั้งแรกที่คุณเรียกใช้ tf.function แม้ว่าจะรันใน Python แต่ก็จับกราฟที่สมบูรณ์และปรับให้เหมาะสมซึ่งแสดงถึงการคำนวณ TensorFlow ที่ทำภายในฟังก์ชัน
x = tf.constant([1, 2, 3])
my_func(x)
Tracing.
<tf.Tensor: shape=(), dtype=int32, numpy=6>
ในการโทรครั้งต่อๆ ไป TensorFlow จะดำเนินการกับกราฟที่ปรับให้เหมาะสมเท่านั้น โดยข้ามขั้นตอนใดๆ ที่ไม่ใช่ TensorFlow ด้านล่างนี้ โปรดทราบว่า my_func ไม่พิมพ์ การติดตาม เนื่องจาก print เป็นฟังก์ชัน Python ไม่ใช่ฟังก์ชัน TensorFlow
x = tf.constant([10, 9, 8])
my_func(x)
<tf.Tensor: shape=(), dtype=int32, numpy=27>
กราฟอาจใช้ซ้ำไม่ได้สำหรับอินพุตที่มี ลายเซ็น ต่างกัน ( shape และ dtype ) ดังนั้นจึงสร้างกราฟใหม่แทน:
x = tf.constant([10.0, 9.1, 8.2], dtype=tf.float32)
my_func(x)
Tracing.
<tf.Tensor: shape=(), dtype=float32, numpy=27.3>
ตัวยึดตำแหน่ง33
กราฟที่จับได้เหล่านี้มีประโยชน์สองประการ:
- ในหลายกรณีพวกเขาให้การเร่งความเร็วอย่างมีนัยสำคัญในการดำเนินการ (แม้ว่าจะไม่ใช่ตัวอย่างเล็กน้อยนี้)
- คุณสามารถส่งออกกราฟเหล่านี้โดยใช้
tf.saved_modelเพื่อทำงานบนระบบอื่น เช่น เซิร์ฟเวอร์ หรือ อุปกรณ์มือถือ ไม่จำเป็นต้องติดตั้ง Python
ดูข้อมูลเบื้องต้นเกี่ยว กับกราฟ สำหรับรายละเอียดเพิ่มเติม
โมดูล เลเยอร์ และรุ่น
tf.Module เป็นคลาสสำหรับจัดการ tf.Variable และ tf.function ที่ทำงานบนอ็อบเจ็กต์ คลาส tf.Module มีความจำเป็นเพื่อรองรับคุณสมบัติที่สำคัญสองประการ:
- คุณสามารถบันทึกและกู้คืนค่าของตัวแปรได้โดยใช้
tf.train.Checkpointสิ่งนี้มีประโยชน์ในระหว่างการฝึกอบรม เนื่องจากสามารถบันทึกและกู้คืนสถานะของแบบจำลองได้อย่างรวดเร็ว - คุณสามารถนำเข้าและส่งออกค่า
tf.Variableและ กราฟtf.functionโดยใช้tf.saved_modelสิ่งนี้ทำให้คุณสามารถรันโมเดลของคุณโดยไม่ขึ้นกับโปรแกรม Python ที่สร้างมันขึ้นมา
นี่คือตัวอย่างที่สมบูรณ์ของการส่งออกวัตถุ tf.Module อย่างง่าย:
class MyModule(tf.Module):
  def __init__(self, value):
    self.weight = tf.Variable(value)

  @tf.function
  def multiply(self, x):
    return x * self.weight
mod = MyModule(3)
mod.multiply(tf.constant([1, 2, 3]))
<tf.Tensor: shape=(3,), dtype=int32, numpy=array([3, 6, 9], dtype=int32)>
บันทึก Module :
save_path = './saved'
tf.saved_model.save(mod, save_path)
INFO:tensorflow:Assets written to: ./saved/assets
2022-01-19 02:29:48.135588: W tensorflow/python/util/util.cc:368] Sets are not currently considered sequences, but this may change in the future, so consider avoiding using them.
SavedModel ที่เป็นผลลัพธ์ไม่ขึ้นกับโค้ดที่สร้าง คุณสามารถโหลด SavedModel จาก Python, การโยงภาษาอื่นๆ หรือ TensorFlow Serving คุณยังสามารถแปลงให้ทำงานด้วย TensorFlow Lite หรือ TensorFlow JS
reloaded = tf.saved_model.load(save_path)
reloaded.multiply(tf.constant([1, 2, 3]))
<tf.Tensor: shape=(3,), dtype=int32, numpy=array([3, 6, 9], dtype=int32)>
tf.keras.layers.Layer และ tf.keras.Model สร้างขึ้นบน tf.Module ที่ให้ฟังก์ชันการทำงานเพิ่มเติมและวิธีการอำนวยความสะดวกสำหรับการสร้าง การฝึกอบรม และการบันทึกโมเดล สิ่งเหล่านี้บางส่วนจะแสดงให้เห็นในหัวข้อถัดไป
อ้างถึง บทนำสู่โมดูล สำหรับรายละเอียด
วงการฝึก
ตอนนี้นำสิ่งนี้มารวมกันเพื่อสร้างแบบจำลองพื้นฐานและฝึกฝนตั้งแต่เริ่มต้น
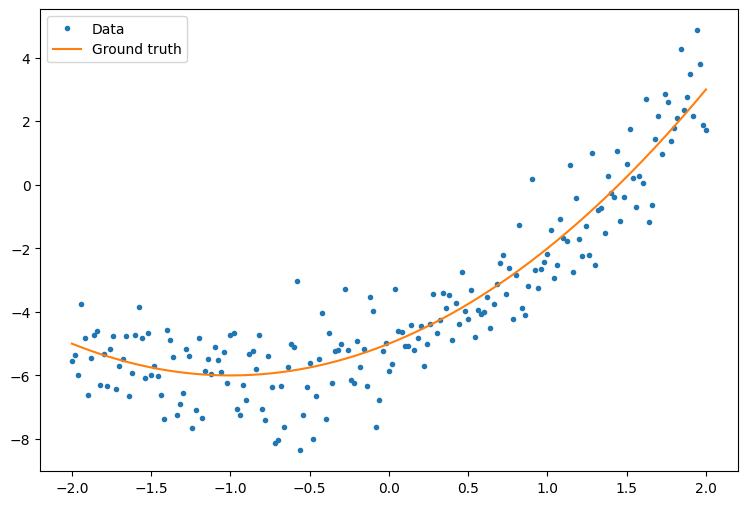
ขั้นแรก สร้างข้อมูลตัวอย่าง สิ่งนี้สร้างกลุ่มจุดที่หลวมตามเส้นโค้งกำลังสอง:
import matplotlib
from matplotlib import pyplot as plt

matplotlib.rcParams['figure.figsize'] = [9, 6]
x = tf.linspace(-2, 2, 201)
x = tf.cast(x, tf.float32)

def f(x):
  y = x**2 + 2*x - 5
  return y

y = f(x) + tf.random.normal(shape=[201])

plt.plot(x.numpy(), y.numpy(), '.', label='Data')
plt.plot(x, f(x),  label='Ground truth')
plt.legend();

สร้างแบบจำลอง:
class Model(tf.keras.Model):
  def __init__(self, units):
    super().__init__()
    self.dense1 = tf.keras.layers.Dense(units=units,
                                        activation=tf.nn.relu,
                                        kernel_initializer=tf.random.normal,
                                        bias_initializer=tf.random.normal)
    self.dense2 = tf.keras.layers.Dense(1)

  def call(self, x, training=True):
    # For Keras layers/models, implement `call` instead of `__call__`.
    x = x[:, tf.newaxis]
    x = self.dense1(x)
    x = self.dense2(x)
    return tf.squeeze(x, axis=1)
model = Model(64)
plt.plot(x.numpy(), y.numpy(), '.', label='data')
plt.plot(x, f(x),  label='Ground truth')
plt.plot(x, model(x), label='Untrained predictions')
plt.title('Before training')
plt.legend();

เขียนวงจรการฝึกขั้นพื้นฐาน:
variables = model.variables

optimizer = tf.optimizers.SGD(learning_rate=0.01)

for step in range(1000):
  with tf.GradientTape() as tape:
    prediction = model(x)
    error = (y-prediction)**2
    mean_error = tf.reduce_mean(error)
  gradient = tape.gradient(mean_error, variables)
  optimizer.apply_gradients(zip(gradient, variables))

  if step % 100 == 0:
    print(f'Mean squared error: {mean_error.numpy():0.3f}')
Mean squared error: 16.123
Mean squared error: 0.997
Mean squared error: 0.964
Mean squared error: 0.946
Mean squared error: 0.932
Mean squared error: 0.921
Mean squared error: 0.913
Mean squared error: 0.907
Mean squared error: 0.901
Mean squared error: 0.897
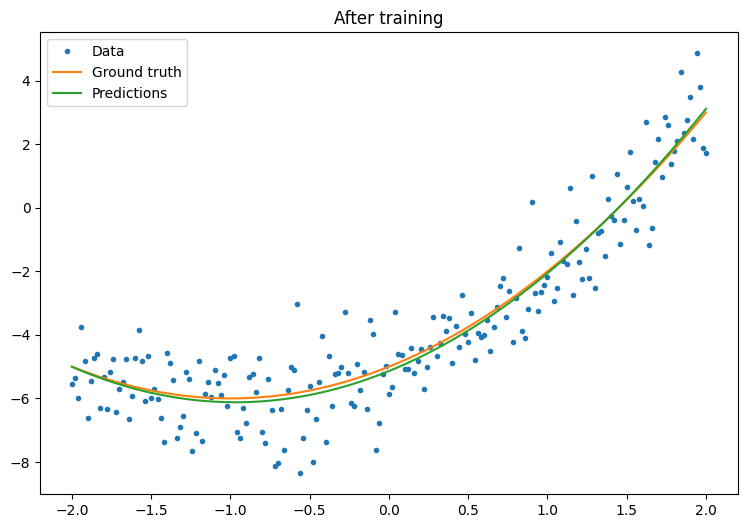
plt.plot(x.numpy(),y.numpy(), '.', label="data")
plt.plot(x, f(x),  label='Ground truth')
plt.plot(x, model(x), label='Trained predictions')
plt.title('After training')
plt.legend();

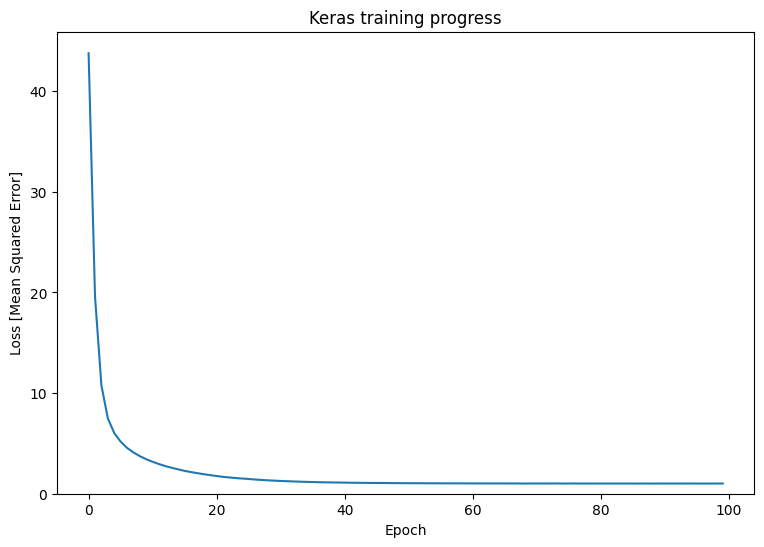
ได้ผล แต่อย่าลืมว่าการใช้งานยูทิลิตี้การฝึกอบรมทั่วไปมีอยู่ในโมดูล tf.keras ดังนั้นให้พิจารณาใช้สิ่งเหล่านั้นก่อนที่จะเขียนของคุณเอง ในการเริ่มต้น Model.compile และ Model.fit ใช้การวนรอบการฝึกสำหรับคุณ:
new_model = Model(64)
new_model.compile(
    loss=tf.keras.losses.MSE,
    optimizer=tf.optimizers.SGD(learning_rate=0.01))

history = new_model.fit(x, y,
                        epochs=100,
                        batch_size=32,
                        verbose=0)

model.save('./my_model')
INFO:tensorflow:Assets written to: ./my_model/assets
plt.plot(history.history['loss'])
plt.xlabel('Epoch')
plt.ylim([0, max(plt.ylim())])
plt.ylabel('Loss [Mean Squared Error]')
plt.title('Keras training progress');

อ้างถึง ลูปการฝึกขั้นพื้นฐาน และ คู่มือ Keras สำหรับรายละเอียดเพิ่มเติม
