 عرض على TensorFlow.org عرض على TensorFlow.org |  تشغيل في Google Colab تشغيل في Google Colab |  عرض المصدر على جيثب عرض المصدر على جيثب |  تحميل دفتر تحميل دفتر |
يقدم هذا الدليل نظرة عامة سريعة على أساسيات TensorFlow . كل قسم من هذا المستند عبارة عن نظرة عامة على موضوع أكبر — يمكنك العثور على روابط لأدلة كاملة في نهاية كل قسم.
TensorFlow عبارة عن نظام أساسي شامل للتعلم الآلي. يدعم ما يلي:
- حساب رقمي متعدد الأبعاد قائم على المصفوفة (مشابه لـ NumPy .)
- GPU والمعالجة الموزعة
- التفاضل التلقائي
- بناء النموذج والتدريب والتصدير
- و اكثر
موتر
يعمل TensorFlow على مصفوفات أو موترات متعددة الأبعاد ممثلة ككائنات tf.Tensor . هنا موتر ثنائي الأبعاد:
import tensorflow as tf

x = tf.constant([[1., 2., 3.],
                 [4., 5., 6.]])

print(x)
print(x.shape)
print(x.dtype)
tf.Tensor(
[[1. 2. 3.]
 [4. 5. 6.]], shape=(2, 3), dtype=float32)
(2, 3)
<dtype: 'float32'>
من أهم سمات tf.Tensor shape dtype :
-
Tensor.shape: يخبرك بحجم الموتر على طول كل من محاوره. -
Tensor.dtype: يخبرك بنوع جميع العناصر في الموتر.
تنفذ TensorFlow عمليات حسابية قياسية على الموترات ، بالإضافة إلى العديد من العمليات المتخصصة في التعلم الآلي.
فمثلا:
x + x
<tf.Tensor: shape=(2, 3), dtype=float32, numpy=
array([[ 2.,  4.,  6.],
       [ 8., 10., 12.]], dtype=float32)>
5 * x
<tf.Tensor: shape=(2, 3), dtype=float32, numpy=
array([[ 5., 10., 15.],
       [20., 25., 30.]], dtype=float32)>
x @ tf.transpose(x)
<tf.Tensor: shape=(2, 2), dtype=float32, numpy=
array([[14., 32.],
       [32., 77.]], dtype=float32)>
tf.concat([x, x, x], axis=0)
<tf.Tensor: shape=(6, 3), dtype=float32, numpy=
array([[1., 2., 3.],
       [4., 5., 6.],
       [1., 2., 3.],
       [4., 5., 6.],
       [1., 2., 3.],
       [4., 5., 6.]], dtype=float32)>
tf.nn.softmax(x, axis=-1)
<tf.Tensor: shape=(2, 3), dtype=float32, numpy=
array([[0.09003057, 0.24472848, 0.6652409 ],
       [0.09003057, 0.24472848, 0.6652409 ]], dtype=float32)>
tf.reduce_sum(x)
<tf.Tensor: shape=(), dtype=float32, numpy=21.0>
يمكن أن يكون إجراء عمليات حسابية كبيرة على وحدة المعالجة المركزية بطيئًا. عند تكوينه بشكل صحيح ، يمكن لـ TensorFlow استخدام أجهزة تسريع مثل وحدات معالجة الرسومات لتنفيذ العمليات بسرعة كبيرة.
if tf.config.list_physical_devices('GPU'):
  print("TensorFlow **IS** using the GPU")
else:
  print("TensorFlow **IS NOT** using the GPU")
TensorFlow **IS** using the GPU
راجع دليل Tensor للحصول على التفاصيل.
المتغيرات
الكائنات tf.Tensor العادية غير قابلة للتغيير. لتخزين أوزان النموذج (أو غيرها من الحالات المتغيرة) في TensorFlow ، استخدم tf.Variable .
var = tf.Variable([0.0, 0.0, 0.0])
var.assign([1, 2, 3])
<tf.Variable 'UnreadVariable' shape=(3,) dtype=float32, numpy=array([1., 2., 3.], dtype=float32)>
var.assign_add([1, 1, 1])
<tf.Variable 'UnreadVariable' shape=(3,) dtype=float32, numpy=array([2., 3., 4.], dtype=float32)>
راجع دليل المتغيرات للحصول على التفاصيل.
التفاضل التلقائي
يعد الانحدار المتدرج والخوارزميات ذات الصلة حجر الزاوية في التعلم الآلي الحديث.
لتمكين ذلك ، يقوم TensorFlow بتنفيذ التمايز التلقائي (autodiff) ، والذي يستخدم حساب التفاضل والتكامل لحساب التدرجات اللونية. عادةً ما ستستخدم هذا لحساب التدرج اللوني لخطأ أو خسارة النموذج فيما يتعلق بأوزانه.
x = tf.Variable(1.0)

def f(x):
  y = x**2 + 2*x - 5
  return y
f(x)
<tf.Tensor: shape=(), dtype=float32, numpy=-2.0>
عند x = 1.0 ، y = f(x) = (1**2 + 2*1 - 5) = -2 .
مشتق y هو y' = f'(x) = (2*x + 2) = 4 . يمكن لـ TensorFlow حساب هذا تلقائيًا:
with tf.GradientTape() as tape:
  y = f(x)

g_x = tape.gradient(y, x)  # g(x) = dy/dx

g_x
<tf.Tensor: shape=(), dtype=float32, numpy=4.0>
هذا المثال المبسط يأخذ فقط المشتق فيما يتعلق بعدد واحد ( x ) ، لكن TensorFlow يمكنه حساب التدرج اللوني فيما يتعلق بأي عدد من الموترات غير العددية في وقت واحد.
الرجوع إلى دليل Autodiff للحصول على التفاصيل.
الرسوم البيانية ووظيفة tf
بينما يمكنك استخدام TensorFlow بشكل تفاعلي مثل أي مكتبة Python ، يوفر TensorFlow أيضًا أدوات لـ:
- تحسين الأداء : لتسريع التدريب والاستدلال.
- تصدير : حتى تتمكن من حفظ نموذجك عند الانتهاء من التدريب.
يتطلب ذلك استخدام دالة tf لفصل كود tf.function النقي عن Python.
@tf.function
def my_func(x):
  print('Tracing.\n')
  return tf.reduce_sum(x)
في المرة الأولى التي تقوم فيها بتشغيل tf.function ، على الرغم من تنفيذها في Python ، إلا أنها تلتقط رسمًا بيانيًا كاملًا ومحسّنًا يمثل حسابات TensorFlow المنفذة داخل الوظيفة.
x = tf.constant([1, 2, 3])
my_func(x)
Tracing.
<tf.Tensor: shape=(), dtype=int32, numpy=6>
في الاستدعاءات اللاحقة ، ينفذ TensorFlow الرسم البياني المحسن فقط ، متخطياً أي خطوات غير TensorFlow. أدناه ، لاحظ أن my_func لا يطبع التتبع لأن print هي دالة Python ، وليست دالة TensorFlow.
x = tf.constant([10, 9, 8])
my_func(x)
<tf.Tensor: shape=(), dtype=int32, numpy=27>
قد لا يكون الرسم البياني قابلاً لإعادة الاستخدام للمدخلات بتوقيع مختلف ( shape dtype ) ، لذلك يتم إنشاء رسم بياني جديد بدلاً من ذلك:
x = tf.constant([10.0, 9.1, 8.2], dtype=tf.float32)
my_func(x)
Tracing.
<tf.Tensor: shape=(), dtype=float32, numpy=27.3>
توفر هذه الرسوم البيانية الملتقطة فائدتين:
- في كثير من الحالات توفر تسريعًا كبيرًا في التنفيذ (وإن لم يكن هذا المثال التافه).
- يمكنك تصدير هذه الرسوم البيانية ، باستخدام
tf.saved_model، للتشغيل على أنظمة أخرى مثل الخادم أو الجهاز المحمول ، دون الحاجة إلى تثبيت Python.
الرجوع إلى مقدمة عن الرسوم البيانية لمزيد من التفاصيل.
الوحدات والطبقات والنماذج
tf.Module عبارة عن فئة لإدارة كائنات tf.Variable ، وكائنات tf.function التي تعمل عليها. تعد فئة tf.Module ضرورية لدعم ميزتين مهمتين:
- يمكنك حفظ واستعادة قيم المتغيرات الخاصة بك باستخدام
tf.train.Checkpoint. يكون هذا مفيدًا أثناء التدريب لأنه سريع في حفظ حالة النموذج واستعادتها. - يمكنك استيراد وتصدير قيم
tf.functionوالرسوم البيانية للدالةtf.saved_modeltf.Variableيتيح لك ذلك تشغيل النموذج بشكل مستقل عن برنامج Python الذي أنشأه.
هذا مثال كامل لتصدير كائن tf.Module بسيط:
class MyModule(tf.Module):
  def __init__(self, value):
    self.weight = tf.Variable(value)

  @tf.function
  def multiply(self, x):
    return x * self.weight
mod = MyModule(3)
mod.multiply(tf.constant([1, 2, 3]))
<tf.Tensor: shape=(3,), dtype=int32, numpy=array([3, 6, 9], dtype=int32)>
احفظ Module :
save_path = './saved'
tf.saved_model.save(mod, save_path)
INFO:tensorflow:Assets written to: ./saved/assets
2022-01-19 02:29:48.135588: W tensorflow/python/util/util.cc:368] Sets are not currently considered sequences, but this may change in the future, so consider avoiding using them.
SavedModel الناتج مستقل عن الكود الذي أنشأه. يمكنك تحميل SavedModel من Python أو روابط لغة أخرى أو خدمة TensorFlow . يمكنك أيضًا تحويله للتشغيل باستخدام TensorFlow Lite أو TensorFlow JS .
reloaded = tf.saved_model.load(save_path)
reloaded.multiply(tf.constant([1, 2, 3]))
<tf.Tensor: shape=(3,), dtype=int32, numpy=array([3, 6, 9], dtype=int32)>
تستند فئات tf.keras.layers.Layer و tf.keras.Model إلى tf.Module مما يوفر وظائف إضافية وأساليب ملائمة لبناء النماذج والتدريب عليها وحفظها. يتم عرض بعض هذه في القسم التالي.
الرجوع إلى مقدمة إلى الوحدات النمطية للحصول على التفاصيل.
حلقات التدريب
الآن ضع كل هذا معًا لبناء نموذج أساسي وقم بتدريبه من نقطة الصفر.
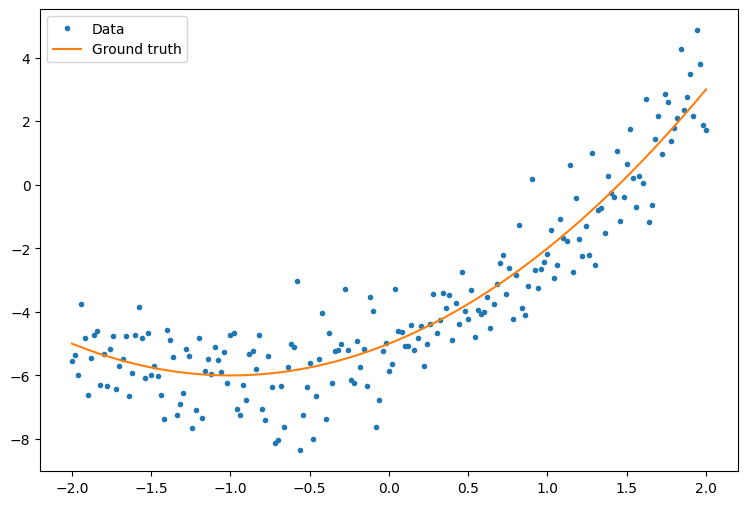
أولاً ، قم بإنشاء بعض الأمثلة على البيانات. ينتج عن هذا سحابة من النقاط التي تتبع بشكل غير محكم منحنى تربيعي:
import matplotlib
from matplotlib import pyplot as plt

matplotlib.rcParams['figure.figsize'] = [9, 6]
x = tf.linspace(-2, 2, 201)
x = tf.cast(x, tf.float32)

def f(x):
  y = x**2 + 2*x - 5
  return y

y = f(x) + tf.random.normal(shape=[201])

plt.plot(x.numpy(), y.numpy(), '.', label='Data')
plt.plot(x, f(x),  label='Ground truth')
plt.legend();

قم بإنشاء نموذج:
class Model(tf.keras.Model):
  def __init__(self, units):
    super().__init__()
    self.dense1 = tf.keras.layers.Dense(units=units,
                                        activation=tf.nn.relu,
                                        kernel_initializer=tf.random.normal,
                                        bias_initializer=tf.random.normal)
    self.dense2 = tf.keras.layers.Dense(1)

  def call(self, x, training=True):
    # For Keras layers/models, implement `call` instead of `__call__`.
    x = x[:, tf.newaxis]
    x = self.dense1(x)
    x = self.dense2(x)
    return tf.squeeze(x, axis=1)
model = Model(64)
plt.plot(x.numpy(), y.numpy(), '.', label='data')
plt.plot(x, f(x),  label='Ground truth')
plt.plot(x, model(x), label='Untrained predictions')
plt.title('Before training')
plt.legend();

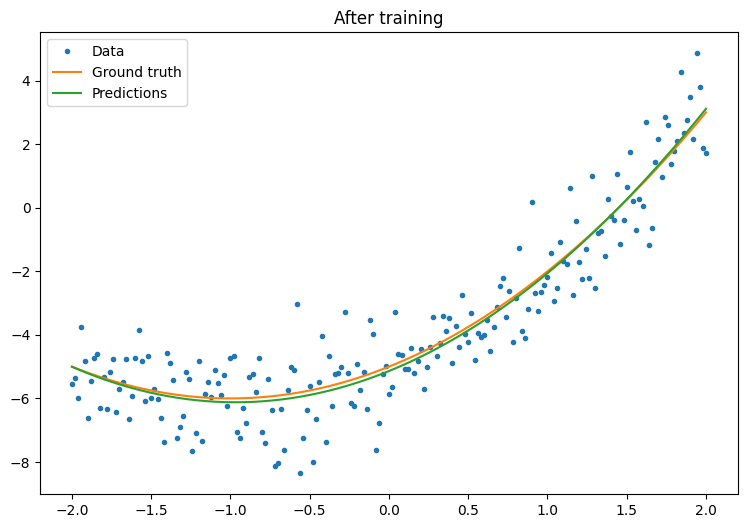
اكتب حلقة تدريب أساسية:
variables = model.variables

optimizer = tf.optimizers.SGD(learning_rate=0.01)

for step in range(1000):
  with tf.GradientTape() as tape:
    prediction = model(x)
    error = (y-prediction)**2
    mean_error = tf.reduce_mean(error)
  gradient = tape.gradient(mean_error, variables)
  optimizer.apply_gradients(zip(gradient, variables))

  if step % 100 == 0:
    print(f'Mean squared error: {mean_error.numpy():0.3f}')
Mean squared error: 16.123
Mean squared error: 0.997
Mean squared error: 0.964
Mean squared error: 0.946
Mean squared error: 0.932
Mean squared error: 0.921
Mean squared error: 0.913
Mean squared error: 0.907
Mean squared error: 0.901
Mean squared error: 0.897
plt.plot(x.numpy(),y.numpy(), '.', label="data")
plt.plot(x, f(x),  label='Ground truth')
plt.plot(x, model(x), label='Trained predictions')
plt.title('After training')
plt.legend();

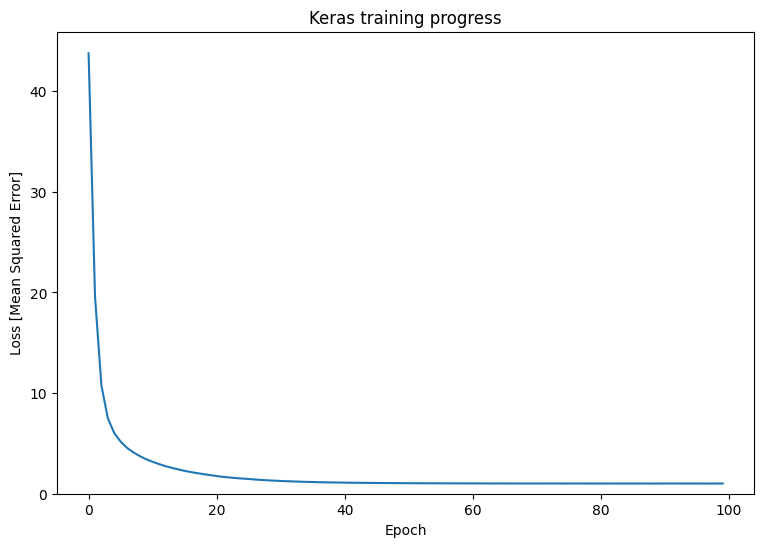
هذا يعمل ، لكن تذكر أن تطبيقات أدوات التدريب الشائعة متوفرة في وحدة tf.keras . لذا ضع في اعتبارك استخدام هؤلاء قبل كتابة ما تريد. لتبدأ ، تقوم Model.compile و Model.fit بتنفيذ حلقة تدريب لك:
new_model = Model(64)
new_model.compile(
    loss=tf.keras.losses.MSE,
    optimizer=tf.optimizers.SGD(learning_rate=0.01))

history = new_model.fit(x, y,
                        epochs=100,
                        batch_size=32,
                        verbose=0)

model.save('./my_model')
INFO:tensorflow:Assets written to: ./my_model/assets
plt.plot(history.history['loss'])
plt.xlabel('Epoch')
plt.ylim([0, max(plt.ylim())])
plt.ylabel('Loss [Mean Squared Error]')
plt.title('Keras training progress');

راجع حلقات التدريب الأساسية ودليل Keras لمزيد من التفاصيل.
