 TensorFlow.org で表示 TensorFlow.org で表示 |
 Google Colabで実行 Google Colabで実行 |
 GitHubでソースを表示 GitHubでソースを表示 |
 ノートブックをダウンロード ノートブックをダウンロード |
概要
この Colab では、同期分散コンピューティングを行うための TensorFlow の拡張機能として提供されている DTensor を紹介します。
DTensor は、開発者がデバイス間の分散を内部的に管理しながら、Tensor でグローバルに動作するアプリケーションを作成できるグローバルプログラミングモデルを提供します。DTensor は、SPMD(単一プログラム複数データ) expansion と呼ばれる手順を通じて、シャーディングディレクティブに従ってプログラムとテンソルを分散します。
アプリケーションとシャーディングディレクティブを分離することで、DTensor は、グローバルセマンティクスを保持しながら、単一のデバイス、複数のデバイス、または複数のクライアントにおける同一のアプリケーションの実行を可能にします。
このガイドでは、分散コンピューティングの DTensor の概念と、DTensor が TensorFlow とどのように統合するかについて説明します。モデルトレーニングで DTensor を使用したデモについては、DTensor を使った分散型トレーニングチュートリアルをご覧ください。
セットアップ
DTensor は TensorFlow 2.9.0 リリースの一部であり、2022 年 4 月 9 日より、TensorFlow ナイトリービルドにも含まれています。
pip install --quiet --upgrade --pre tensorflowインストールが完了したら、tensorflow と tf.experimental.dtensor をインポートします。そして、6 個の仮想 CPU を使用するように、TensorFlow を構成します。
この例では vCPU を使用しますが、DTensor は CPU、GPU、または TPU デバイスでも同じように動作します。
import tensorflow as tf
from tensorflow.experimental import dtensor

print('TensorFlow version:', tf.__version__)

def configure_virtual_cpus(ncpu):
  phy_devices = tf.config.list_physical_devices('CPU')
  tf.config.set_logical_device_configuration(phy_devices[0], [
        tf.config.LogicalDeviceConfiguration(),
    ] * ncpu)

configure_virtual_cpus(6)
DEVICES = [f'CPU:{i}' for i in range(6)]

tf.config.list_logical_devices('CPU')
2024-01-11 19:29:04.703904: E external/local_xla/xla/stream_executor/cuda/cuda_dnn.cc:9261] Unable to register cuDNN factory: Attempting to register factory for plugin cuDNN when one has already been registered
2024-01-11 19:29:04.703959: E external/local_xla/xla/stream_executor/cuda/cuda_fft.cc:607] Unable to register cuFFT factory: Attempting to register factory for plugin cuFFT when one has already been registered
2024-01-11 19:29:04.705496: E external/local_xla/xla/stream_executor/cuda/cuda_blas.cc:1515] Unable to register cuBLAS factory: Attempting to register factory for plugin cuBLAS when one has already been registered
TensorFlow version: 2.15.0
[LogicalDevice(name='/device:CPU:0', device_type='CPU'),
 LogicalDevice(name='/device:CPU:1', device_type='CPU'),
 LogicalDevice(name='/device:CPU:2', device_type='CPU'),
 LogicalDevice(name='/device:CPU:3', device_type='CPU'),
 LogicalDevice(name='/device:CPU:4', device_type='CPU'),
 LogicalDevice(name='/device:CPU:5', device_type='CPU')]
分散テンソルの DTensor モデル
DTensor は、dtensor.Mesh と dtensor.Layout の 2 つの概念を導入します。これらはテンソルのシャーディングをトポロジー的に関連するデバイス間でモデル化する抽象です。
Meshは、コンピュテーションのデバイスリストを定義します。Layoutは、Meshでテンソル次元をシャーディングする方法を定義します。
Mesh
Mesh は、一連のデバイスの論理的な直行トポロジーを表現します。直行グリッドの各次元はメッシュ次元と呼ばれ、名前で参照されます。同じ Mesh 内のメッシュの名前は一意である必要があります。
メッシュ次元の名前は Layout によって参照され、tf.Tensor の各軸に沿ったシャーディングの動作を説明します。これについては、Layout に関する後方のセクションでさらに詳しく説明します。
Mesh は、デバイスの多次元配列として考えることができます。
1 次元 Mesh では、すべてのデバイスが単一のメッシュ次元でリストを形成します。次の例では、dtensor.create_mesh を使用して、6 CPU デバイスから 6 デバイスのサイズを持つメッシュ次元 'x' のメッシュを作成します。

mesh_1d = dtensor.create_mesh([('x', 6)], devices=DEVICES)
print(mesh_1d)
Mesh.from_string(|x=6|0,1,2,3,4,5|0,1,2,3,4,5|/job:localhost/replica:0/task:0/device:CPU:0,/job:localhost/replica:0/task:0/device:CPU:1,/job:localhost/replica:0/task:0/device:CPU:2,/job:localhost/replica:0/task:0/device:CPU:3,/job:localhost/replica:0/task:0/device:CPU:4,/job:localhost/replica:0/task:0/device:CPU:5)
Mesh は多次元でもあります。次の例では、6 CPU デバイスで 3x2 のメッシュを形成します。'x' 次元メッシュは 3 デバイスのサイズ、'y' 次元メッシュは 2 デバイスのサイズです。
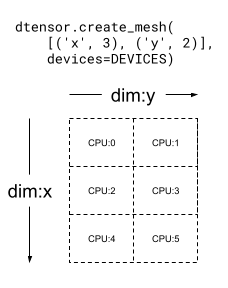
mesh_2d = dtensor.create_mesh([('x', 3), ('y', 2)], devices=DEVICES)
print(mesh_2d)
Mesh.from_string(|x=3,y=2|0,1,2,3,4,5|0,1,2,3,4,5|/job:localhost/replica:0/task:0/device:CPU:0,/job:localhost/replica:0/task:0/device:CPU:1,/job:localhost/replica:0/task:0/device:CPU:2,/job:localhost/replica:0/task:0/device:CPU:3,/job:localhost/replica:0/task:0/device:CPU:4,/job:localhost/replica:0/task:0/device:CPU:5)
Layout
Layout は、テンソルが Mesh でどのように分散されるか、またはシャーディングされるかを指定します。
注意: Mesh と Layout を混同しないために、このガイドでは、次元と言った場合は常に Mesh に、軸と言った場合は常に Tensor と Layout に関連付けています。
Layout の階数は、Layout が適用されている Tensor の階数と同じです。Tensor の各軸では、Layout がテンソルをシャーディングするメッシュ次元を指定しているか、字句を "シャーディングなし" として指定する場合があります。テンソルはシャーディングされていない任意のメッシュ次元で複製されます。
Layout の階数と Mesh の次元数が一致している必要はありません。Layout の unsharded の軸がメッシュ次元に関連する必要も、unsharded メッシュ次元が layout 軸に関連している必要もありません。
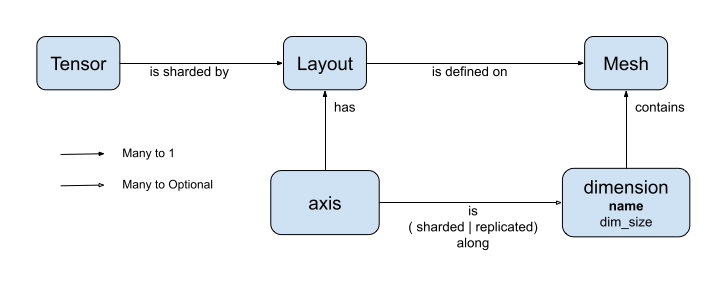
前のセクションで作成した Mesh の Layout の例をいくつか分析してみましょう。
[("x", 6)] などの 1 次元メッシュ(前のセクションの mesh_1d)では、Layout(["unsharded", "unsharded"], mesh_1d) は、6 個のデバイスで複製された 2 階数のテンソルのレイアウトです。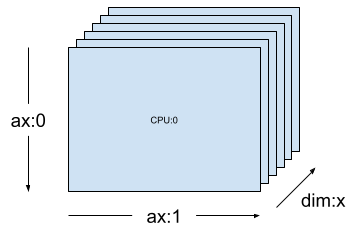
layout = dtensor.Layout([dtensor.UNSHARDED, dtensor.UNSHARDED], mesh_1d)
同じテンソルとメッシュを使用すると、レイアウト Layout(['unsharded', 'x']) は、6 個のデバイスでテンソルの 2 番目の軸をシャーディングします。
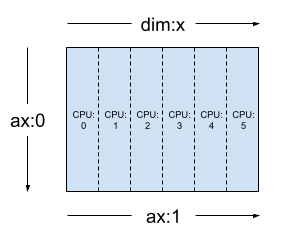
layout = dtensor.Layout([dtensor.UNSHARDED, 'x'], mesh_1d)
[("x", 3), ("y", 2)] などの 2 次元の 3x2 メッシュ(前のセクションの mesh_2d)とした場合、Layout(["y", "x"], mesh_2d) は 2 階数 Tensor のレイアウトで、最初の軸はメッシュ次元 "y" で、2 番目の軸はメッシュ次元 "x" でシャーディングされます。
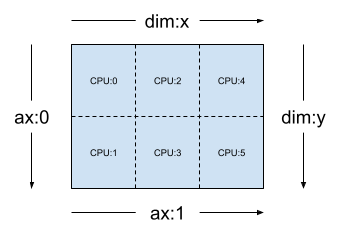
layout = dtensor.Layout(['y', 'x'], mesh_2d)
同じ mesh_2d において、レイアウト Layout(["x", dtensor.UNSHARDED], mesh_2d) は、"y" で複製される 2 階数 Tensor のレイアウトで、最初の軸はメッシュ次元 x でシャーディングされます。
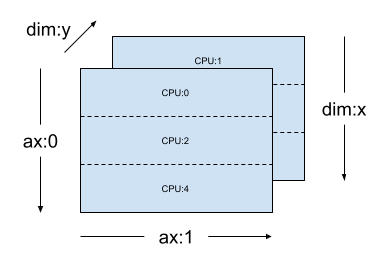
layout = dtensor.Layout(["x", dtensor.UNSHARDED], mesh_2d)
シングルクライアントとマルチクライアントのアプリケーション
DTensor は、シングルクライアントとマルチクライアントの両方のアプリケーションをサポートしています。Colab の Python カーネルはシングルクライアントアプリケーションの例で、Python プロセスが 1 つしかありません。
マルチクライアント DTensor アプリケーションでは、複数の Python プロセスが一貫性のあるアプリケーションとして集合的に実行します。マルチクライアント DTensor アプリケーションの Mesh の直交グリッドは、現在のクライアントにローカルで接続されているか、別のクライアントにリモートで接続されているかに関係なく、デバイス全体に広がります。Mesh が使用する一連の全デバイスは、グローバルデバイスリストと呼ばれます。
マルチクライアント DTensor アプリケーションでの Mesh の作成は、すべての参加クライアントが同一のグローバルデバイスリストを使う集合的な演算で、Mesh の作成はグローバルなバリアとして機能します。
Mesh を作成中、各クライアントはローカルデバイスリストと期待されるグローバアルデバイスリストを提供し、DTensor はそれら両方のリストが一貫していることを検証します。マルチクライアントメッシュの作成とグローバルデバイスリストの詳細については、dtensor.create_mesh と dtensor.create_distributed_mesh の API ドキュメントをご覧ください。
シングルクライアントは、クライアントが 1 つしかないマルチクライアントの特殊ケースとして考え得られます。シングルクライアントアプリケーションの場合、グローバルデバイスリストはローカルデバイスリストと同一です。
シャーディングされたテンソルとしての DTensor
では、DTensor を使ってコーディングを始めましょう。ヘルパー関数の dtensor_from_array は、tf.Tensor のように見えるものから DTensor を作成する方法を説明しています。この関数は 2 つのステップを実行します。
- テンソルをメッシュ上のすべてのデバイスに複製する
- 引数でリクエストされているレイアウトに従って、コピーをシャーディングする
def dtensor_from_array(arr, layout, shape=None, dtype=None):
  """Convert a DTensor from something that looks like an array or Tensor.

  This function is convenient for quick doodling DTensors from a known,
  unsharded data object in a single-client environment. This is not the
  most efficient way of creating a DTensor, but it will do for this
  tutorial.
  """
  if shape is not None or dtype is not None:
    arr = tf.constant(arr, shape=shape, dtype=dtype)

  # replicate the input to the mesh
  a = dtensor.copy_to_mesh(arr,
          layout=dtensor.Layout.replicated(layout.mesh, rank=layout.rank))
  # shard the copy to the desirable layout
  return dtensor.relayout(a, layout=layout)
DTensor の構造
DTensor は tf.Tensor オブジェクトですが、シャーディングの振る舞いを定義する Layout アノテーションで拡張されています。DTensor は以下の内容で構成されています。
- テンソルのグローバルな形状と dtype などを含むグローバルテンソルメタデータ
Tensorが属するMeshと、TensorがそのMeshにどのようにシャーディングされるかを定義するLayoutMesh内のローカルデバイスあたり 1 つの項目を持つコンポーネントテンソルのリスト
dtensor_from_array を使用すると、最初の DTensor である my_first_dtensor を作成し、その内容を調べることができます。
mesh = dtensor.create_mesh([("x", 6)], devices=DEVICES)
layout = dtensor.Layout([dtensor.UNSHARDED], mesh)

my_first_dtensor = dtensor_from_array([0, 1], layout)

# Examine the dtensor content
print(my_first_dtensor)
print("global shape:", my_first_dtensor.shape)
print("dtype:", my_first_dtensor.dtype)
tf.Tensor([0 1], layout="sharding_specs:unsharded, mesh:|x=6|0,1,2,3,4,5|0,1,2,3,4,5|/job:localhost/replica:0/task:0/device:CPU:0,/job:localhost/replica:0/task:0/device:CPU:1,/job:localhost/replica:0/task:0/device:CPU:2,/job:localhost/replica:0/task:0/device:CPU:3,/job:localhost/replica:0/task:0/device:CPU:4,/job:localhost/replica:0/task:0/device:CPU:5", shape=(2,), dtype=int32)
global shape: (2,)
dtype: <dtype: 'int32'>
レイアウトと fetch_layout
DTensor のレイアウトは、tf.Tensor の通常の属性ではありません。代わりに DTensor は DTensor のレイアウトにアクセスするための関数 dtensor.fetch_layout を提供します。
print(dtensor.fetch_layout(my_first_dtensor))
assert layout == dtensor.fetch_layout(my_first_dtensor)
Layout.from_string(sharding_specs:unsharded, mesh:|x=6|0,1,2,3,4,5|0,1,2,3,4,5|/job:localhost/replica:0/task:0/device:CPU:0,/job:localhost/replica:0/task:0/device:CPU:1,/job:localhost/replica:0/task:0/device:CPU:2,/job:localhost/replica:0/task:0/device:CPU:3,/job:localhost/replica:0/task:0/device:CPU:4,/job:localhost/replica:0/task:0/device:CPU:5)
コンポーネントテンソル、pack と unpack
DTensor はコンポーネントテンソルのリストで構成されます。Mesh 内のデバイスのコンポーネントテンソルは、そのデバイスに格納されているグローバル DTensor を表現する Tensor オブジェクトです。
DTensor は dtensor.unpack を使ってコンポーネントテンソルにアンパックできます。dtensor.unpack を使用すれば、DTensor のコンポーネントを調べて、それらが Mesh のすべてのデバイス上にあることを確認できます。
グローバルビューのコンポーネントテンソルの位置は、互いに重なり合っていることに注意してください。たとえば、完全に複製されたレイアウトの場合、すべてのコンポーネントはグローバルテンソルの同一のレプリカになっています。
for component_tensor in dtensor.unpack(my_first_dtensor):
  print("Device:", component_tensor.device, ",", component_tensor)
Device: /job:localhost/replica:0/task:0/device:CPU:0 , tf.Tensor([0 1], shape=(2,), dtype=int32)
Device: /job:localhost/replica:0/task:0/device:CPU:1 , tf.Tensor([0 1], shape=(2,), dtype=int32)
Device: /job:localhost/replica:0/task:0/device:CPU:2 , tf.Tensor([0 1], shape=(2,), dtype=int32)
Device: /job:localhost/replica:0/task:0/device:CPU:3 , tf.Tensor([0 1], shape=(2,), dtype=int32)
Device: /job:localhost/replica:0/task:0/device:CPU:4 , tf.Tensor([0 1], shape=(2,), dtype=int32)
Device: /job:localhost/replica:0/task:0/device:CPU:5 , tf.Tensor([0 1], shape=(2,), dtype=int32)
示されているとおり、my_first_dtensor は、すべての 6 個のデバイスに複製されている [0, 1] のテンソルです。
dtensor.unpack の反対の演算は dtensor.pack です。コンポーネントテンソルは DTensor にパックし直すことができます。
コンポーネントには同じ階数と dtype がある必要があります。つまり、これが、戻される DTensor の階数と dtype になります。ただし、dtensor.unpack の入力として、コンポーネントテンソルのデバイスの配置に関する厳格な要件はありません。関数は、コンポーネントテンソルを自動的に対応するそれぞれのデバイスにコピーします。
packed_dtensor = dtensor.pack(
    [[0, 1], [0, 1], [0, 1],
     [0, 1], [0, 1], [0, 1]],
     layout=layout
)
print(packed_dtensor)
tf.Tensor([0 1], layout="sharding_specs:unsharded, mesh:|x=6|0,1,2,3,4,5|0,1,2,3,4,5|/job:localhost/replica:0/task:0/device:CPU:0,/job:localhost/replica:0/task:0/device:CPU:1,/job:localhost/replica:0/task:0/device:CPU:2,/job:localhost/replica:0/task:0/device:CPU:3,/job:localhost/replica:0/task:0/device:CPU:4,/job:localhost/replica:0/task:0/device:CPU:5", shape=(2,), dtype=int32)
DTensor をメッシュにシャーディングする
ここまで、my_first_dtensor を操作してきました。これは、1 次元 Mesh に完全に複製された 1 階数 DTensor です。
次は、2 次元 Mesh にシャーディングされた DTensor を作成して検査します。次の例では、6 個の CPU デバイス上の 3x2 Mesh でこの操作を行います。メッシュ次元 'x' のサイズは 3 デバイス、メッシュ次元 'y' のサイズは 2 デバイスです。
mesh = dtensor.create_mesh([("x", 3), ("y", 2)], devices=DEVICES)
2 次元メッシュで完全にシャーディングされた 2 階数 Tensor
3x2 の 2 階数 DTensor を作成し、最初の軸を 'x' メッシュ次元に沿って、2 番目の軸を 'y' メッシュ次元に沿ってシャーディングします。
- テンソルの形状は、すべてのシャーディングされた軸に沿ってメッシュ次元と同じであるため、各デバイスは DTensor の1 つの要素を受け取ります。
- コンポーネントテンソルの階数は、必ずグローバル形状の階数と同じです。DTensor はコンポーネントテンソルとグローバル DTensor の関係を特定するための情報を保持する単純な方法として、この手法を採用しています。
fully_sharded_dtensor = dtensor_from_array(
    tf.reshape(tf.range(6), (3, 2)),
    layout=dtensor.Layout(["x", "y"], mesh))

for raw_component in dtensor.unpack(fully_sharded_dtensor):
  print("Device:", raw_component.device, ",", raw_component)
Device: /job:localhost/replica:0/task:0/device:CPU:0 , tf.Tensor([[0]], shape=(1, 1), dtype=int32)
Device: /job:localhost/replica:0/task:0/device:CPU:1 , tf.Tensor([[1]], shape=(1, 1), dtype=int32)
Device: /job:localhost/replica:0/task:0/device:CPU:2 , tf.Tensor([[2]], shape=(1, 1), dtype=int32)
Device: /job:localhost/replica:0/task:0/device:CPU:3 , tf.Tensor([[3]], shape=(1, 1), dtype=int32)
Device: /job:localhost/replica:0/task:0/device:CPU:4 , tf.Tensor([[4]], shape=(1, 1), dtype=int32)
Device: /job:localhost/replica:0/task:0/device:CPU:5 , tf.Tensor([[5]], shape=(1, 1), dtype=int32)
2 次元メッシュで完全に複製された 2 階数 Tensor
比較するために、同じ 2 次元メッシュに完全に複製された 3x2 の 2 階数 DTensor を作成します。
- DTensor は完全に複製されているため、各デバイスは 3x2 DTensor の完全レプリカを受け取ります。
- コンポーネントテンソルの階数はグローバル形状の階数と同じです。この場合、コンポーネントテンソルの形状はいずれにしてもグローバル形状と同じであるため、特に難しい事ではありません。
fully_replicated_dtensor = dtensor_from_array(
    tf.reshape(tf.range(6), (3, 2)),
    layout=dtensor.Layout([dtensor.UNSHARDED, dtensor.UNSHARDED], mesh))
# Or, layout=tensor.Layout.fully_replicated(mesh, rank=2)

for component_tensor in dtensor.unpack(fully_replicated_dtensor):
  print("Device:", component_tensor.device, ",", component_tensor)
Device: /job:localhost/replica:0/task:0/device:CPU:0 , tf.Tensor(
[[0 1]
 [2 3]
 [4 5]], shape=(3, 2), dtype=int32)
Device: /job:localhost/replica:0/task:0/device:CPU:1 , tf.Tensor(
[[0 1]
 [2 3]
 [4 5]], shape=(3, 2), dtype=int32)
Device: /job:localhost/replica:0/task:0/device:CPU:2 , tf.Tensor(
[[0 1]
 [2 3]
 [4 5]], shape=(3, 2), dtype=int32)
Device: /job:localhost/replica:0/task:0/device:CPU:3 , tf.Tensor(
[[0 1]
 [2 3]
 [4 5]], shape=(3, 2), dtype=int32)
Device: /job:localhost/replica:0/task:0/device:CPU:4 , tf.Tensor(
[[0 1]
 [2 3]
 [4 5]], shape=(3, 2), dtype=int32)
Device: /job:localhost/replica:0/task:0/device:CPU:5 , tf.Tensor(
[[0 1]
 [2 3]
 [4 5]], shape=(3, 2), dtype=int32)
2 次元メッシュのハイブリッド 2 階数 Tensor
完全シャーディングと完全複製の合間の場合はどうでしょうか。
DTensor では、Layout をハイブリッドにすることができます。ある軸でシャーディングされ、他の軸で複製されたレイアウトです。
たとえば、同じ 3x2 の 2 階数 DTensor を以下のようにシャーディングできます。
- 1 つ目の軸を
'x'次元メッシュに沿ってシャーディング - 2 つ目の軸を
'y'次元メッシュに沿って複製
このシャーディングスキームは、2 つ目の軸のシャーディング仕様を 'y' から dtensor.UNSHARDED に置き換え、2 番目の軸にそって複製する意図を示すだけで実現できます。レイアウトオブジェクトは Layout(['x', dtensor.UNSHARDED], mesh) のようになります。
hybrid_sharded_dtensor = dtensor_from_array(
    tf.reshape(tf.range(6), (3, 2)),
    layout=dtensor.Layout(['x', dtensor.UNSHARDED], mesh))

for component_tensor in dtensor.unpack(hybrid_sharded_dtensor):
  print("Device:", component_tensor.device, ",", component_tensor)
Device: /job:localhost/replica:0/task:0/device:CPU:0 , tf.Tensor([[0 1]], shape=(1, 2), dtype=int32)
Device: /job:localhost/replica:0/task:0/device:CPU:1 , tf.Tensor([[0 1]], shape=(1, 2), dtype=int32)
Device: /job:localhost/replica:0/task:0/device:CPU:2 , tf.Tensor([[2 3]], shape=(1, 2), dtype=int32)
Device: /job:localhost/replica:0/task:0/device:CPU:3 , tf.Tensor([[2 3]], shape=(1, 2), dtype=int32)
Device: /job:localhost/replica:0/task:0/device:CPU:4 , tf.Tensor([[4 5]], shape=(1, 2), dtype=int32)
Device: /job:localhost/replica:0/task:0/device:CPU:5 , tf.Tensor([[4 5]], shape=(1, 2), dtype=int32)
作成した DTensor のコンポーネントテンソルを検査し、これらが実際にスキームに従ってシャーディングされていることを確認できます。この様子をチャートで示すとわかりやすいでしょう。
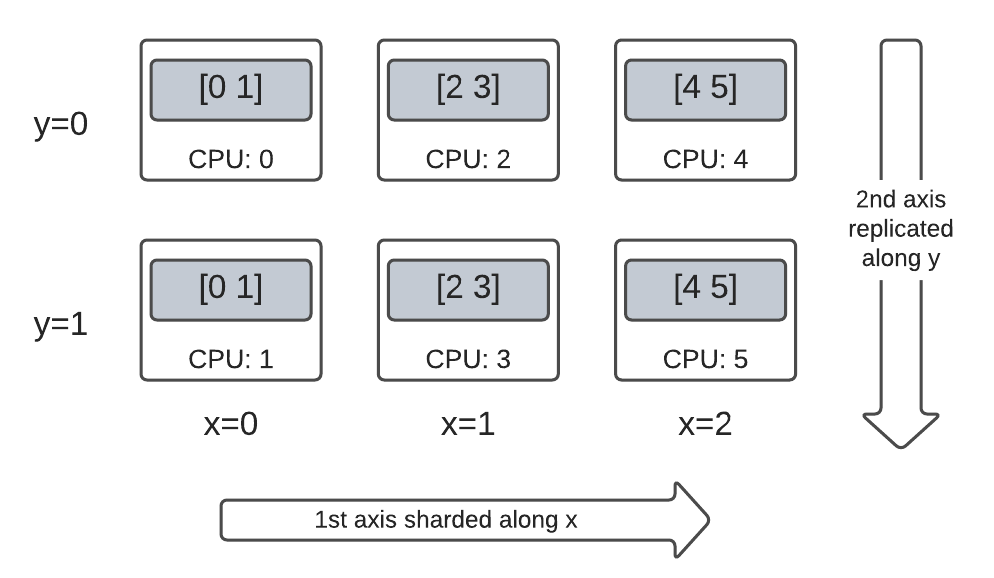
Tensor.numpy() とシャーディングされた DTensor
シャーディングされた DTensor に .numpy() を呼び出すとエラーが発生することに注意してください。エラーが発生する理由は、複数のコンピューティングデバイスのデータが、返される NumPy 配列をサポートするホスト CPU デバイスに意図せずに収集されないようにするためです。
print(fully_replicated_dtensor.numpy())

try:
  fully_sharded_dtensor.numpy()
except tf.errors.UnimplementedError:
  print("got an error as expected for fully_sharded_dtensor")

try:
  hybrid_sharded_dtensor.numpy()
except tf.errors.UnimplementedError:
  print("got an error as expected for hybrid_sharded_dtensor")
[[0 1]
 [2 3]
 [4 5]]
got an error as expected for fully_sharded_dtensor
got an error as expected for hybrid_sharded_dtensor
DTensor での TensorFlow API
DTensor はプログラムのテンソルのドロップイン代替となることを目指しています。Ops ライブラリ関数の tf.function や tf.GradientTape といった、tf.Tensor を消費する TensorFlow Python API も DTensor と動作します。
それを実現するため、それぞれの TensorFlow Graph に対し、DTensor は SPMD expansion と呼ばれる手順で相当する SPMD グラフを生成して実行します。DTensor の SPMD expansion には、以下のような重要なステップがいくつか含まれます。
- DTensor のシャーディング
Layoutを TensorFlow グラフに伝搬する - グローバル DTensor の TensorFlow Ops をコンポーネントテンソルの相当する TensorFlow Ops に書き換え、必要に応じて集合的な通信 Ops を挿入する
- バックエンドの中立した TensorFlow Ops をバックエンド固有の TensorFlow Ops に降格する
最終的に、DTensor は Tensor のドロップイン代替になります。
注意: DTensor はまだ実験的 API であるため、DTensor プログラミングモデルの境界と制限を探索しながら克服する作業となります。
DTensor の実行は 2 つの方法でトリガーされます。
tf.matmul(a, b)のように、Python 関数のオペランドとしての DTensor はaまたはbのいずれか、または両方が DTensor である場合に DTensor を介して実行します。- Python 関数の結果が DTensor となるようにリクエストすると(
dtensor.call_with_layout(tf.ones, layout, shape=(3, 2))など)、tf.ones の出力がlayoutに従ってシャーディングされるようにリクエストすることになるため、DTensor を介して実行されます。
オペランドとしての DTensor
多数の TensorFlow API 関数はオペランドとして tf.Tensor を取り、結果として tf.Tensor を返します。このような関数の場合、DTensor をオペランドとして渡すことで、DTensor を介して関数を実行する意図を示すことができます。このセクションでは、例として tf.matmul(a, b) を使用します。
完全に複製された入力と出力
この場合、DTensors は完全に複製されています。Mesh の各デバイスで、以下のようになっています。
- オペランド
aのコンポーネントテンソルは[[1, 2, 3], [4, 5, 6]](2x3) - オペランド
bのコンポーネントテンソルは[[6, 5], [4, 3], [2, 1]](3x2) - コンピュテーションは、単一の
MatMulの(2x3, 3x2) -> 2x2で構成されます。 - 結果
cのコンポーネントテンソルは[[20, 14], [56,41]](2x2)
浮動小数点 mul 演算の合計数は、6 device * 4 result * 3 mul = 72 です。
mesh = dtensor.create_mesh([("x", 6)], devices=DEVICES)
layout = dtensor.Layout([dtensor.UNSHARDED, dtensor.UNSHARDED], mesh)
a = dtensor_from_array([[1, 2, 3], [4, 5, 6]], layout=layout)
b = dtensor_from_array([[6, 5], [4, 3], [2, 1]], layout=layout)

c = tf.matmul(a, b) # runs 6 identical matmuls in parallel on 6 devices

# `c` is a DTensor replicated on all devices (same as `a` and `b`)
print('Sharding spec:', dtensor.fetch_layout(c).sharding_specs)
print("components:")
for component_tensor in dtensor.unpack(c):
  print(component_tensor.device, component_tensor.numpy())
Sharding spec: ['unsharded', 'unsharded']
components:
/job:localhost/replica:0/task:0/device:CPU:0 [[20 14]
 [56 41]]
/job:localhost/replica:0/task:0/device:CPU:1 [[20 14]
 [56 41]]
/job:localhost/replica:0/task:0/device:CPU:2 [[20 14]
 [56 41]]
/job:localhost/replica:0/task:0/device:CPU:3 [[20 14]
 [56 41]]
/job:localhost/replica:0/task:0/device:CPU:4 [[20 14]
 [56 41]]
/job:localhost/replica:0/task:0/device:CPU:5 [[20 14]
 [56 41]]
収縮した軸に沿ってオペランドをシャーディングする
デバイスごとのコンピュテーションの量は、オペランド a と b をシャーディングすることで、減らすことができます。tf.matmul の一般的なシャーディングスキームは、収縮の軸に沿ったオペランドのシャーディングで、2 番目の軸に沿った a のシャーディングと 1 番目の軸に沿った b のシャーディングです。
このスキームでシャーディングされるグローバル行列積は、同時に実行するローカル matmul と、それに続くローカル結果を集計するための一括還元によって効率的に実行可能です。これは、分散行列ドット積の正規の方法でもあります。
浮動小数点 mul 演算の合計数は、6 devices * 4 result * 1 = 24 で、完全に複製された上記のケース(72)に対する係数 3 の還元です。係数 3 は、3 デバイスのサイズで x 次元メッシュに沿って共有されるためです。
順次実行される操作数の削減は、同期モデル並列処理がトレーニングを加速する主なメカニズムです。
mesh = dtensor.create_mesh([("x", 3), ("y", 2)], devices=DEVICES)
a_layout = dtensor.Layout([dtensor.UNSHARDED, 'x'], mesh)
a = dtensor_from_array([[1, 2, 3], [4, 5, 6]], layout=a_layout)
b_layout = dtensor.Layout(['x', dtensor.UNSHARDED], mesh)
b = dtensor_from_array([[6, 5], [4, 3], [2, 1]], layout=b_layout)

c = tf.matmul(a, b)
# `c` is a DTensor replicated on all devices (same as `a` and `b`)
print('Sharding spec:', dtensor.fetch_layout(c).sharding_specs)
Sharding spec: ['unsharded', 'unsharded']
追加シャーディング
入力に追加のシャーディングを実行し、結果に適切に引き継ぐことが可能です。たとえば、最初の軸に沿ったオペランド a の追加のシャーディングを 'y' 次元メッシュに適用することができます。追加のシャーディングは、結果 c の最初に軸に引き継がれます。
浮動小数点 mul 演算の合計数は、6 devices * 2 result * 1 = 12 で、完全に複製された上記のケース(24)に対する係数 2 の還元です。係数 2 は、2 デバイスのサイズで y 次元メッシュに沿って共有されるためです。
mesh = dtensor.create_mesh([("x", 3), ("y", 2)], devices=DEVICES)

a_layout = dtensor.Layout(['y', 'x'], mesh)
a = dtensor_from_array([[1, 2, 3], [4, 5, 6]], layout=a_layout)
b_layout = dtensor.Layout(['x', dtensor.UNSHARDED], mesh)
b = dtensor_from_array([[6, 5], [4, 3], [2, 1]], layout=b_layout)

c = tf.matmul(a, b)
# The sharding of `a` on the first axis is carried to `c'
print('Sharding spec:', dtensor.fetch_layout(c).sharding_specs)
print("components:")
for component_tensor in dtensor.unpack(c):
  print(component_tensor.device, component_tensor.numpy())
Sharding spec: ['y', 'unsharded']
components:
/job:localhost/replica:0/task:0/device:CPU:0 [[20 14]]
/job:localhost/replica:0/task:0/device:CPU:1 [[56 41]]
/job:localhost/replica:0/task:0/device:CPU:2 [[20 14]]
/job:localhost/replica:0/task:0/device:CPU:3 [[56 41]]
/job:localhost/replica:0/task:0/device:CPU:4 [[20 14]]
/job:localhost/replica:0/task:0/device:CPU:5 [[56 41]]
出力としての DTensor
オペランドを取らずに、シャーディング可能な Tensor 結果を返す Python 関数の場合はどうでしょうか。以下のような関数がこれに該当します。
こういった Python 関数の場合、DTensor には、DTensor で Python 関数を Eager 実行する dtensor.call_with_layout が備わっており、返される Tensor が要求された Layout を使った DTensor であることを保証します。
help(dtensor.call_with_layout)
Help on function call_with_layout in module tensorflow.dtensor.python.api:

call_with_layout(fn: Callable[..., Any], layout: Optional[tensorflow.dtensor.python.layout.Layout], *args, **kwargs) -> Any
    Calls a function in the DTensor device scope if `layout` is not None.

    If `layout` is not None, `fn` consumes DTensor(s) as input and produces a
    DTensor as output; a DTensor is a tf.Tensor with layout-related attributes.

    If `layout` is None, `fn` consumes and produces regular tf.Tensors.

    Args:
      fn: A supported TF API function such as tf.zeros.
      layout: Optional, the layout of the output DTensor.
      *args:  Arguments given to `fn`.
      **kwargs: Keyword arguments given to `fn`.

    Returns:
      The return value of `fn` transformed to a DTensor if requested.
Eager 実行された Python 関数には通常、1 つの自明ではない TensorFlow Op のみが含まれます。
dtensor.call_with_layout で複数の TensorFlow Op を発行する Python 関数を使用するには、関数を tf.function に変換する必要があります。tf.function の呼び出しは、単一の TensorFlow Op です。tf.function が呼び出されると、DTensor は tf.function の計算グラフを分析するときに、中間テンソルのいずれかが具体化される前にレイアウトの伝播を実行できます。
1 つの TensorFlow Op を発行する API
関数が 1 つの TensorFlow Op を発行する場合、その関数に直接 dtensor.call_with_layout を適用できます。
help(tf.ones)
Help on function ones in module tensorflow.python.ops.array_ops:

ones(shape, dtype=tf.float32, name=None, layout=None)
    Creates a tensor with all elements set to one (1).

    See also `tf.ones_like`, `tf.zeros`, `tf.fill`, `tf.eye`.

    This operation returns a tensor of type `dtype` with shape `shape` and
    all elements set to one.

    >>> tf.ones([3, 4], tf.int32)
    <tf.Tensor: shape=(3, 4), dtype=int32, numpy=
    array([[1, 1, 1, 1],
           [1, 1, 1, 1],
           [1, 1, 1, 1]], dtype=int32)>

    Args:
      shape: A `list` of integers, a `tuple` of integers, or a 1-D `Tensor` of
        type `int32`.
      dtype: Optional DType of an element in the resulting `Tensor`. Default is
        `tf.float32`.
      name: Optional string. A name for the operation.
      layout: Optional, `tf.experimental.dtensor.Layout`. If provided, the result
        is a [DTensor](https://www.tensorflow.org/guide/dtensor_overview) with the
        provided layout.

    Returns:
      A `Tensor` with all elements set to one (1).
mesh = dtensor.create_mesh([("x", 3), ("y", 2)], devices=DEVICES)
ones = dtensor.call_with_layout(tf.ones, dtensor.Layout(['x', 'y'], mesh), shape=(6, 4))
print(ones)
tf.Tensor({"CPU:0": [[1 1]
 [1 1]], "CPU:1": [[1 1]
 [1 1]], "CPU:2": [[1 1]
 [1 1]], "CPU:3": [[1 1]
 [1 1]], "CPU:4": [[1 1]
 [1 1]], "CPU:5": [[1 1]
 [1 1]]}, layout="sharding_specs:x,y, mesh:|x=3,y=2|0,1,2,3,4,5|0,1,2,3,4,5|/job:localhost/replica:0/task:0/device:CPU:0,/job:localhost/replica:0/task:0/device:CPU:1,/job:localhost/replica:0/task:0/device:CPU:2,/job:localhost/replica:0/task:0/device:CPU:3,/job:localhost/replica:0/task:0/device:CPU:4,/job:localhost/replica:0/task:0/device:CPU:5", shape=(6, 4), dtype=float32)
複数の TensorFlow Op を発行する API
API が複数の TensorFlow Op を発行する場合、tf.function を介して関数を 1 つの Op に変換します。たとえば、tf.random.stateleess_normal です。
help(tf.random.stateless_normal)
Help on function stateless_random_normal in module tensorflow.python.ops.stateless_random_ops:

stateless_random_normal(shape, seed, mean=0.0, stddev=1.0, dtype=tf.float32, name=None, alg='auto_select')
    Outputs deterministic pseudorandom values from a normal distribution.

    This is a stateless version of `tf.random.normal`: if run twice with the
    same seeds and shapes, it will produce the same pseudorandom numbers.  The
    output is consistent across multiple runs on the same hardware (and between
    CPU and GPU), but may change between versions of TensorFlow or on non-CPU/GPU
    hardware.

    Args:
      shape: A 1-D integer Tensor or Python array. The shape of the output tensor.
      seed: A shape [2] Tensor, the seed to the random number generator. Must have
        dtype `int32` or `int64`. (When using XLA, only `int32` is allowed.)
      mean: A 0-D Tensor or Python value of type `dtype`. The mean of the normal
        distribution.
      stddev: A 0-D Tensor or Python value of type `dtype`. The standard deviation
        of the normal distribution.
      dtype: The float type of the output: `float16`, `bfloat16`, `float32`,
        `float64`. Defaults to `float32`.
      name: A name for the operation (optional).
      alg: The RNG algorithm used to generate the random numbers. See
        `tf.random.stateless_uniform` for a detailed explanation.

    Returns:
      A tensor of the specified shape filled with random normal values.
ones = dtensor.call_with_layout(
    tf.function(tf.random.stateless_normal),
    dtensor.Layout(['x', 'y'], mesh),
    shape=(6, 4),
    seed=(1, 1))
print(ones)
tf.Tensor({"CPU:0": [[0.0368092842 1.76192284]
 [1.22868407 -0.731756687]], "CPU:1": [[0.255247623 -0.13820985]
 [-0.747412503 1.06443202]], "CPU:2": [[-0.395325899 -0.836183369]
 [0.581941128 -0.2587713]], "CPU:3": [[0.476060659 0.406645179]
 [-0.110623844 -1.49052978]], "CPU:4": [[0.645035267 1.36384416]
 [2.18210244 -0.965060234]], "CPU:5": [[-1.70534277 1.32558191]
 [0.972473264 0.972343624]]}, layout="sharding_specs:x,y, mesh:|x=3,y=2|0,1,2,3,4,5|0,1,2,3,4,5|/job:localhost/replica:0/task:0/device:CPU:0,/job:localhost/replica:0/task:0/device:CPU:1,/job:localhost/replica:0/task:0/device:CPU:2,/job:localhost/replica:0/task:0/device:CPU:3,/job:localhost/replica:0/task:0/device:CPU:4,/job:localhost/replica:0/task:0/device:CPU:5", shape=(6, 4), dtype=float32)
1 つの TensorFlow Op を発行する Python 関数を tf.function でラップすることができます。唯一の注意点は、Python 関数から tf.function を作成するための関連コストと複雑さが発生することです。
ones = dtensor.call_with_layout(
    tf.function(tf.ones),
    dtensor.Layout(['x', 'y'], mesh),
    shape=(6, 4))
print(ones)
tf.Tensor({"CPU:0": [[1 1]
 [1 1]], "CPU:1": [[1 1]
 [1 1]], "CPU:2": [[1 1]
 [1 1]], "CPU:3": [[1 1]
 [1 1]], "CPU:4": [[1 1]
 [1 1]], "CPU:5": [[1 1]
 [1 1]]}, layout="sharding_specs:x,y, mesh:|x=3,y=2|0,1,2,3,4,5|0,1,2,3,4,5|/job:localhost/replica:0/task:0/device:CPU:0,/job:localhost/replica:0/task:0/device:CPU:1,/job:localhost/replica:0/task:0/device:CPU:2,/job:localhost/replica:0/task:0/device:CPU:3,/job:localhost/replica:0/task:0/device:CPU:4,/job:localhost/replica:0/task:0/device:CPU:5", shape=(6, 4), dtype=float32)
tf.Variable から dtensor.DVariable
Tensorflow では、tf.Variable はミュータブルの Tensor 値のホルダーです。DTensor では、対応する変数のセマンティクスが dtensor.DVariable によって提供されます。
DTensor 変数に新しい型 Variable が導入されたのは、変数にはレイアウトを初期値から変更できないという追加の要件があるためです。
mesh = dtensor.create_mesh([("x", 6)], devices=DEVICES)
layout = dtensor.Layout([dtensor.UNSHARDED, dtensor.UNSHARDED], mesh)

v = dtensor.DVariable(
    initial_value=dtensor.call_with_layout(
        tf.function(tf.random.stateless_normal),
        layout=layout,
        shape=tf.TensorShape([64, 32]),
        seed=[1, 1],
        dtype=tf.float32))

print(v.handle)
assert layout == dtensor.fetch_layout(v)
tf.Tensor(<ResourceHandle(name="Variable/2", device="/job:localhost/replica:0/task:0/device:CPU:0", container="Anonymous", type="tensorflow::Var", dtype and shapes : "[ DType enum: 1, Shape: [64,32] ]")>, layout="sharding_specs:unsharded,unsharded, mesh:|x=6|0,1,2,3,4,5|0,1,2,3,4,5|/job:localhost/replica:0/task:0/device:CPU:0,/job:localhost/replica:0/task:0/device:CPU:1,/job:localhost/replica:0/task:0/device:CPU:2,/job:localhost/replica:0/task:0/device:CPU:3,/job:localhost/replica:0/task:0/device:CPU:4,/job:localhost/replica:0/task:0/device:CPU:5", shape=(), dtype=resource)
layout の一致に関する要件を除けば、Variable は tf.Variable と同じように動作します。たとえば、変数を DTensor に追加できます。
a = dtensor.call_with_layout(tf.ones, layout=layout, shape=(64, 32))
b = v + a # add DVariable and DTensor
print(b)
tf.Tensor([[2.66521645 2.36637592 1.77863169 ... -1.18624139 2.26035929 0.664066315]
 [0.511952519 0.655031443 0.122243524 ... 0.0424078107 1.67057109 0.912334144]
 [0.769825 1.42743981 3.13473773 ... 1.16159868 0.628931046 0.733521938]
 ...
 [0.388001859 2.72882509 2.92771554 ... 1.17472672 1.72462416 1.5047121]
 [-0.252545118 0.761886716 1.72119033 ... 0.775034547 2.8065362 1.00457215]
 [1.23498726 0.584536672 1.15659761 ... 0.955793858 1.11440909 0.18848455]], layout="sharding_specs:unsharded,unsharded, mesh:|x=6|0,1,2,3,4,5|0,1,2,3,4,5|/job:localhost/replica:0/task:0/device:CPU:0,/job:localhost/replica:0/task:0/device:CPU:1,/job:localhost/replica:0/task:0/device:CPU:2,/job:localhost/replica:0/task:0/device:CPU:3,/job:localhost/replica:0/task:0/device:CPU:4,/job:localhost/replica:0/task:0/device:CPU:5", shape=(64, 32), dtype=float32)
また、DTensor を DVariable に代入することもできます。
v.assign(a) # assign a DTensor to a DVariable
print(a)
tf.Tensor([[1 1 1 ... 1 1 1]
 [1 1 1 ... 1 1 1]
 [1 1 1 ... 1 1 1]
 ...
 [1 1 1 ... 1 1 1]
 [1 1 1 ... 1 1 1]
 [1 1 1 ... 1 1 1]], layout="sharding_specs:unsharded,unsharded, mesh:|x=6|0,1,2,3,4,5|0,1,2,3,4,5|/job:localhost/replica:0/task:0/device:CPU:0,/job:localhost/replica:0/task:0/device:CPU:1,/job:localhost/replica:0/task:0/device:CPU:2,/job:localhost/replica:0/task:0/device:CPU:3,/job:localhost/replica:0/task:0/device:CPU:4,/job:localhost/replica:0/task:0/device:CPU:5", shape=(64, 32), dtype=float32)
DTensor に互換性のないレイアウトを割り当てて DVariable のレイアウトを変更しようとすると、エラーが発生します。
# variable's layout is immutable.
another_mesh = dtensor.create_mesh([("x", 3), ("y", 2)], devices=DEVICES)
b = dtensor.call_with_layout(tf.ones,
                     layout=dtensor.Layout([dtensor.UNSHARDED, dtensor.UNSHARDED], another_mesh),
                     shape=(64, 32))
try:
  v.assign(b)
except:
  print("exception raised")
exception raised
次のステップ
この Colab では、分散コンピューティングを行うための TensorFlow 拡張機能である DTensor について学習しました。チュートリアルでこれらの概念を試すには、DTensor による分散トレーニングをご覧ください。
